Halloween Devil’s Booze Cake Recipe

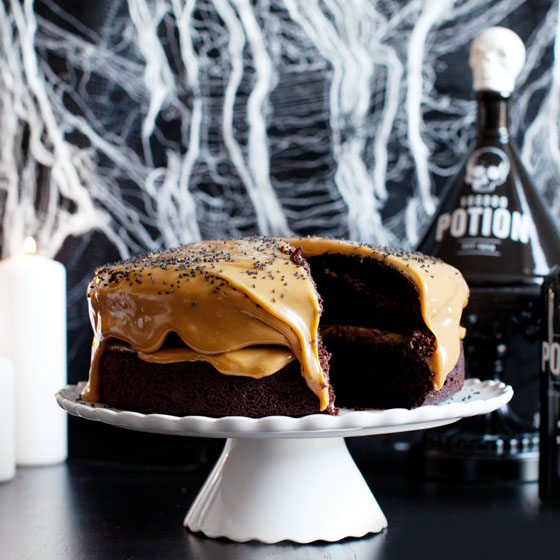
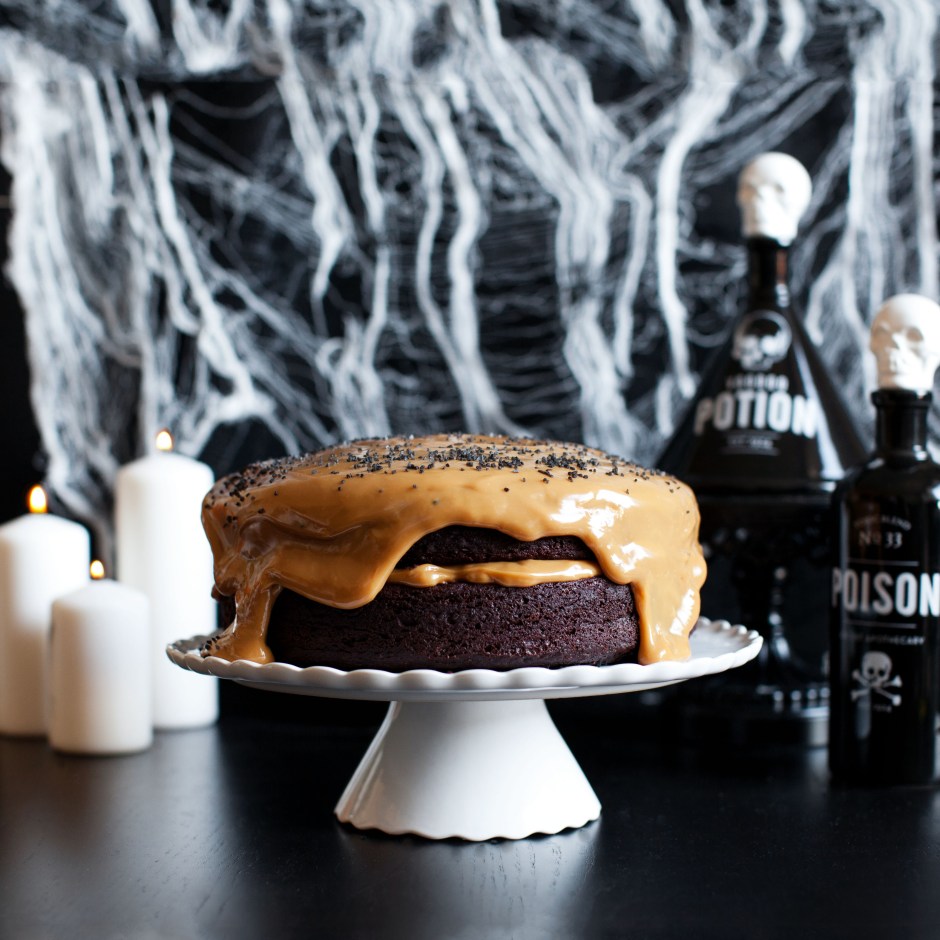
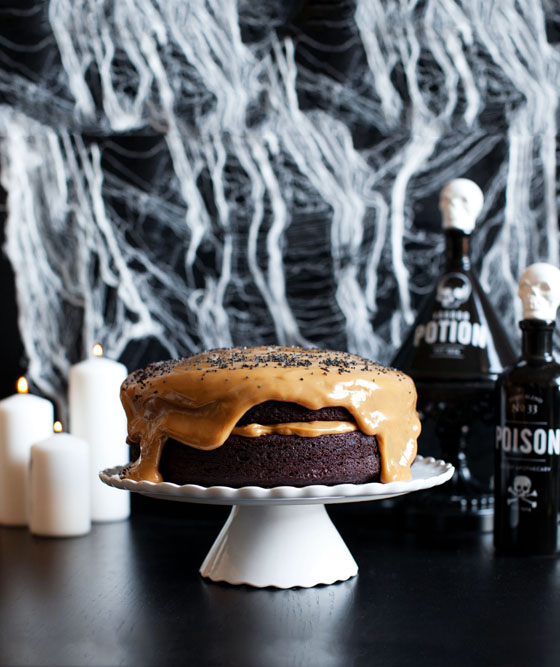
If you’re in the mood for something super rich, chocolate-y, and boozy for your Halloween shindig, I’ve got the perfect cake for you. It’s a chocolate cake soaked in coffee flavored vodka, with gooey dulce de leche in between the layers and on top, and finished with black sea salt. It basically tastes like a boozy candy bar. In the words of Ina Garten, “How bad could that be?”. It’s perfect for Halloween! Or for when you’re generally feeling dark and want to eat your feelings, have PMS, etc. This cake has no limits, but it really is most perfect for Halloween.

Let’s bake.
Devil's Booze Cake Recipe via Melodrama
This recipe was adapted from Beatty’s Chocolate Cake

Butter, for greasing the pans
1 3/4 cups all-purpose flour
2 cups sugar
3/4 cups cocoa powder
2 teaspoons baking soda
1 teaspoon baking powder
1 teaspoon kosher salt
1 cup buttermilk, shaken
1/2 cup vegetable oil
2 extra-large eggs, at room temperature
1 teaspoon pure vanilla extract
1 cup freshly brewed hot coffee
2 cans sweetened condensed milk
1 cup coffee or espresso flavored vodka
Black Hawaiian Sea Salt for finishing

Preheat the oven to 350 degrees F. Butter two 8-inch x 2-inch round cake pans. Line with parchment paper, then butter and dust the pans with cocoa powder. (I like to flour chocolate cake pans with cocoa powder. I think this gives it a nicer finish.)

Sift the flour, sugar, cocoa, baking soda, baking powder, and salt into the bowl of an electric mixer fitted with a paddle attachment and mix on low speed until combined. In another bowl, combine the buttermilk, oil, eggs, and vanilla. With the mixer on low speed, slowly add the wet ingredients to the dry. With mixer still on low, add the coffee and stir just to combine, scraping the bottom of the bowl with a rubber spatula. Pour the batter into the prepared pans and bake for 35 to 40 minutes, until a cake tester comes out clean. Cool in the pans for 30 minutes, then turn them out onto a cooling rack and cool completely.

Meanwhile, make your dulce de leche. Place two cans of sweetened condensed milk to a pot of simmering water. Make sure the cans are completely submerged in water or they will explode. Simmer for 3-4 hours. Remove from water and let cool to the touch. Be cautious of opening cans. If they are still too hot they may splatter.

Once cakes are cooled, use a tooth pick to poke small holes around the layer. Brush the coffee flavored vodka onto each layer (about 1/2 cup each layer). Let the cake soak up the vodka.

Place 1 cake layer, flat side up, on a flat plate or cake pedestal. Pour a good amount of dulce de leche on and spread around. Place the second layer on top, rounded side up, and pour remaining dulce de leche on top and let it run down the sides.

Devil's Booze Cake Recipe via Melodrama

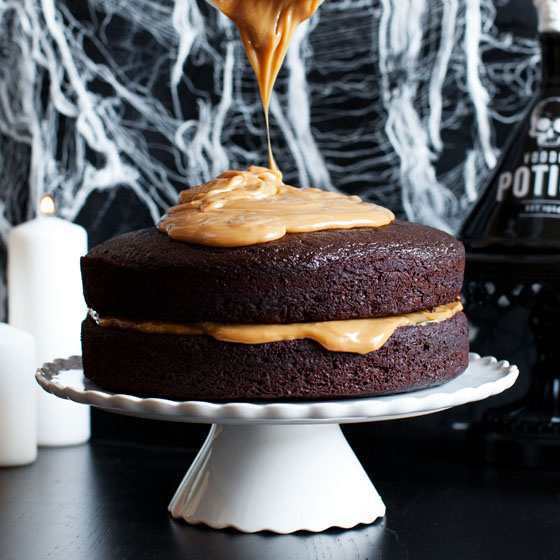
Top with a sprinkle of black sea salt. SO. GOOD.

Devil's Booze Cake Recipe via Melodrama

Fall Holidays: Pink Pearl Apple Galette Recipe

We all know that one of the most popular (and basic) autumn activities is to go apple picking. You’ve probably already noticed all the posts on Instagram with boots, scarves, cider, and apples galore. This is mostly known as a North Eastern tradition, but believe it or not we have orchards for apple picking in Southern California, too!

Last weekend the weather cooled down for a whole day and we finally got some rain, so my husband and I took the trip out to our favorite apple picking spot, Oak Glen, to take advantage of the cool, rainy, fall-like weather.

Oak Glen, CA Apple pickingOak Glen is a quaint little town about 2 hours outside of LA. There are lovely orchards where you’ll find all of the traditional autumn favorites, from apples to hayrides to hot cider donuts.

Oak Glen ApplesThe reason I like going to pick my own apples is because I can usually find varieties that aren’t found in our local markets. This time we came home with Pink Pearl apples. These apples are sweet and tart with a gorgeous pink color.

Pink Pearl Apple Galette Recipe via Melodrama

We had some left over pate brisee dough hanging out in the freezer, so I decided to make a galette with the apples and apple jelly we got from our trip. These apples are amazing for baking. They’re super juicy and I think the flavor gets even better when they’re cooked.

Plus, they’re really pretty.

Pink Pearl Apple Galette Recipe via Melodrama

Here’s a recipe to make your own apple galette. You can use any apples you want, but if you can get your hands on some Pink Pearl apples, I highly recommend you do.

Galette Dough
2 1/2 cups all-purpose flour
1 teaspoon salt
1 teaspoon sugar
1 cup (2 sticks) unsalted butter chilled and cut into small pieces
1/4 to 1/2 cup ice water
Apple Filling
1 lb apples, cored
1/4 cup apple jelly
3 tbsp sugar
whole milk

In a bowl combine flour, salt, and sugar. Add butter, and use a dough cutter or food processor to mix the butter in until the mixture until it reaches a course meal texture. Add ice water slowly (1 tbsp at a time) until the dough just holds together without being wet. Divide the dough in half and into balls. Flatten dough balls into discs and wrap in plastic. Refrigerate for one hour.

Roll out chilled dough on parchment paper or a lightly floured surface into a 1/8 inch thick circle. Chill again for about 20 minutes.

Meanwhile core and slice the apples. Pre-heat oven to 400 degrees.

Pink Pearl Apple Galette Recipe via Melodrama

Remove chilled dough round from refrigerator and spoon two tablespoons of jelly on to the dough, leaving at least a 1.5 inch boarder.

Pink Pearl Apple Galette Recipe via MelodramaPlace apple slices over the jelly in slightly overlapping concentric circles. Sprinkle with 2 tablespoons of sugar.

Pink Pearl Apple Galette Recipe via MelodramaFold the plain dough boarder over the apples. Brush with milk and sprinkle with remaining sugar.

Pink Pearl Apple Galette Recipe via MelodramaTransfer galette and parchment paper onto a baking sheet. Bake at 400 degrees for 30 minutes. Lower oven temperature to 375 degrees for another 15 minutes or until dough is golden brown. Heat remaining apple jelly and brush on top of cooked apples for a nice shiny finish. Let cool for 10 minutes and serve.

Pink Pearl Apple Galette Recipe via Melodrama

DIY: Tropical Retro Inspired Decoupage Easter Eggs

Unlock this Exclusive Content on Patreon

DIY: Mid-Century Googie Style Glass Mugs

Sometimes I find myself perusing the tablewares section for things I totally don’t need but always end up buying anyway. One of my most recent unnecessary purchases were these little 69 cent glass mugs from IKEA. I figured I could use them for something or another, and I thought the shape was pretty cool, but I thought they needed something to jazz them up. I decided to give them a midcentury, googie style makeover using craft paint and painters tape.

DIY Glass Paint Stenciling

First I found some midcentury style clip art and printed it so I could make my stencil. I used an exacto knife to cut the shapes into painters tape.

DIY Glass Painting

Then I applied the tape to the glass in a random pattern.DIY Glass Paint Stenciling

I used a screen printing method to apply the paint. This is where you put on a drop of paint and use a squeegee to drag it across and fill in the stencil to create a smooth finish. You can use a sponge or brush, too, but it probably won’t have as smooth of a finish.

DIY Glass Paint Stenciling DIY Glass Paint Stenciling

Make sure to remove the tape before the paint dries. Otherwise the tape will take the paint off with it.

DIY Glass Paint Stenciling

DIY MidCentury Painted Glass Mugs

Let the paint dry for about an hour and then place into a cool oven and set the heat to 350 degrees. Let bake for 30 minutes and then shut the oven off. Let the glass cool in the oven and then remove. The paint will be cured and washable.

DIY MidCentury Painted Glass Mugs

Pretty neat looking cups for 70 cents, huh?

DIY MidCentury Painted Glass Mugs

Valentines Day Aperol, Rose, and Sparkling Wine Cocktail Recipe


As you can see above, I really like this cool spot in San Diego called Polite Provisions, and one of my favorite drinks on the menu is the Veronica Rose. The menu’s description reads “Aperol, rose gomme, and sparkling wine”. Perfect.

It’s delicious and beautiful, but since I can’t get down to San Diego every time I want one, I recreated it at home. Here’s my version of the Veronica Rose.

Aperol, Rose, Sparkling Wine


This recipe makes two drinks:

1 oz. Aperol
1 oz. rose syrup (I recommend Royal Rose Syrup)
3-4 dashes Angostura bitters
4 oz sparkling wine

Stir Aperol, rose syrup, and bitters with a cube of ice, strain into chilled glasses. Top with sparkling wine. Garnish with a lemon twist or, as I like to do, a rose petal.

Veronica Rose Recipe - aperol, rose, and sparkling wine

Or if you only want to make it a serving for one…get serious, just use a larger glass.


Aperol, Rose, Sparkling Wine

DIY: Ouija Board Serving Tray

If you want to be the Halloween hostess with the mostest, you need this Ouija board tray to serve your guests their cocktails and treats. Also, maybe conjure some spirits while you’re at it. Just kiddingggg…kind of.

You can find basic serving trays like this at most stores that sell home goods. I got mine at IKEA.

klack-tray__15449_PE082139_S4I wanted to use a classically creepy image and the Ouija board is one of the most iconic things I could think of. It works perfectly for this. I searched for the right image and decided on the William Fuld/Parker Brothers version. This is the image I associate most with the Ouija, and I like the cheekiness of the Parker Brothers name being on there. What a fun toy…and not satanic at all…it’s Parker Brothers!

oujia board
Click to download full size image.

Above is the image I used for my tray. For it to fit I had it printed at 24 x 18 on heavy paper. You can crop and resize it to fit the size of your tray and then take it to your local print shop. I went to FedEx Office.

DIY OUIJA BOARD TRAYFirst, I painted the tray black and then I cut out my Ouija image to fit in the bottom of the tray. I used Mod Podge in a matte finish to stick and seal the image on. Easy!

DIY OUIJA BOARD TRAYIt looks legit right? I just hope the wine glasses don’t start moving over the letters to spell things out. Although, I’m sure if I drink enough wine it’ll look like that anyway.

DIY OUIJA BOARD TRAY

DIY: IKEA FADO Lamp Turned Jack-o-Lantern

I can be a bit of a Halloween traditionalist, you guys. I like my October nights lit by the faces of Jack-o-lanterns and I like those Jack-o-lantern faces to be classic. However, I still like to mix things up sometimes, and get serious, it’s not exactly practical for me to have carved pumpkins sitting around as light sources for the entire month. When I saw the orange FADO at IKEA, I didn’t just see a colorful orb lamp, I saw a potential Jack-o-lantern.

fado-table-lamp__0275795_PE413950_S4

The FADO is a pretty cool lamp on its own. It has a spherical shape that is a throwback to the mid-century space age era and it gives off a nice, soft, glowing light.

Pulling this off is really as simple as drawing or painting a Jack-o-lantern face onto the lamp. I used chalk to draw my ideal face shapes and then painted over it using a charcoal colored chalk paint. You can use a sharpie, a paint pen, or whatever you’d like. I just liked the chalk paint texture against the frosted glass of the FADO. It also looked more vintage to me that way.

IKEA FIDO Lamp turned Jack-o-Lantern

I love this little guy. Look how cute he is! And the glow sets the perfect mood light for Halloween movie watching.

IKEA FIDO Lamp turned Jack-o-Lantern


Potluck Mini Pie Cupcakes

Mini Pie Cupcakes? Mini PieCakes? CupPieCakes?

Call them whatever you want but these are my new favorite things. Remember the pie-cake I made? It’s almost like that, but in cupcake form. Sure, the cake was good, but most of the time I’ll pick cupcakes over cake. This version is more simple and mild, but still very delicious and interesting. These cupcakes were a lot easier to manage and took a lot less time than the monster pie-cake. So if you’re feeling intimidated by pie-cakes because of flavor and effort, try this instead.

This time I made the cake and frosting from scratch, which I very much prefer and will do next time I attempt a pie-cake. What I didn’t make from scratch were the mini pies. It would be simple enough to do that using a mini cupcake tin, but it wasn’t necessary because Trader Joe’s has the best mini pies ever. Are you familiar with this medley of fruit pies? Well, you should be.

Trader Joes Mini Pies

All you need to do is whip up some cake batter and frosting (your own recipe or boxed is fine) and buy (or make) some mini pies. If you’re using frozen pies, let them thaw out for a bit.

Pie inside of a cupcake!

I made my favorite yellow cake recipe. It has a classic flavor and is the perfect density to hold the pie.

Ingredients
1 cup unsalted butter
2 cups sugar
1 1/2 teaspoons vanilla extract
4 eggs
3 cups sifted cake flour
1 tablespoon baking powder
1/2 teaspoon salt
1 cup milk

Cream room temperature butter until light and fluffy. Add sugar and continue to beat. Gradually add the vanilla and eggs (one at a time) and mix well. Sift together the dry ingredients. Add them to the butter mixture alternating with the milk.

Line your cupcake pan with cupcake liners. Pour a small amount of batter into the liner and push it up the sides a little. Place the mini pie in and top with more cake batter. Bang the pan on the counter to make sure everything is settled in there. Then bake at 350 degrees for 25-30 minutes.

Mini Pie Cupcakes. Pie inside of the cupcake!

The frosting I used is a simple buttercream.

Ingredients
1 cup (2 sticks) unsalted butter
1 teaspoons vanilla extract
4 cups powdered sugar
2-3 tablespoons milk

Cream together the butter and vanilla. Sift the powdered sugar and add it to the butter mixture. Scrape down the bowl often to make sure all everything is mixed in. Add milk one tablespoon at a time until it’s your desired consistency. Beat until smooth for about 2-4 minutes.

Pie filled cupcakes!What you get is PIE INSIDE OF CAKE IN CUPCAKE FORM. You get the best of both worlds. The pie center is so good. And the piecrust goes super well with the fluffy cake. It’s basically a dream hybrid dessert.

DIY: Sugar String Easter Egg Nests

Ok, guys. I already showed you how to make the sugar eggs I adore so much, now I’m going to show you how to make adorable little nests using the same method.

Sugar String Easter Nest Tutorial

Use the same mixture and method as the Sugar String Easter Egg Baskets (3 parts sugar, 1 part water, crochet string). This time just use a smaller balloon…

Sugar String Nest Tutorial

…and once it’s dry cut it in half.

Sugar String Easter Nest Tutorial

Fill them up with candy eggs and those nasty little marshmallow Peep bird things you all seem to love and watch everyone go gaga over the cuteness!

Sugar String Easter Nest Tutorial

Sugar String Easter Nest Tutorial

DIY: Sugar String Easter Egg Baskets

So Easter is pretty cute, right? There’s adorable spring colors, cute little eggs to hunt for, and candy everywhere. My nana used to make these amazing sugared string Easter egg baskets for me every year. I was obsessed with them and thought she was a magician or something because they were always perfect and sparkly and made with SUGAR. As I got older, she stopped making them, but there is not a year that goes by where I don’t talk about about her awesome Easter creations.

Sugar String Easter Egg Baskets - sugar water and string!

This year I decided I would make them and show you guys how it’s done. I texted her to make sure I remembered the steps correctly and she texted back with blurry pictures from the pages of her decades-old crafting notes. They read:

SUGAR EGGS

3 cups sugar
1 cup water
Approx. 9 drops of food color for pastel sugar (optional)
3-9 inch balloon
1 spool crochet thread (350 yards)
Lace or ribbon
Acrylic Spray (optional)

Sugar Easter Egg Basket Tutorial

“Blow up balloon to approximately 1 foot in length and tie. While holding balloon close to your body, wrap thread firmly, vertically, horizontally, and criss-crossing until you have used the whole spool. Just leave the end of the string tucked or loose, the sugar coating will keep it in place.”

Make Easter baskets with sugar, water, and string!

“Mix sugar and hot water. Pour large spoonfuls of the mixture on to the balloon letting mixture run down sides. Mixture is thick and won’t run too fast. Periodically and toward the end, use your hands to spread the mixture over the egg so all the thread gets moistened.”

Instructions for Sugar String Easter Baskets

“Place balloon on the empty cardboard-like spool to dry. Place a plate under the spool to catch drippings.”

Sugar String Easter Basket Tutorial

“Let dry for about 24 hours. When bottom is still a little soft, pop the balloon with a needle or pin, and sit on counter, the bottom will flatten out. With a pen, mark an opening about 5″ wide and 7″ long. With sharp scissors, carefully cut opening.”

“Spray inside and out with two light coats of clear acrylic spray (to preserve). Decorate with ribbons, bows, flowers, etc. Two rows of lace looks best to cover raw edges of opening.”

That’s it! The sugar mixture  dries to becomes a hard, sparkly, crystalized shell.

Sugar String Easter Basket Tutorial

Decorate your little bunny houses how ever you’d like. I used pastel colored crochet thread and white sugar. I like the look of the raw edge so I kept mine simple and decorated with colorful Easter grass, flowers, a bow, and of course a chocolate bunny and candy inside.

Easter baskets made from sugar and string -- Tutorial

Easter basket made from sugar and string -- TutorialClick here to learn how to make these Sugar String Nests, too.

Sugar String Easter Nest Tutorial