DIY: Banquette Seat EXPEDIT/KALLAX IKEA Hack

And the dining room saga continues…

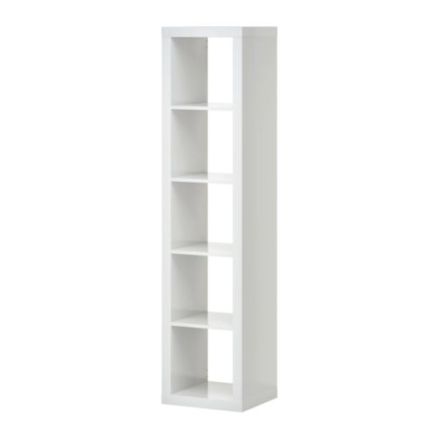
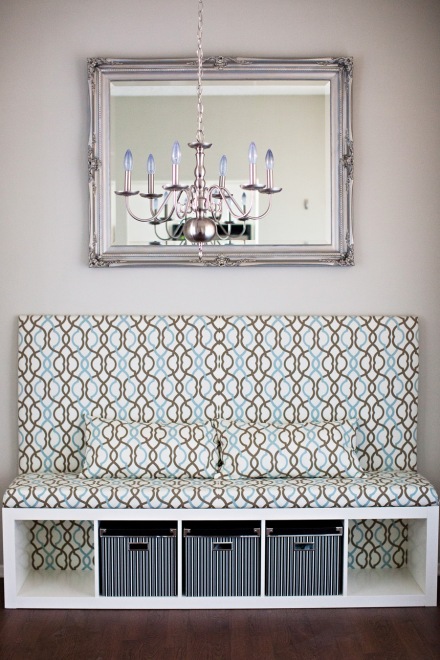
Because we have a small awkward space, I thought it would be a good idea to use a banquette style seat to complete our dining set. I’m that person who always requests a booth at restaurants, so I was set on it. We shopped around for one but none were right for us. The size, color, style, and price were always off. I started thinking about how I could pull off a DIY version. I thought about using kitchen cabinets or building a frame like the kind I’ve seen in custom kitchens, but Jvee said NO. We don’t have the tools or the space to pull that off. During a trip to IKEA, I noticed one of the EXPEDIT shelving units was turned on its side (I’d seen it used before as window and bench seating) and seemed durable enough to sit on. It measured at the right size! And it had cubbies! We bought it. [Note: The EXPEDIT has since been replaced with the KALLAX.]

I immediately thought of how I was going make the back for it. I wanted it to be comfortable to lean against and high enough to make a statement. A few years ago we made a DIY headboard for my cousin’s room using plywood, foam, and fabric. That’s how I was going to do it. So simple!

I started with a 4’x6′ piece of plywood. I padded it with 1″ thick foam and covered it with batting. My indoor/outdoor canvas fabric measured 55in wide, which would have been fine if I wanted to run the pattern horizontally. Since I wanted to run the pattern vertically, I needed to cut 2 pieces of fabric to 4 1/2 feet long and sew them together at the selvages, being sure to match up the pattern. I made sure the seam ran down the center of the board.

I started by placing a staple in the middle of each end of the plywood, pulling the fabric taut, and then working my way around with staples to secure it. You can use flushmount brackets to secure the piece to the wall if you want. We felt the EXPEDIT was heavy enough to hold the backboard up, so we decided to forget that step. If you have kids or want the peace of mind, by all means mount it to the wall.

Now it needed a comfy seat! My first plan was to sew an entire seat cover for the foam, but I decided against it. Mostly out of laziness. I considered upholstering the top (side) of the unit like you would a chair, but ultimately I didn’t like the idea of messing it up with staples. That’s when I stumbled across similar types of projects on Pinterest that used a piece of MDF board. Genius! I didn’t screw the MDF into the EXPEDIT because, again, I wanted to preserve the bookcase. But, if you have kids I recommend securing it. I also decided against legs so it’s sturdier by being directly on the floor. We don’t use this piece every single day, but we’ve had game nights and dinner parties and it has successfully held 3 full sized adults with an estimated combined weight of at LEAST 400lbs, several times. Obviously the risk is all yours.

I had the piece of MDF cut to the right measurements at Home Depot and covered it with 2 inch thick pieces of foam and covered it with batting. The 2 inch foam added to the height of the EXPEDIT brings the seat height up to 19 inches, which happens to be the exact height of our dining chairs.

Then upholstered like you would a chair seat. Upholstering pieces like this is super easy. It’s like wrapping a present but with fabric and staples inside of paper and tape. It’s really that simple. Promise!

I added the pillows that I made with the left over fabric pieces for extra lumbar comfort. Look how perfect the cubbies are for storage boxes! [Edit: The fabric has since been changed to the striped black and white fabric I’d been looking for.]

Ahhh yes, restaurant style banquette seating. Yay!

Edit:

I wasn’t planning on sticking with that fabric and I’ve since changed it. I found the perfect black and white striped fabric that I’d had in mind, at IKEA, for $8/yard. Find the updated look that was inspired by my favorite cafes in Paris, below:

Striped DIY Banquette- Ikea Hack

DIYBanquetteIkeaHack

DIYBanquetteSeatIkeaHack

Ikea Hack Dining Banquette

See! It’s totally versatile and easy to change when you get the whim.

Advertisement

263 thoughts on “DIY: Banquette Seat EXPEDIT/KALLAX IKEA Hack

    1. You can use screws, and if you have children its recommended, but the weight of the board holds itself in place well enough for my needs. I’ve also used heavy duty Velcro for similar projects. Thanks!

      1. You can also use rubberized shelving paper or even those rubberized circular coasters from the dollar stores. Using about 6 or 8 of them under the 6′ bench seat would work wonders; nothing would move or slide. Great looking project!
        (Am also glad you removed that rug in the earlier pictures. With the corners curling, they were accidents waiting to happen!)

      2. Bonnie that is a genius idea!

        And yes definitely, that rug was just I could protect my floor from any project mishaps. It’s long goneeee

      3. Thanks! I’ve used that ‘waffle-like’ rubberized product, either the coasters or off a roll all over the house. They’re great!
        Oh, sorry I ‘replied’ too soon to your answer re: the foam thickness—reading it closer AFTER I sent my comment, I saw you DID use the 2″ for the seat and the 1″ for the backboard. Sorry for the confusion! Regards!

  1. Nice job!
    1. How comfortable is it?
    2. How’s it holding up against adult weight-bearing?

    I see these IKEA bookshelf-turned-window seats a lot online, but they’re mostly in kid’s playrooms and would love to get your experience on how yours is accommodating adult’s body weight. We have an IKEA coffee table made out of the same material as your bookshelf and my husband (180lbs) sits on it occasionally but we’ve just started noticing that it has dented in from him doing that. We don’t have foam on top of ours like a bench would though.

    1. Thanks for your questions Kaitlyn!

      1. I used a 1 inch thick foam for the backboard and 2 inch dense foam for the seat and it is comfortable enough to sit through dinner parties and sometimes as a work space. You could definitely use a thicker foam for more comfort, but for short durations like dinner or game night, it works just fine for us.

      2. The bookcase is laid directly on the floor with no legs and the 4 vertical boards in between help hold weight to prevent denting. This helps hold more weight because there is even support through the entire piece. We’ve had about 500 lbs of combined weight on there between people and it held just fine.

      We have had ours for over a year and have since changed the upholstery. The foam and everything has held up well.

      1. Hi! I used a one inch high density foam for the backboard and two inch high density foam cushions for the seat. Both were purchased from Joann Fabrics. Thanks!

      2. Hi. Your original description said you used 2″ thick foam. Did you change that to 1″ thick foam when you changed the fabric?

    2. I’m just confusing myself by not reading ALL the comments before ‘replying’ to anything, because (July 6 @ 5:43pm) you said you used 1″ dense foam and it was comfortable to sit on. All-in-all, I’m deciding the seat was done, both times, with 2″ dense foam, right???

      1. Yes, all the time with 2″ for the seat. The other comment was a typo and completely my mistake! 1″ for the backboard, 2″ for the seat :).

  2. Beautiful work! Also, I’m in love, and have been looking for, a mirror. What can you tell me about yours, please?

    1. Thanks! I found this mirror on Craigslist for $20. There is no mark or label indicating where it came from. It definitely was a lucky find. I’m actually in the middle of changing my decor and this mirror will be painted again. It’s too good to get rid of.

  3. How is the depth? I would like to make a window seat but was reading that the depth should be 18 to 24 inches and this shelf looks to be 15 3/8″ from what I can see on Ikea’s website… Thank you!!

    1. Hi! I measured the depth at about 15.5 inches. Definitely enough room to sit comfortably on. Our dining chair seats are about 16 1/2″ deep, so not much of a difference there. If you’re unsure about the depth, I’d say take a trip to Ikea where they normally have one displayed in this position and try it out. Thanks!

  4. Is it high enough to actually sit at a dining table comfortably? Great job and exactly what I would like for our kitchen/breakfast nook area.

    1. Hi Karen!

      Great question. With the suggested padding it actually turns out to be the same seat height as most average dining chairs at approx. 19 inches high. Hope that helps and good luck!

  5. Brilliant! I have a small living room and I’m downsizing the furniture to a loveseat and 2 chairs. This would be perfect next to the door leading to the basement and extra seating for the grandkids, thanks for sharing!!

    1. Using an upholstery staple gun! I secured each side with a staple and then worked my way around, placing staples while pulling the fabric taut. Once you have those foundation staples in, it’s pretty easy going from there!

  6. I never leave posts and I just had to for you.

    YOU DID A GREAT JOB AND THIS IS FAB-U-LOUS!!!

    Times have been very hard for me in the last years and I now live in a space that used to actually be a motel room. I had to get rid of a lot and make work what I have. I wanted to do what you have done but what just so worried that it would not be elegant. Elegance in a small space mixed with utility is sooooo necessary. I have pinned and repined you on my Pinterest and you deserve it.

    This is absolutely the most $ saving and elegant plus simple to create – use of these shelves for a sitting space that I have seen.

    I will be using mine in the living room…will use 2 butted together then can also use as an extra bed for visitors.

    Personally, I love your first canvas but it is your style and the stripes are definitely more powerful.

    Thank you for your easy directions and love, love, love…love.

    1. Thanks you so much!! This is the best comment ever! Best of luck to you and please send me pictures of your finished project. I would LOVE to see your finished space!

  7. So fantastic! I was just at IKEA yesterday and will be going back to get my dining room set…minus 2 chairs and plus this project (in place of the 2 chairs). Thanks for the great idea! Do you happen to have pictures of this with your dining set? Do you have an oval table or a rectangular one? My guess is this looks best with a rectangular one…whereas I was hoping to buy a circular table that expands to an oval. Hopefully it will still look great!

    1. Hi Hannah! I’m so excited for you! I have photos that you can see here: http://blog.krysmelo.com/2012/10/11/dining-room-wrap-up-dining-room-makeover-projects/ . As you’ll see, it’s an oval shape and works great.

      I think round works too. In fact I’m going to pick up the Docksta tulip table from Ikea for my latest re-do. I’ll be posting pictures of the redesign soon!

      Good luck and send me photos of your finished product. I’d love to see it!

      1. Beautiful!! You posted your follow-up as I posted a pic I found too of an oval table with a bench. I’m so excited to do this!! I will send pics – it may be a few weeks though. Thanks again!

  8. One more question – I know you said the first fabric is indoor/outdoor canvas. Do you think a lighter fabric would work or is it highly recommended to use the heavy upholstery-type fabric?

    1. I’d say it really depends on how much you’re going to use it. I wouldn’t recommend something that is going to stretch out a lot over time, because it won’t keep it’s taut smooth look, which is why I like to use heavier fabrics. Upholstery fabric can get pricey so think outside the box. Velvets, sturdy cottons, and even burlap are great alternatives when upholstering. And remember, it’s so easy to do you can change it up later if you aren’t happy with it!

  9. This is AMAZING. I have been looking for something like this for my entry way/foyer–a place to sit down and put our shoes as a way of keeping the floors cleaner. I’m totally doing this–and will be giving you props!

  10. Hi! I have this bench sitting in my front entry way and its one of my favorites. I am just getting around to adding a cushion to it and am wondering how you got the stripes facing the way you did? I thought I was gonna have to do my stripes the long way.

    1. I cut two pieces of the fabric with the stripes running vertically, lined them up, and then sewed them together in the middle using a sewing machine. You can probably use iron-on hemming/bonding tape to achieve the same effect if you don’t have a sewing machine!

  11. So pretty!! I’m planning to do a similar hack to make a bench to sit below a long wall of windows in my living area. I am thinking it would be a great modular piece I can move around for entertaining if I add castors to the bottom. My thought is to add a plywood piece to the bottom to affix the castors to something more solid… Any thoughts or advice?

    Also, I will be doing this project entirely in my condo on the 25th floor, so any tips you have to make the project simpler would be fab!

    Thanks!

    1. Your idea sounds awesome! You can add casters to this piece fairly easily with or without plywood. This is a very sturdy piece but I would recommend adding a set of casters in the middle as well as the ends to provide more support and prevent bowing (dipping down in the middle) of the bookcase over time. I also recommend using these casters from Ikea. They are easy to install, the bar adds extra sturdy support, and they are specifically for the Expedit: http://www.ikea.com/us/en/catalog/products/60169977/

      If you choose to use plywood it’s best to have all of your pieces cut before bringing them home. It usually comes in big sheets that are a pain to get home in one piece. The Expedit is VERY easy to assemble and takes no time at all. I think the hardest part will be getting the box up to your apt. It’s heavy. Just take care not to lose any pieces and you’re golden.

      Send me pictures when you’re done! I’d love, love, love to see your finished product. Good luck!

      1. Awesome tip on the castors – I know IKEA like the back of my hand, but had never seen them before! Thanks! I will send pictures when I finally get to it! 🙂

    2. Yes but mostly my grand kids ages 2 and 4. However no problems. It seems very sturdy when adults have been seated there.

    1. Awesome!

      I actually used 2″ thick chair pads and pieced them together on the MDF. I believe they were $8.99 and I had a 50% off coupon. As for the backboard, I used the 1″ thick foam that is sold by the yard, also from Joann. I think the roll measures at 24″ wide, so I got 2 pieces cut at 72″ long and pieced them together on the plywood which measured 48″x72″. I hope this makes sense!

      Good luck, Kim, and send me pics of your finished project!

  12. Oh great – thanks!!! I am just doing the Expedit bench part – well, times TWO for a super long playroom window-wall. 🙂 Can I ask where you found/ordered the chair pads? Joanns? I’d never thought of that! 🙂

  13. You rock – thank you!!! Though, one dumb ? .. I see the depth on the foam is 15 inches.. and the Expedit is 15 and 3/8 inch.. did that extra bit throw anything off?
    (and yowza, for my two Expedits, I guess I’d need to purchase 9 of these pads…. COUPON!!!haha!)

  14. I love this so much, I am planning on doing it myself. I actually love the first fabric so very much, it goes with my living room, would you happen to know where you got it and/ or the name of the pattern?

    1. Hi Felicia! Glad you like it!

      As for the fabric- It’s a great fabric but didn’t go with my decor. I got it at JoAnn in the indoor/outdoor canvas section. I think they may still have it! Good luck!

  15. Hi! I LOVE the first fabric you used! I have been searching everywhere for that pattern and colour combo for my banquette cushion. I scoured joann.com online but could not find it anywhere. Can you please provide the name of the fabric/company?
    I’m in Canada and I would be ordering it online, so although I see other pretty patterns out there, it’s nice to see my favourite one actually used in a project! Thanks!!

    1. Hi Natalie,

      The blue and taupe lattice fabric was from Joann. It may be discontinued now though. The striped is from Ikea. Hope that helps!

  16. This is the best Ikea hack ever!!! I definitely try this! Can you please provide the thickness of he MDF and plywood?

    1. I used 1/2 standard plywood for the back board and 3/4 inch MDF for the seat. I found both at Home Depot and was able to get it cut there for free. Good luck with your project!

  17. This is so perfect. I am completely inspired. Now to convince the man that we need this in the foyer!! I linked your page on my blog CoiledGlory.wordpress.com check it out

  18. I used this idea to make a banquette for my daughter’s kitchen. However, the Ikea Expedit shelf that was used has been discontinued by Ikea. We ended up with a four -cubby shelf from Ikea that is similar, Kallax brand. It turned out great. We used a gray and cream Chevron pattern for the fabric. One thing I would suggest, though, is to cover the staples on the back of the back pieces with something so the staples do not scratch the wall. I am going to hot glue some felt along the edges for this purpose.
    Thank you for this great idea. Far more affordable than any I have seen, and absolutely guarantees a custom look.

    1. I have been looking at the Kallax but was worried the thinner sides might not be as sturdy for a bench. Is the Kallax working for you as seating? Are adults using it? Thanks.

      1. Hi! I was wondering the same thing. I want to do the bed hack but wasn’t sure if the kallex was sturdy enough to hold a mattress andan adult sized person.

  19. Hi, I just wanted to know how many yards of fabric did you use in total? So like for the backboard and seating. I’m actually going to attempt this and it would be really helpful if i knew how much fabric I should order. Thanks for your time!

      1. Thanks so much for your reply! Btw how long did it take you to complete the whole project?

      2. No problem! I did the entire project alone, but the actual upholstering only took about an hour, the Expedit assembly was less than that, and the prep work (sewing, cutting foam) was around another hour. Aside from prep shopping you could finish in about 3 hours depending on how fast you work.

  20. Love this !!! I been wanting to make a window seat. I have always loved window benches. I also have thought about kitchen cabinets etc. Love this much better !! I will be starting on mine tomorrow !! Thanks for sharing how easy this is !!

  21. Hi, i love this diy! Really amazing:) im thinking of trying to make one of my own with my expedit. Do you mind telling me the dimensions of the MDF board for the back board and bench cushion? That would really help! Thanks

  22. I’m not one for leaving notes on blogs, but I have a space behind my front door and I wanted a spot JUST like this for putting on shoes and storage for muddy items. I even said “Lets build in a seat” and above that (your backboard) would have coat racks and hooks etc. I think I can sell this to my hubby since it doesn’t involve much more than cutting fabric and stapling. w00t ..

  23. A fascinating discussion is worth comment. I believe that you
    ought to write more about this subject matter, it might not be a
    taboo subject but usually people do not speak about such issues.
    To the next! Kind regards!!

  24. If you needed to create banquette seating that fit into a corner and was more L shaped could you still use these Ikea benches or would you recommend something else?

    1. I think it would work just fine if you arrange them in an L shape and then secure them to each other. You’ll lose out on one cubby hole but it definitely seems to be like it would work. Let me know how it turns out if you decide to do it! Good luck

  25. Hi krys,i am wondering if it is safe to use this as a “sofa” without backing it to the wall?i am thinking about incorporating this into our living room so we can have extra seating and also playarea for my 9months old..thanks

    1. Hi Cindy! I’ve seen a few parents use this as a bench in their play rooms and it seems it has worked just fine for them. I’ve also seen it used as extra seating in hallways and rooms. Here is an example sent to me by a reader http://lduerrnj.wordpress.com/2013/10/21/before-and-after-an-ikea-hack/

      IKEA isn’t making this EXPEDIT unit anymore. They have a new model called the KALLAX, so I can’t vouch for how sturdy that model is. If you do end up using it, please let me know how well it works for you. I’d love to hear your experience and thoughts. Good luck!

  26. awesome, I have been searching for sometime to make a small banquette in my kitchen which is 9 x 11. The house was built in the 50’s previous owners created a dining area in the living room but I knew I could carve out a small nook for 4 people. The seat will fit perfectly under the window and I have a 32 inch pedestal table with 1 chair, perfect. I think I will add 3 inch legs to this so it is off the floor for a bit. Thank you! for sharing:)

    1. Sounds awesome! If you’re adding legs it’s a good idea to add them to the middle as well, to prevent the seat from bowing over time. If you have Instagram I’d love to see how it turns out. You can tag me at @melodramablog. Good luck!

  27. I will be following this tutorial to make an L shaped banquette for my beach house eat in kitchen in the next week.. Will use the Kallax since Expedit is discontinued. Ordered my fabric and 2″ foam from Joann online using a 50% off foam and 60% off fabric deal. I am nervous about stapling the fabric to the MDF- I want it to be smooth like yours. I wasn’t going to use batting on top of the foam. Is that a key part or is it ok to skip? For the stapling on such a long rectangle, did you start one staple in the middle edges on both sides, then work your way down to both ends, then wrap the ends like a present, to get the nice tight corners? Thanks for a reply in advance!
    Amy

    1. I like to use batting to keep the foam in place before doing the final fabric. I find it gives a smoother result, but it’s not completely necessary. You can always fix any mistakes by removing or adding more staples. You got the technique right – I started in the middle on the long sides and worked my way around and folded the short ends like a present and stapled. Good luck!

  28. Krys,
    I made the benchops today and they turned out GREAT! I am sooo happy. Thank you for the inspiration and the clear directions! I ended up skipping the batting and using 1/4 inch plywood for the base as it was less expensive. Lowes cut the plywood to the sizes i needed with no problem. When I end up blogging about the beach house decorating on a budget, I will definitely give you credit for the inspiration and send people to you for the instructions. Thanks again!
    Amy

      1. Krys,
        Here is the picture from final assembly this weekend. Turned out great! I used industrial strength Velcro circles (4 per bench) to keep the cushion from moving. The height is perfect for eating at the kitchen table, which I moved out of the way for this pic. Thanks again for posting the detailed directions!
        Amy

  29. After exploring a handful of the blog posts on your web site, I truly appreciate your technique of blogging. I bookmarked it to my bookmark webpage list and will be checking back in the near future. Take a look at my web site too and let me know how you feel.

  30. Extremely creative. I can be very picky when I have an idea if something I want but have a hard time finding the perfect item. What more than to have the privilege of making your own piece of perfection!!! I would definitely like to encorporate this idea in my new home. Very excited not only to save money but be able to reap the rewards of my handy work that is only if I don’t screw it up Lol . I did have few questions. 1.What type of batting did you buy and where did you get it from? 2. Did you have to steam/iron the fabric before stapling it on? 3. Did you glue the foam to the board and batting to the foam??

    1. Hi! I’m sure you’ll do fine. Great questions.
      1. I used regular cheap quilting batting that I bought at Joann. You can find it at any fabric store.
      2. I did iron the fabric before putting it on. Mine had a deep crease that needed to be pressed. I would recommend getting rid of wrinkles beforehand.
      3. I didn’t use any glue. The batting and staples keep everything in place nicely.

      Hope that helps!

  31. Hi! I love this and I’m thinking about doing it myself! However I can’t find the Expedit shelves on the Ikea website. Do you know how long it is?
    I have found a similar cube shelf that is 57″ long so I’m assuming I’ll use a 5×6 piece of plywood.

  32. I am so glad I came across this a few months ago. I finally completed my project and love it. I paired the banquette with a new Avalon table from Crate & Barrel. Thank you for all of the instructions and inspiration! I would love to share a picture of the finished product with you!

    1. Mine has been paired with both an oval French provincial and a round tulip table and looked great both ways. I think it can probably go with anything honestly!

  33. Hi Krys, I’m in the middle of this project. I have a question about the batting. Did you wrap the batting around the back of the wood panel? It seems that would make the wood not sit flush against the wall. Thanks!

    1. Hi Donna!

      I did wrap batting around the back board. I just made sure to stretch and staple it as flat as possible. My batting wasn’t very thick once I stretched it, and I made sure to trim any excess so it would lay as flush as possible against the wall. Hope that helps! Please let me know how it turns out! Good luck

      1. Hi Krys, I finally finished this project and I am absolutely thrilled with how it turned out! It gave me more seating, more room AND more storage. All of which is a plus when you live in a condo! Thank you so much for the help and inspiration! I posted it on Instagram at donnaggibson.

      2. Donna! That’s fantastic! I’m sooo glad it was able to help you with more seating and storage. I’ll look for you on Instagram! Thanks again xoxo

  34. If by any chance I read someone wining how cryptic IKEA assembly instructions are I’ll reference them to here. It’s stunning how you managed to assemble everything and you’re clear vision on it right from the start.

  35. I absolutely LOVE this! I plan on doing this in my girls’ room as we are redoing it to make room for baby #4. I do have a question though. How has the fabric held up? It looks like based on IKEA’s website it is just a regular cotton. It is very thin? I’m worried about it being too thin for a couch/bench but like the price of the cotton options better then a true upholstery fabric.

    1. Hi Emily! I’m so glad you plan on doing the project! Great question about the fabric. It’s actually a thicker canvass-like material. It has held up very well and is easy to clean. I’m actually using this backboard as a headboard now! Let me know if you have any other questions down the road and I’d love to see a picture when you’re done! Good luck xx

  36. Ha! In ref to the mirror, I have same one for years and I was planning on getting rid of it. Hmm I thinking of painting it first and see how I like it. It’s a great size and I got it for free!!
    Great job on the project. I thinking of doing this for my entrance minus the back. How far would you place the mirror above? If if I keep it..
    Thanks!

  37. Hi, When you made the backboard, where/how did you staple the 1″ foam to the plywood – did you wrap the foam around to the back, or did you staple it in the front, and if so, did this make visible dents? thank you!

  38. I just love this for the mud room that I am creating. My question is where did you buy the original fabric? I see it was 4 years ago so any information life maker, design name etc would be very appreciated.

    1. Hi Brenda, it’s from Joann Fabrics. I believe it was called “lattice” something or another. Sorry I can’t be of more help. Good luck!

    1. This was so long ago I can’t remember exactly. It depends on your own dimensions but I believe i used 7? I had to sew two panels together at the selvages so I doubled the amount of length I needed. I can’t be certain but I believe I bought 7 yards.

  39. I was just wondering what the exact measurements you need of fabric to make this.Also what is MDF board?
    Thanks

    1. Hi Amanda,
      MDF is just a really strong Manufactured/ engineered wood. Its very thick and strong for a lower cost than real wood mainly because it is made up of recycled bits of hard and soft wood species. i love this stuff

Leave a Reply

Fill in your details below or click an icon to log in:

WordPress.com Logo

You are commenting using your WordPress.com account. Log Out /  Change )

Twitter picture

You are commenting using your Twitter account. Log Out /  Change )

Facebook photo

You are commenting using your Facebook account. Log Out /  Change )

Connecting to %s