And the dining room saga continues…
Because we have a small awkward space, I thought it would be a good idea to use a banquette style seat to complete our dining set. I’m that person who always requests a booth at restaurants, so I was set on it. We shopped around for one but none were right for us. The size, color, style, and price were always off. I started thinking about how I could pull off a DIY version. I thought about using kitchen cabinets or building a frame like the kind I’ve seen in custom kitchens, but Jvee said NO. We don’t have the tools or the space to pull that off. During a trip to IKEA, I noticed one of the EXPEDIT shelving units was turned on its side (I’d seen it used before as window and bench seating) and seemed durable enough to sit on. It measured at the right size! And it had cubbies! We bought it. [Note: The EXPEDIT has since been replaced with the KALLAX.]

I immediately thought of how I was going make the back for it. I wanted it to be comfortable to lean against and high enough to make a statement. A few years ago we made a DIY headboard for my cousin’s room using plywood, foam, and fabric. That’s how I was going to do it. So simple!

I started with a 4’x6′ piece of plywood. I padded it with 1″ thick foam and covered it with batting. My indoor/outdoor canvas fabric measured 55in wide, which would have been fine if I wanted to run the pattern horizontally. Since I wanted to run the pattern vertically, I needed to cut 2 pieces of fabric to 4 1/2 feet long and sew them together at the selvages, being sure to match up the pattern. I made sure the seam ran down the center of the board.

I started by placing a staple in the middle of each end of the plywood, pulling the fabric taut, and then working my way around with staples to secure it. You can use flushmount brackets to secure the piece to the wall if you want. We felt the EXPEDIT was heavy enough to hold the backboard up, so we decided to forget that step. If you have kids or want the peace of mind, by all means mount it to the wall.

Now it needed a comfy seat! My first plan was to sew an entire seat cover for the foam, but I decided against it. Mostly out of laziness. I considered upholstering the top (side) of the unit like you would a chair, but ultimately I didn’t like the idea of messing it up with staples. That’s when I stumbled across similar types of projects on Pinterest that used a piece of MDF board. Genius! I didn’t screw the MDF into the EXPEDIT because, again, I wanted to preserve the bookcase. But, if you have kids I recommend securing it. I also decided against legs so it’s sturdier by being directly on the floor. We don’t use this piece every single day, but we’ve had game nights and dinner parties and it has successfully held 3 full sized adults with an estimated combined weight of at LEAST 400lbs, several times. Obviously the risk is all yours.

I had the piece of MDF cut to the right measurements at Home Depot and covered it with 2 inch thick pieces of foam and covered it with batting. The 2 inch foam added to the height of the EXPEDIT brings the seat height up to 19 inches, which happens to be the exact height of our dining chairs.

Then upholstered like you would a chair seat. Upholstering pieces like this is super easy. It’s like wrapping a present but with fabric and staples inside of paper and tape. It’s really that simple. Promise!

I added the pillows that I made with the left over fabric pieces for extra lumbar comfort. Look how perfect the cubbies are for storage boxes! [Edit: The fabric has since been changed to the striped black and white fabric I’d been looking for.]

Ahhh yes, restaurant style banquette seating. Yay!

Edit:
I wasn’t planning on sticking with that fabric and I’ve since changed it. I found the perfect black and white striped fabric that I’d had in mind, at IKEA, for $8/yard. Find the updated look that was inspired by my favorite cafes in Paris, below:
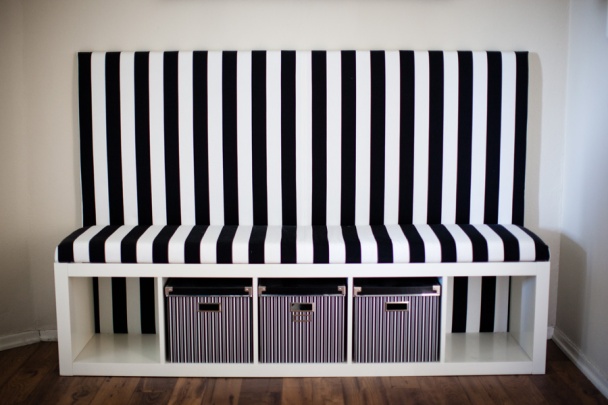


See! It’s totally versatile and easy to change when you get the whim.

 I just mixed those up with hot water and a little dish soap right in my sink basin. I then soaked them in Rit’s dye fixative and rinsed with cold water. Easy peasy!
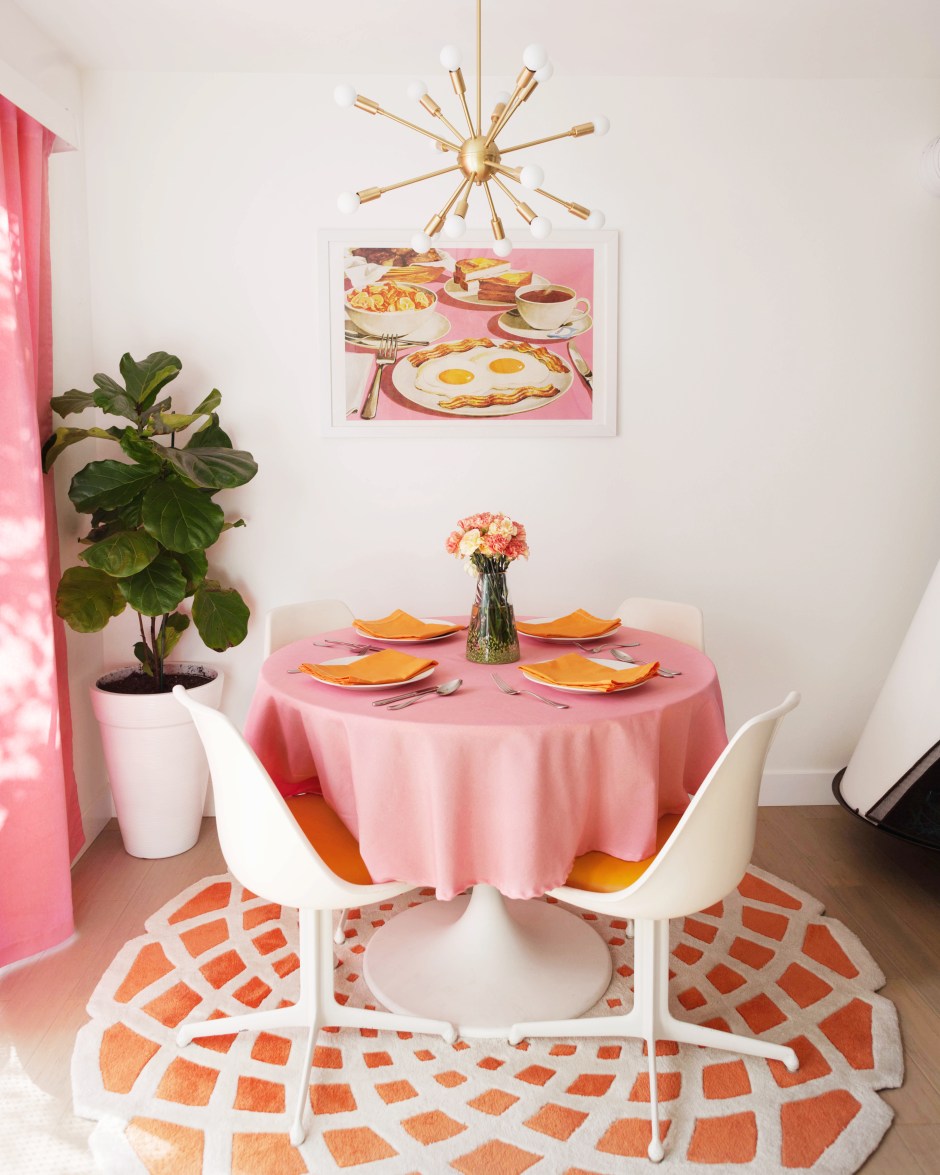
 I love how everything ties together with the artwork and my vintage Burke chair pads. Now I just need to throw a little dinner party with a Jell-o salad and few cocktails ;).


