DIY No-Sew Mid-Century Inspired Christmas Tree Skirt

It’s that time again! Christmas time! I love this time of year. No matter what is going on in life, good or bad, decorating my Christmas tree always cheers me up. This year we switched things up a bit and used our fake pink tree instead of trying to find a natural, flocked one here in the desert. We even got a rotating stand so the whole thing spins!

I badly needed a new tree skirt since my last DIY one got ruined during our move. Wahhh.

diy-felt-christmas-tree-skirt-3

I used the same tutorial and materials as my previous no-sew felt Christmas tree skirt (pictured above), and put a different spin on it.

First you need a couple yards of 72″ felt. Then you make a circle in your desired size. I explain this in more detail here.diy-felt-christmas-tree-skirt-2

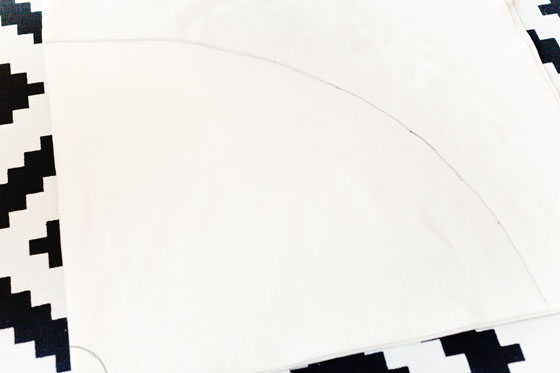
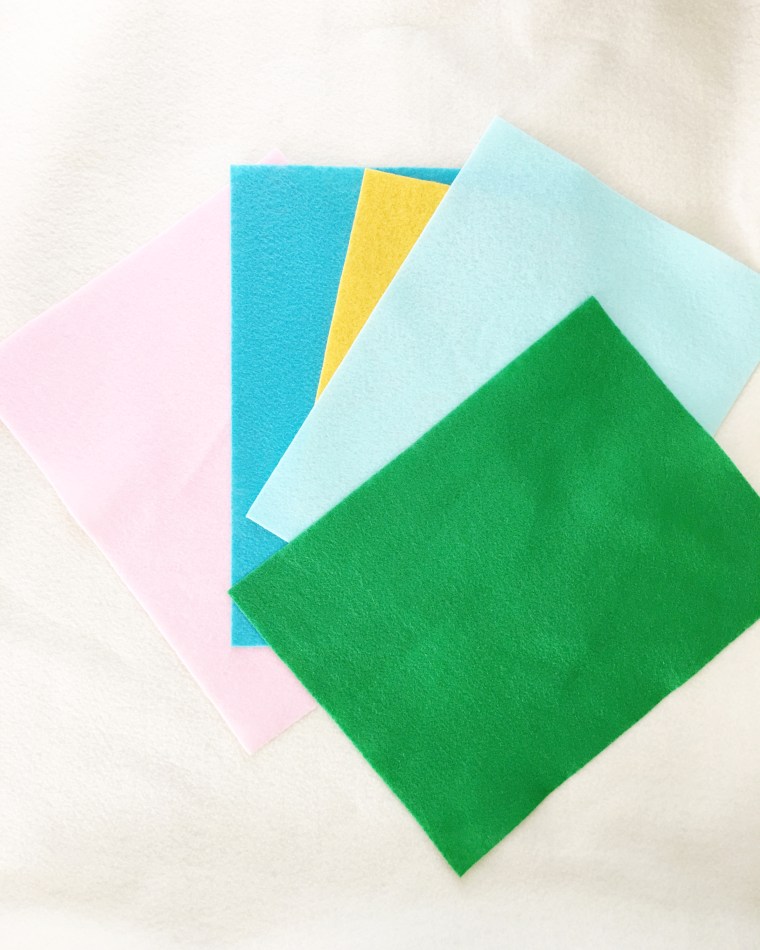
Then use pieces of felt in various colors to create curved rhombus shapes that were popular in the 50s and 60s.

Mid-century inspired tree skirtLike so!Mid-century inspired tree skirt made with felt

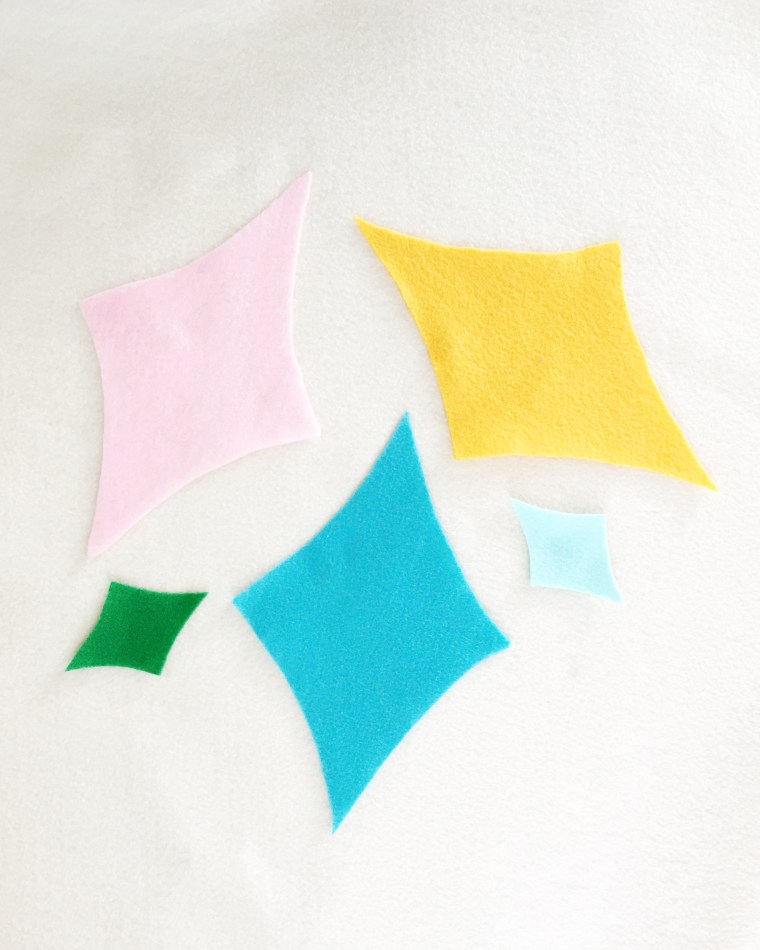
Then just simply use fabric glue to adhere them to the felt skirt in whatever pattern you desire.

Mid-century inspired tree skirt DIY

And there you have it! A quick and easy DIY tree skirt for your retro tree.

DIY Mid-century inspired Christmas tree skirt

Happy tree trimming!


Be sure to tag your Christmas photos with #Krysmasgram on Instagram!


A Look Back At My Apartment Through The Years

If you haven’t heard the news already, I’m leaving my apartment of over 6 years and moving back to Palm Springs!

As I pack up each room for the move I’m reminded of how many faces each one has had over the years, and how we started out here with literally only an air mattress and a laptop. I worked hard to make this apartment feel like our own home and did every thing I could to personalize it within the limits allowed. In the beginning I worked with what I had and could afford, which wasn’t much, and slowly improved each room over the years and brought in new and better things to make it what it is today. I had fun doing it and I’m really proud of what I’ve done and been able to share with you all since the blog started.

I thought it would be fun to take a little look back through the years. Each rooms has looked even more different than what you’ll see below, but this is what I could find on my Instagram and photo archives.

The living room and dining room have always been the main focus. It’s where we spend the most time and really the only room people see when they come over. It started out with ugly paint and carpet (the floors were eventually changed by management) and eventually turned into a bright and spacious feeling room. It was even featured in Better Homes and Gardens!

44421_430992239058_6727695_n

124

As you can see I flipped the entire layout last year.

57

The dining room has had a few different lives too. 45778_431244939058_252962_nHere are a couple of my favorites.891011

Even the front door got a makeover a couple of times!

1213

And lastly, the bedroom. I went from garden grandma chic vibes to tropical resort vibes.

14151617

I’ve had a lot of fun living here and sprucing this place up, but I’m excited for something new!

Stay tuned for projects in the new place soon!


Melodrama Holiday Home Tour 2016

I’ve said it before but I feel like this month has flown by. I honestly wanted to do a little more decorating but ran out of time. Boooo. I did manage to get all of the necessities in here though! Christmas Tree: check! Bottle brush trees: check! More Christmas trees: check! I’ve realized this year that I have a thing for Christmas trees.

dining-roomIn the dining room I used large bottle brush trees from Target to decorate my shelves and then stuck in two more baby trees for good measure.barI got a little more festive on the adjacent bar, of course. I used Shiny Brite ornaments and epsom salts to dress up a cheapy $5 plain wreath and garland.living-room-bar-kitchenlivingroomThe living room is definitely the most festive place in the apartment! I spy a DIY corn husk wreath over the fireplace.IMG_5640.jpgI also decorated the fireplace with my collection of bottle brush trees and DIY Putz Housesvintage-inspired-christmas-tree-decorationAnd then there’s the treevintage-inspired-christmas-tree-decor

I’m going to miss this when it’s gone.

flamingo
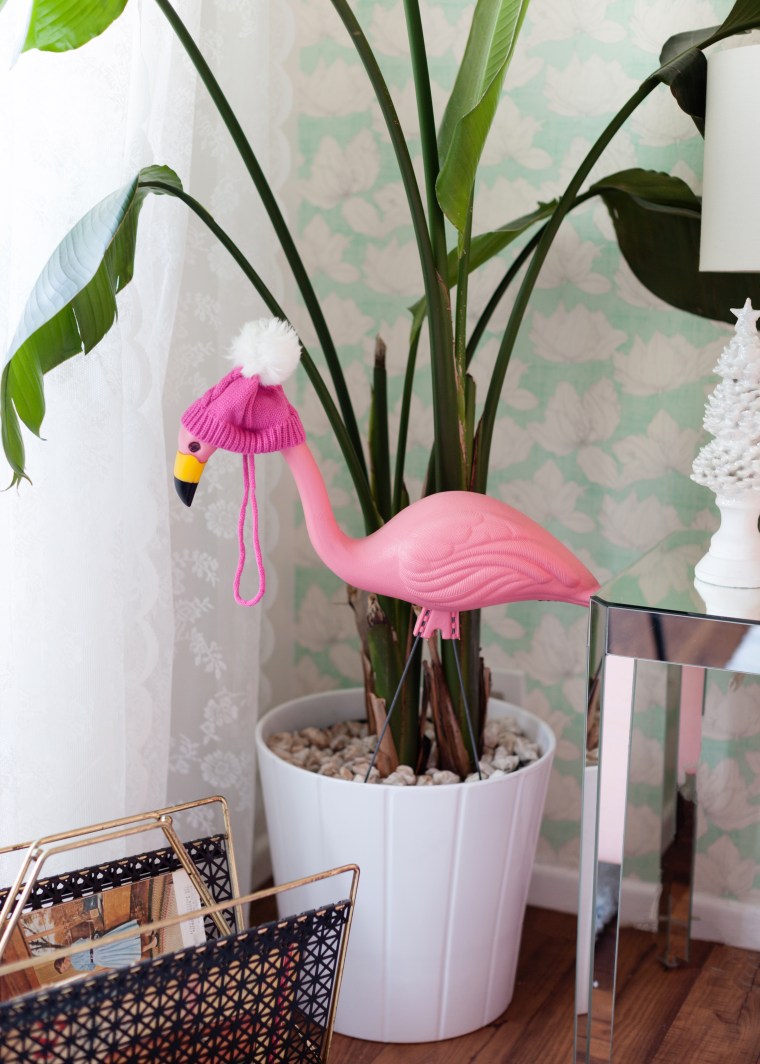
I got this hat for my dog but she hates it so Frank the flamingo got a festive little makeover.

diy-felt-pom-pom-pillows-3

These DIY pom-pom pillows dressed up our little IKEA Hack bench. I made these for Christmas but I think they’ll end up sticking around all year.

I didn’t get much decorating done in our bedroom, except for this little gold tree that holds our personal, heirloom, and travel collection of ornaments. I used a faux fur throw as a tree skirt and hung a cute little DIY Christmas print on the wall. The lighting from this tree is super cozy and great to have on during bedtime Christmas movie watching AKA my favorite winter time hobby.bedroom-tree

That’s it! Thanks for stopping by and Happy Holidays! Xoxo!

DIY Decor: Metallic Gold IKEA EKBY BJÄRNUM Bar Shelves

One of the main challenges I always have while decorating my apartment is finding the decor I envision, at the prices I want. Neither of those are ever easy. Either I can’t find what I have in mind, or when I get close, somehow it’s the most expensive item in the store. I can drool over those high ticket items all I want, but let’s get serious, I’m no Rockefeller.

But it’s ok! This is where my handy-dandy DIY skills get to shine. This is where I get to do my favorite task of trying to figure out how to get the look I want for as little money as possible.

DIY Gold IKEA Bar Shelves For example, I wanted to expand my home bar area by adding 3 shelves above my bar cart. I wanted them to be gold to match said bar cart. My search pretty much turned up empty except for one option that was almost the right dimensions (from a store that will remain nameless) for over $100 per shelf. My other option was an IKEA favorite of mine that I’ve been keeping my eye on for a bit, and it just so happens that the EKBY JÄRPEN/EKBY BJÄRNUM combo was the perfect size, style, and price I was going for. The only drawback was that the brackets are only available in aluminum. Womp, womp.

EASY FIX.

DIY Gold EKBY BJARNUM IKEA Shelves via MelodramaThe right choice for me was clear and I’m glad I made it. Did I want to spend $300 on shelves from Unnamed Store, or around $60 for IKEA shelves and a can of spray paint? Um. DUH. The way I see it is if I can spend $60 total on a DIY version and use the extra $200+ toward other fun things like going away for the weekend or, I dont know, paying my bills, you’re damn straight I’m taking that route.

DIY Gold IKEA BJARNUM Shelves via MelodramaLet’s all just take a moment to reflect on the magic of spray paint. All I did was spray the brackets and screws with metallic gold chrome paint and it completely changed the vibe of the shelves. Done and done. So easy.

DIY Gold IKEA BJARNUM Shelves via MelodramaI styled them with the help of my growing glass and bareware collection, and a DIY framed print.

DIY Gold IKEA BJARNUM Shelves via Melodrama

Shelves: IKEA
Paint: Montana Gold – Metallic Goldchrome
Glassware: Baigelman Glass, Crate & Barrel, Target, Vintage
Bar Cart: Target
Chair: Vintage DIY
Floor Lamp: IKEA
Dresser: Vintage DIY
Lamps: Target

DIY: IKEA FADO Lamp Turned Jack-o-Lantern

I can be a bit of a Halloween traditionalist, you guys. I like my October nights lit by the faces of Jack-o-lanterns and I like those Jack-o-lantern faces to be classic. However, I still like to mix things up sometimes, and get serious, it’s not exactly practical for me to have carved pumpkins sitting around as light sources for the entire month. When I saw the orange FADO at IKEA, I didn’t just see a colorful orb lamp, I saw a potential Jack-o-lantern.

fado-table-lamp__0275795_PE413950_S4

The FADO is a pretty cool lamp on its own. It has a spherical shape that is a throwback to the mid-century space age era and it gives off a nice, soft, glowing light.

Pulling this off is really as simple as drawing or painting a Jack-o-lantern face onto the lamp. I used chalk to draw my ideal face shapes and then painted over it using a charcoal colored chalk paint. You can use a sharpie, a paint pen, or whatever you’d like. I just liked the chalk paint texture against the frosted glass of the FADO. It also looked more vintage to me that way.

IKEA FIDO Lamp turned Jack-o-Lantern

I love this little guy. Look how cute he is! And the glow sets the perfect mood light for Halloween movie watching.

IKEA FIDO Lamp turned Jack-o-Lantern