As I pack up each room for the move I’m reminded of how many faces each one has had over the years, and how we started out here with literally only an air mattress and a laptop. I worked hard to make this apartment feel like our own home and did every thing I could to personalize it within the limits allowed. In the beginning I worked with what I had and could afford, which wasn’t much, and slowly improved each room over the years and brought in new and better things to make it what it is today. I had fun doing it and I’m really proud of what I’ve done and been able to share with you all since the blog started.
I thought it would be fun to take a little look back through the years. Each rooms has looked even more different than what you’ll see below, but this is what I could find on my Instagram and photo archives.
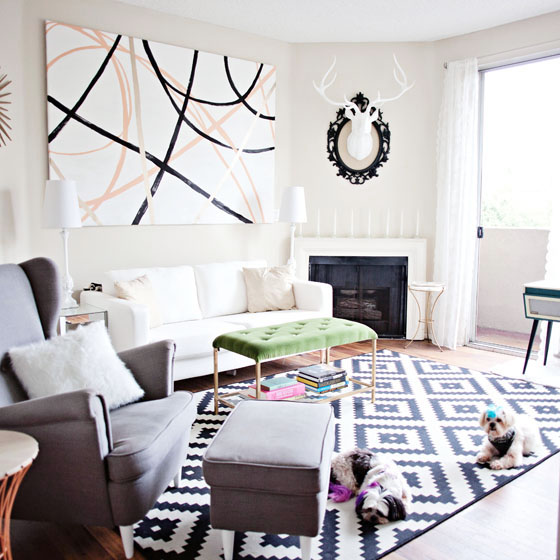
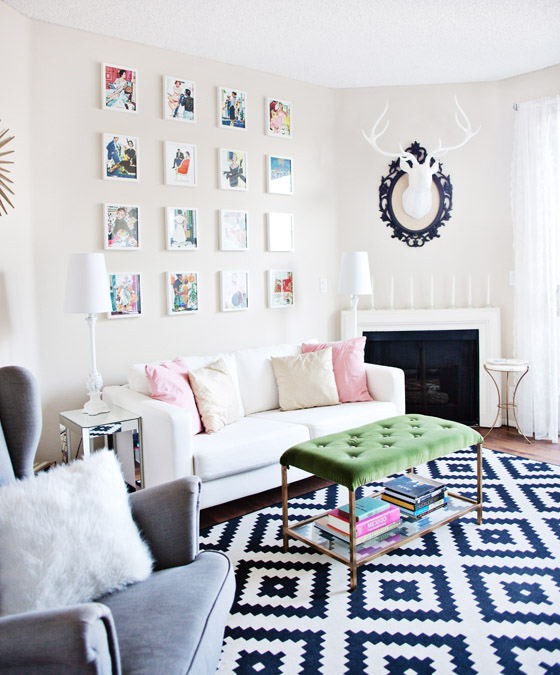
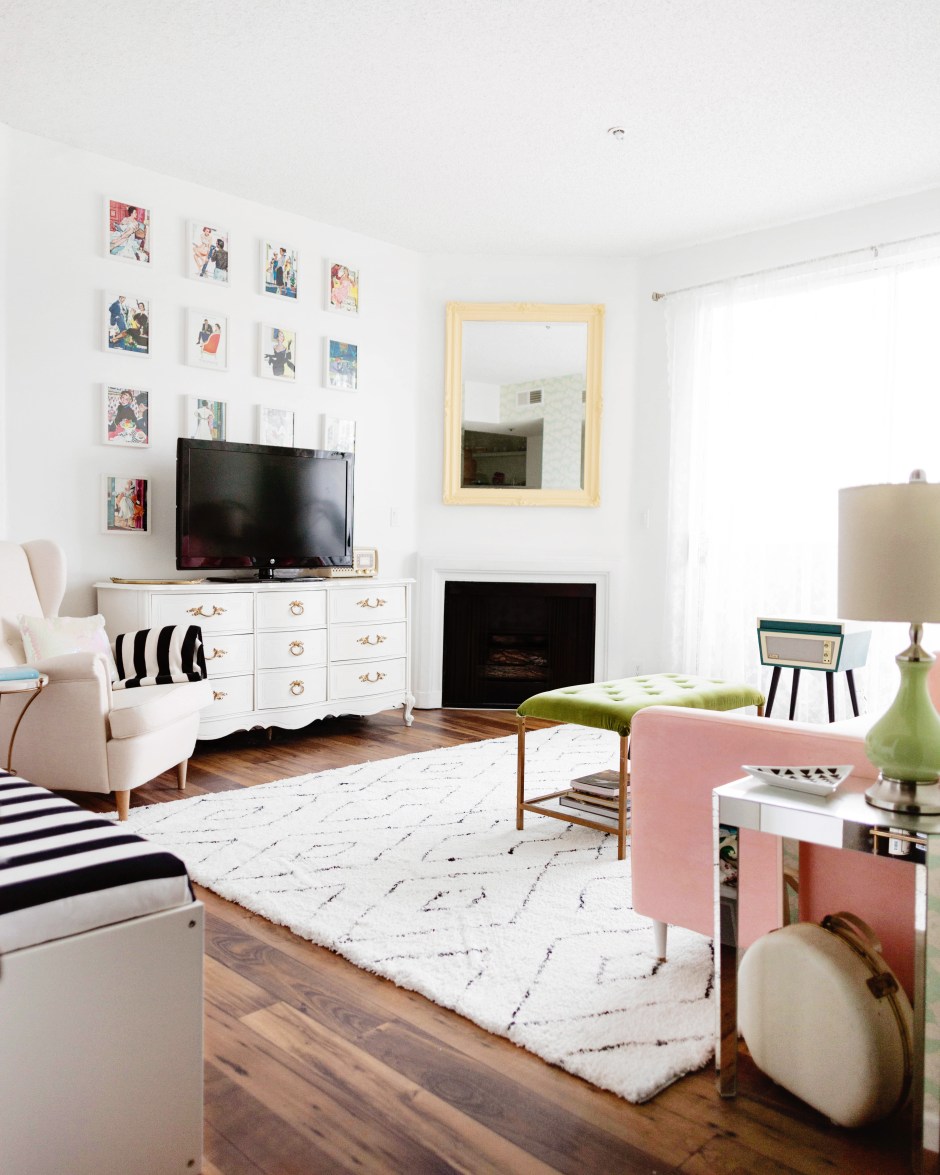
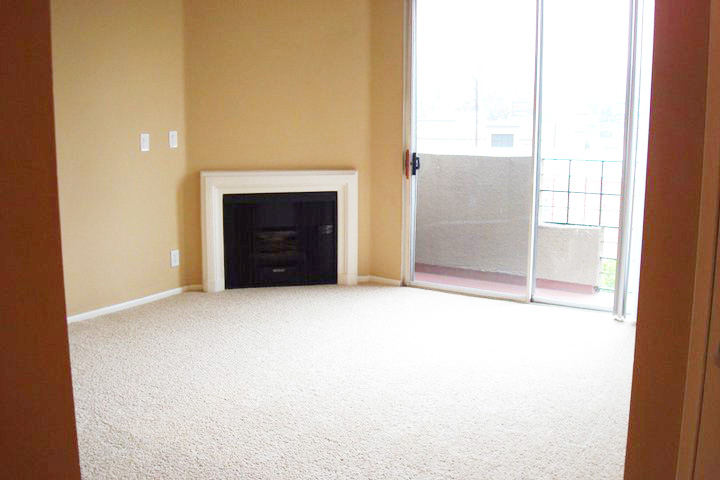
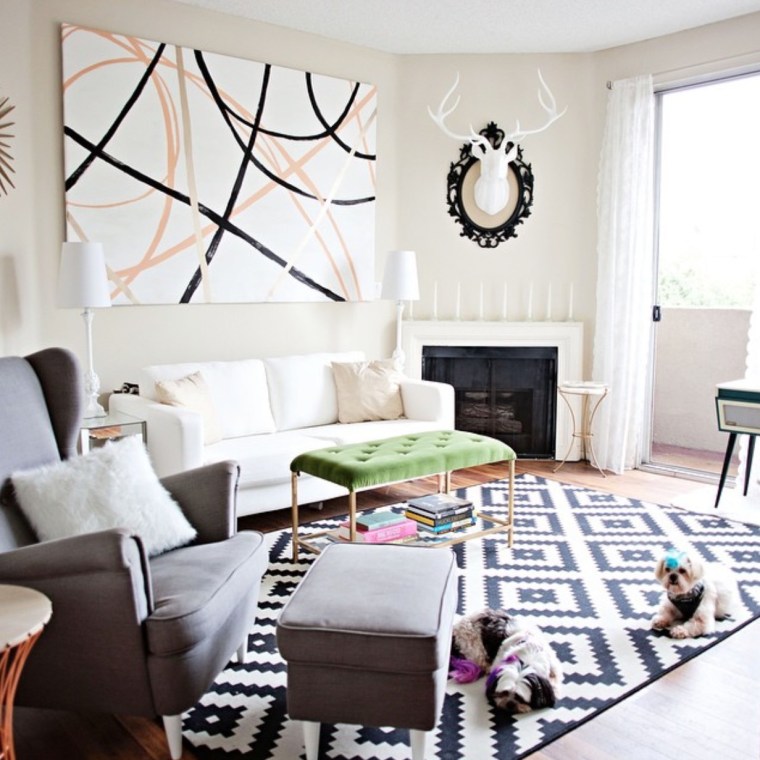
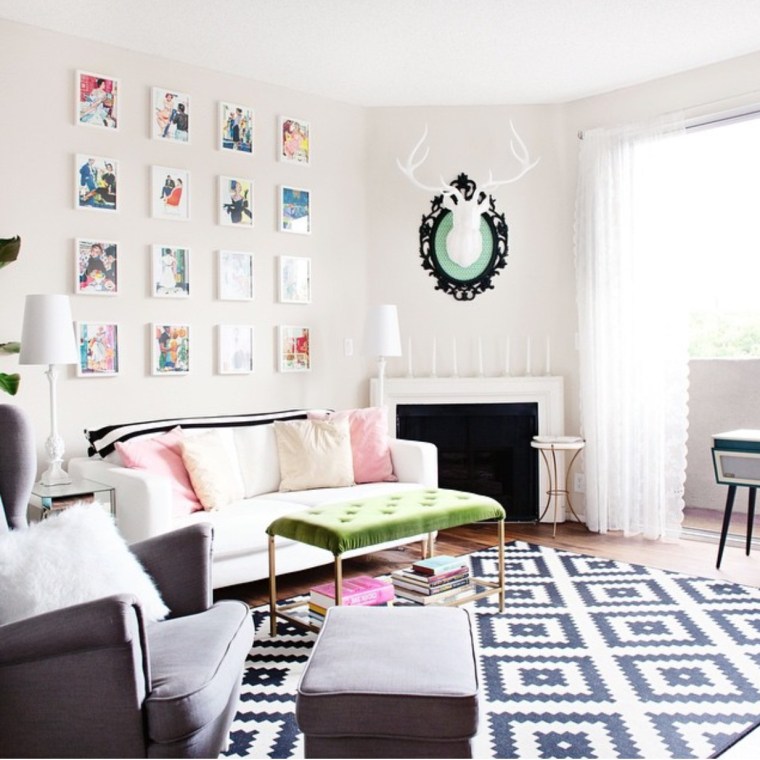
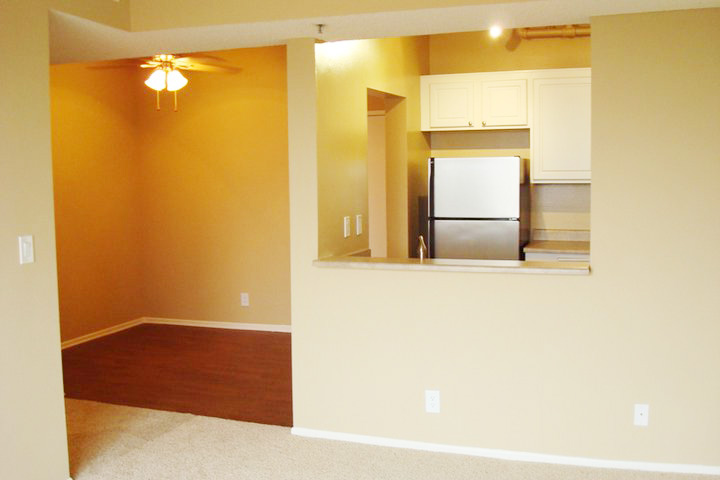
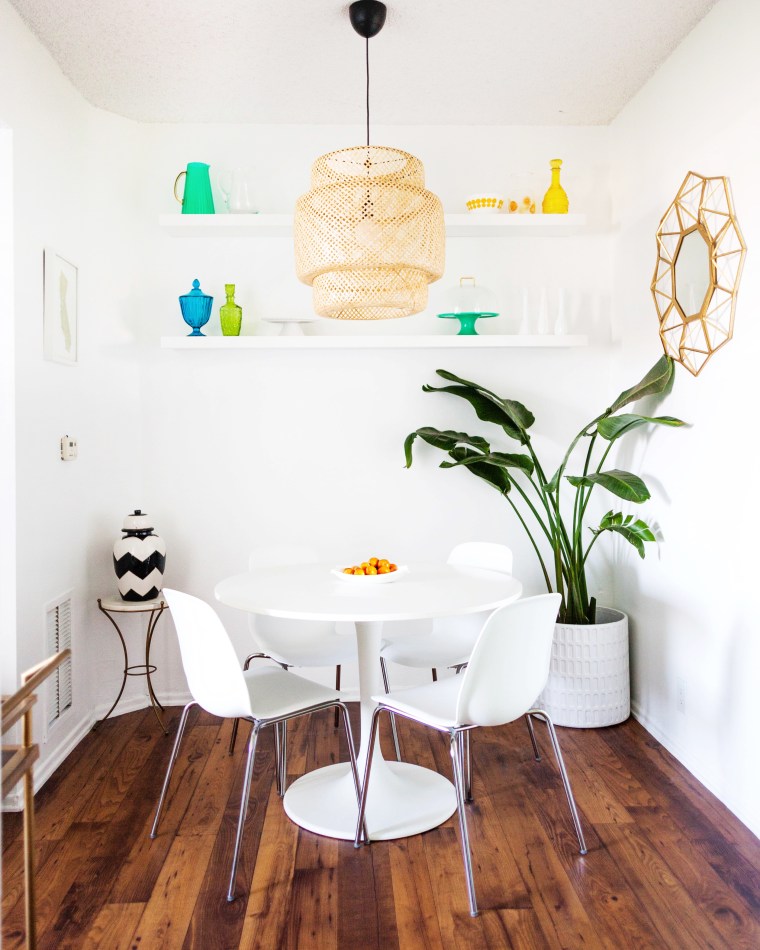
The living room and dining room have always been the main focus. It’s where we spend the most time and really the only room people see when they come over. It started out with ugly paint and carpet (the floors were eventually changed by management) and eventually turned into a bright and spacious feeling room. It was even featured in Better Homes and Gardens!
As you can see I flipped the entire layout last year.
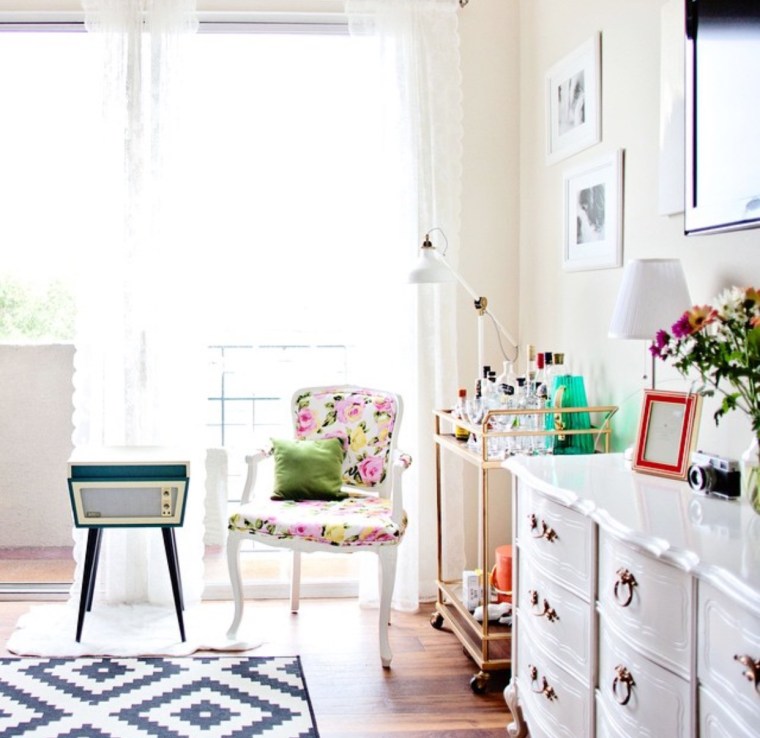
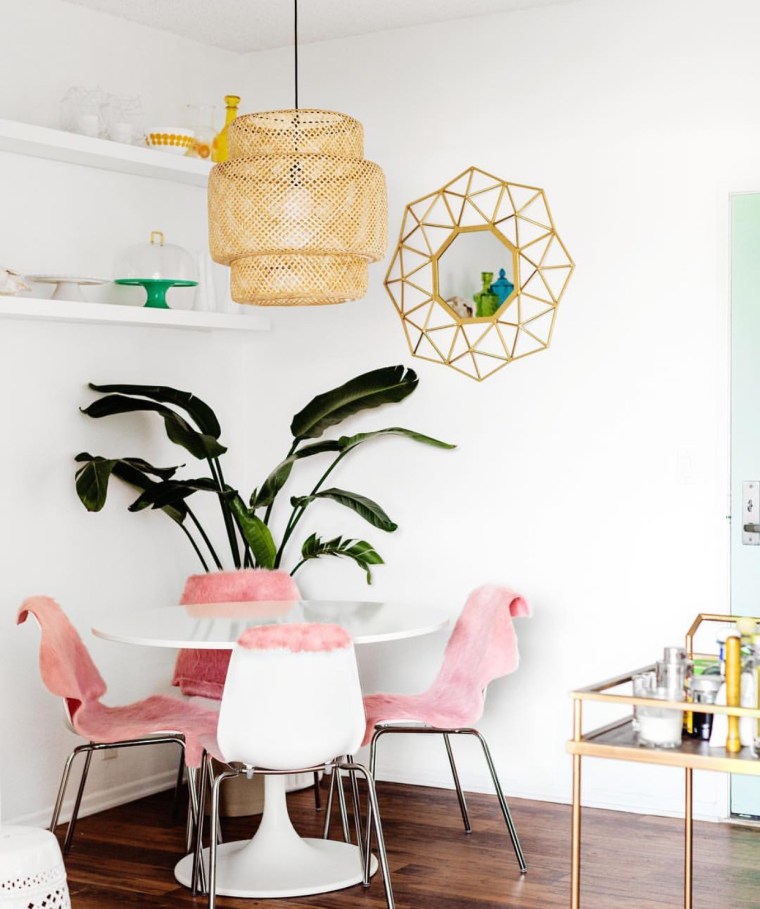
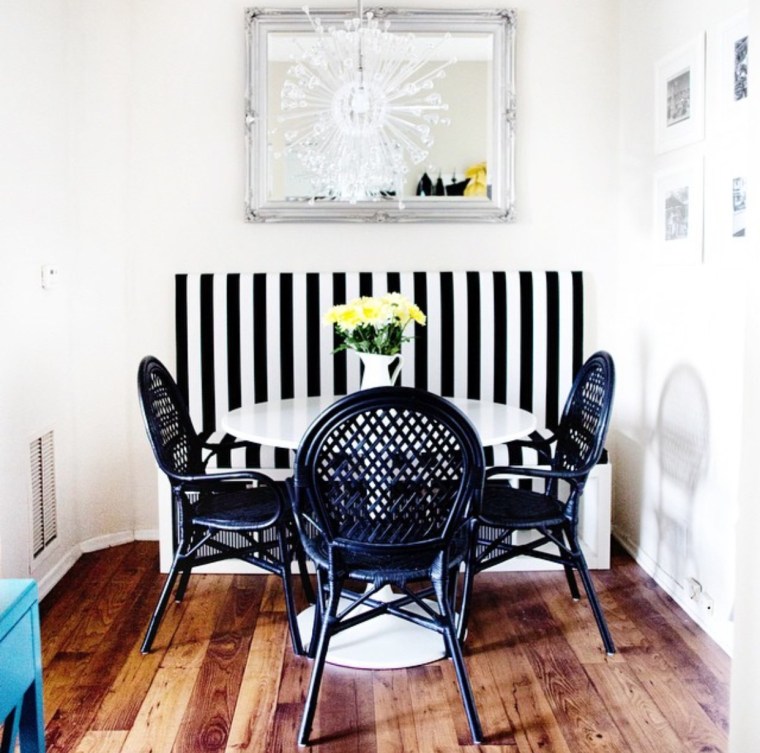
The dining room has had a few different lives too. Here are a couple of my favorites.
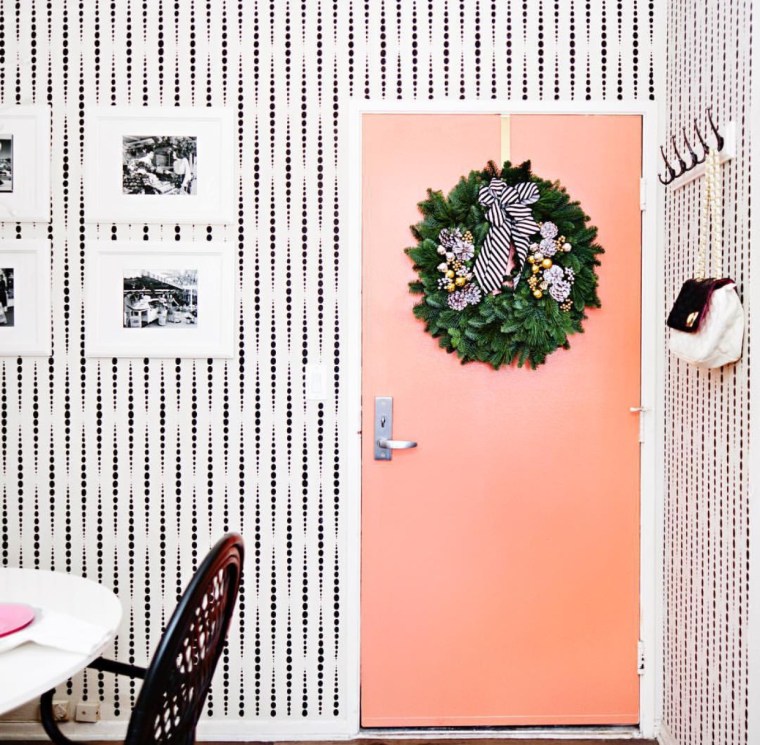
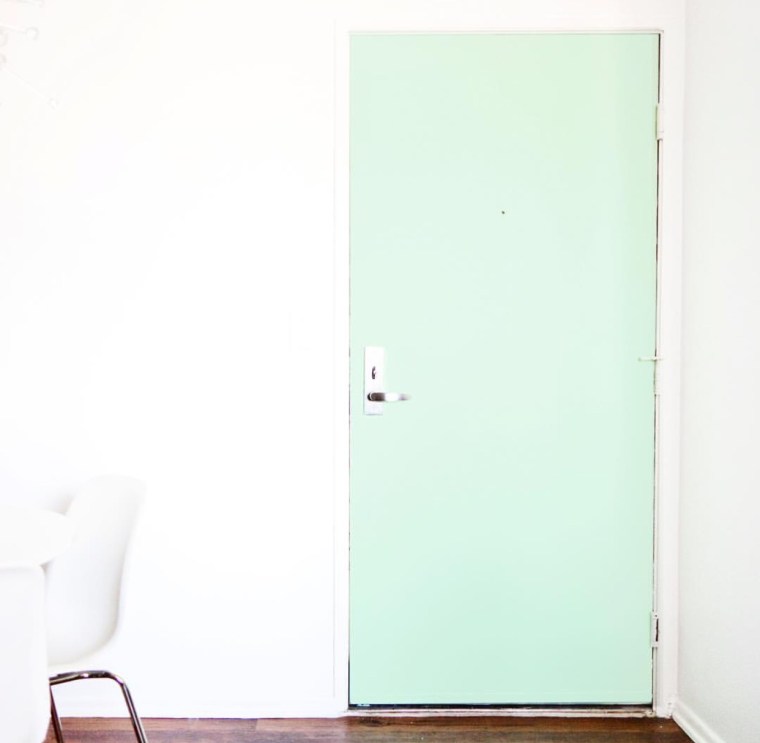
Even the front door got a makeover a couple of times!
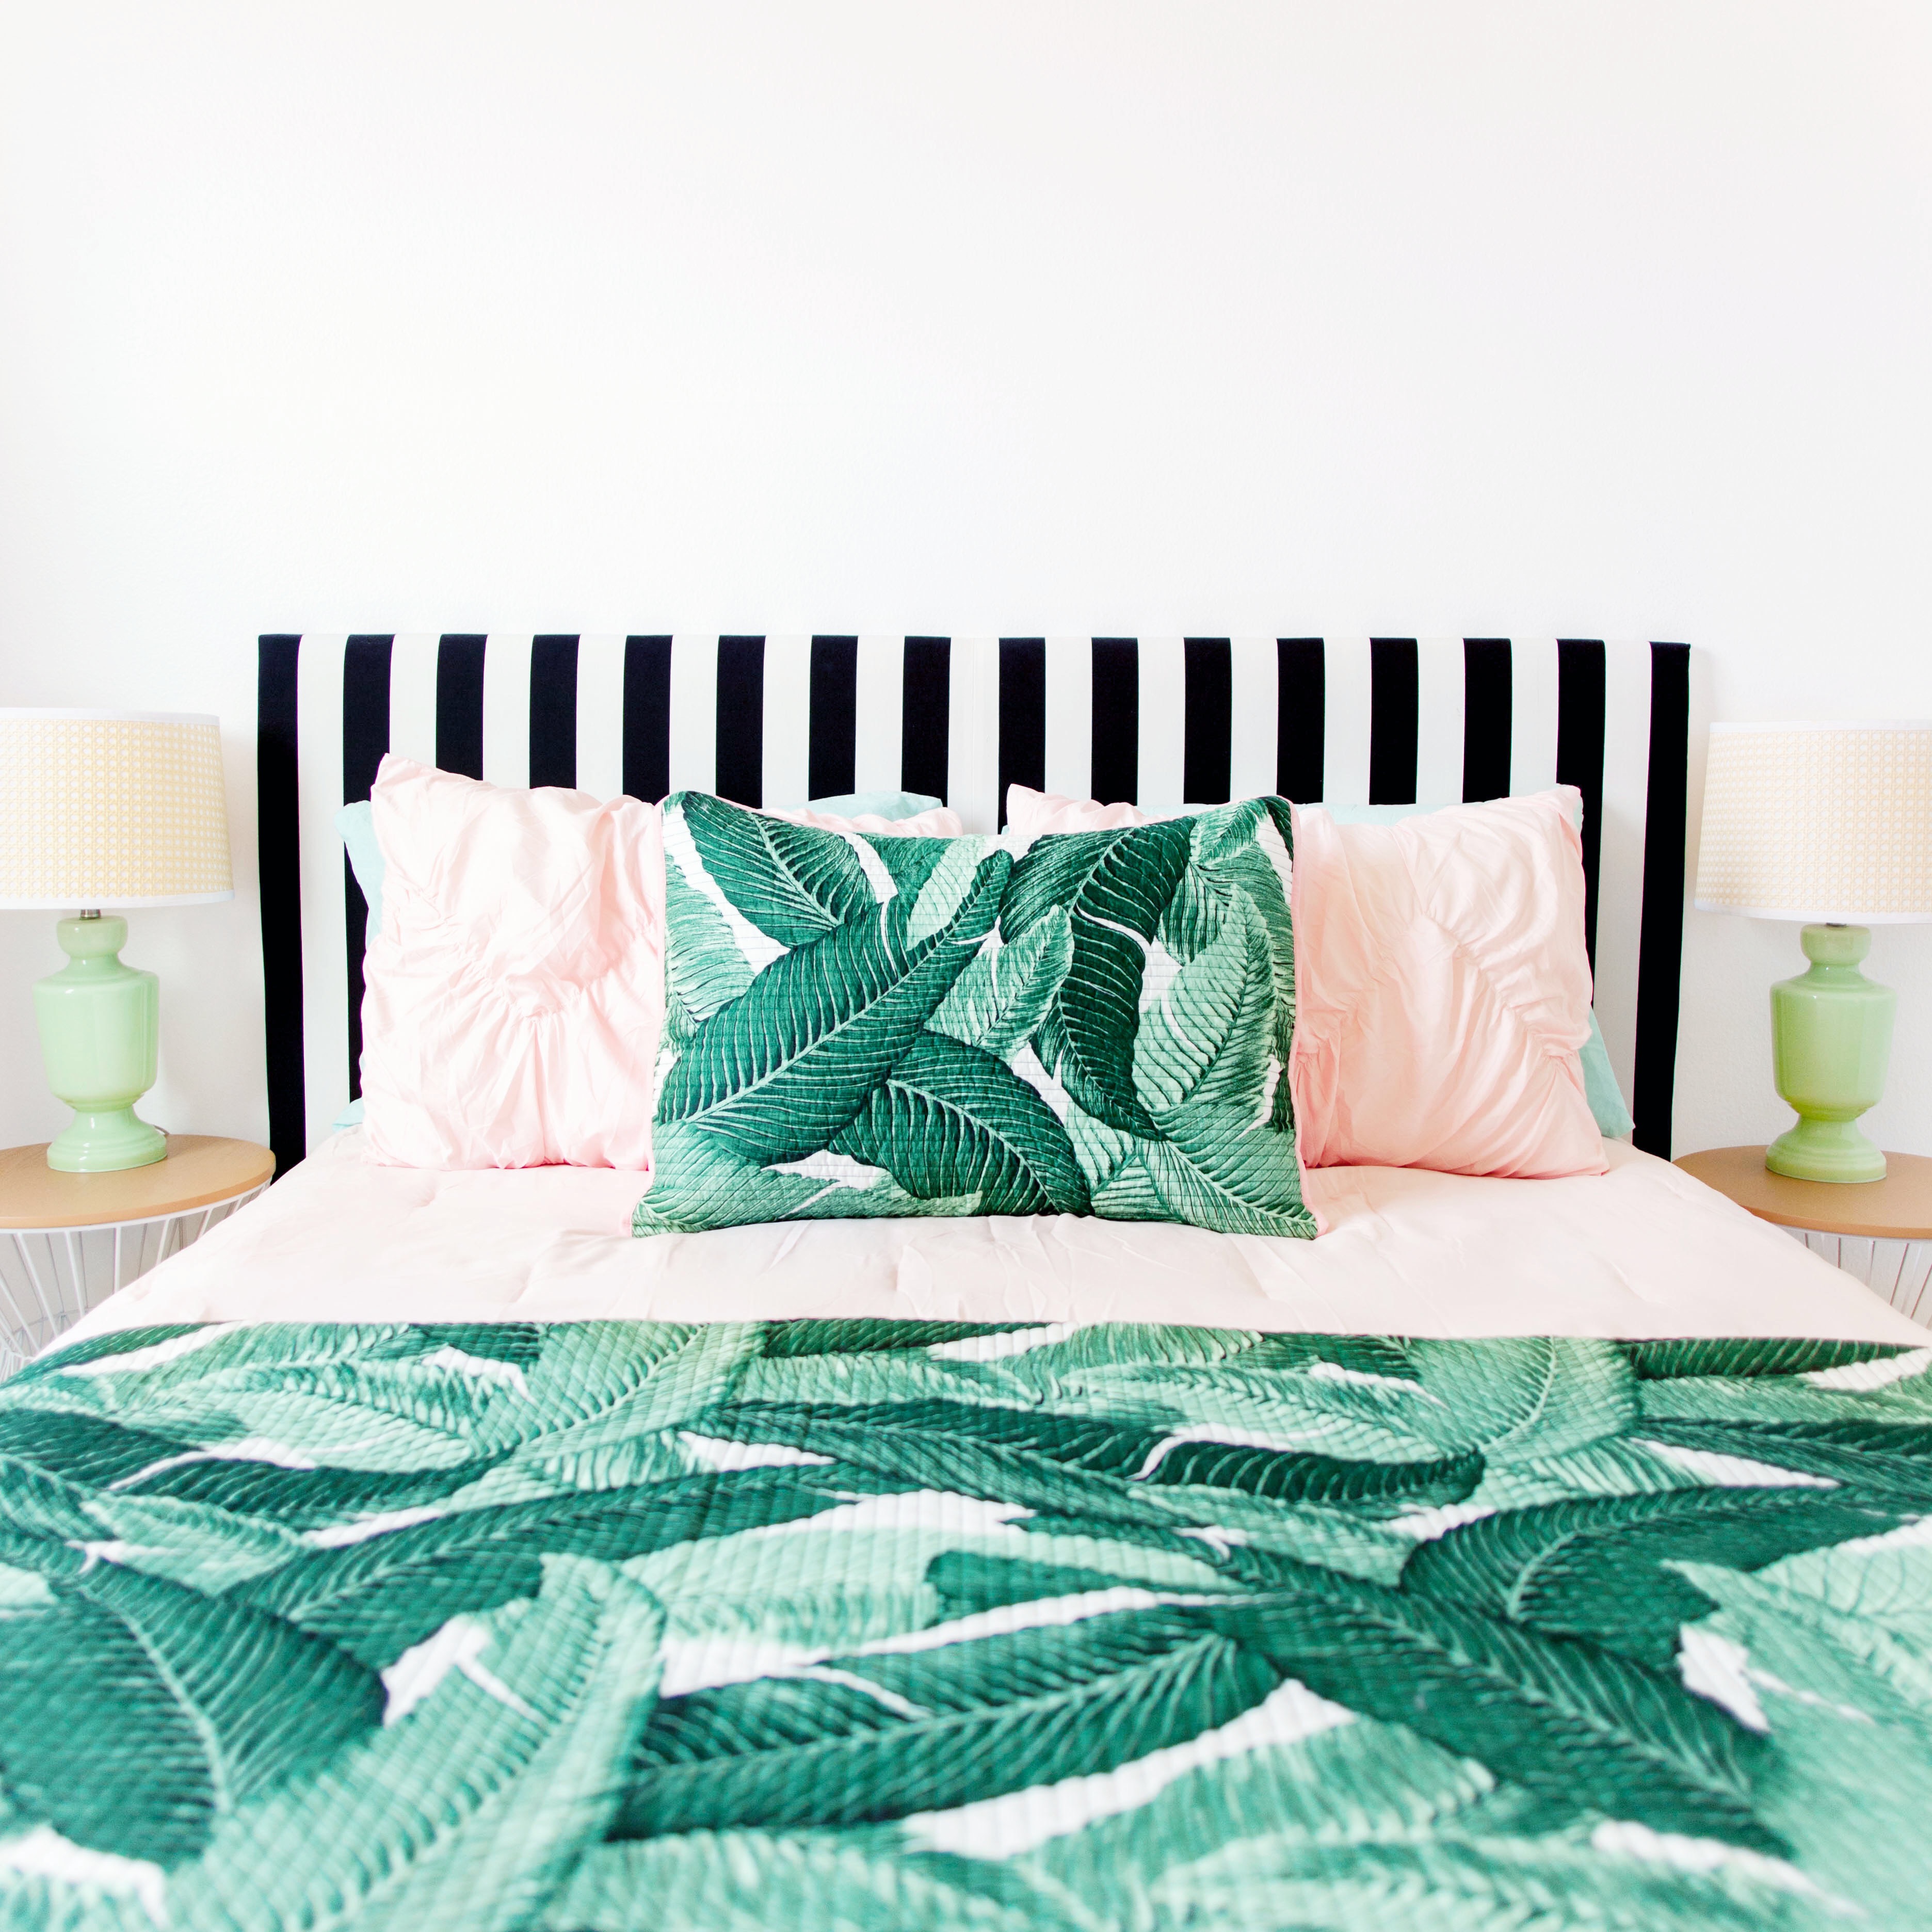
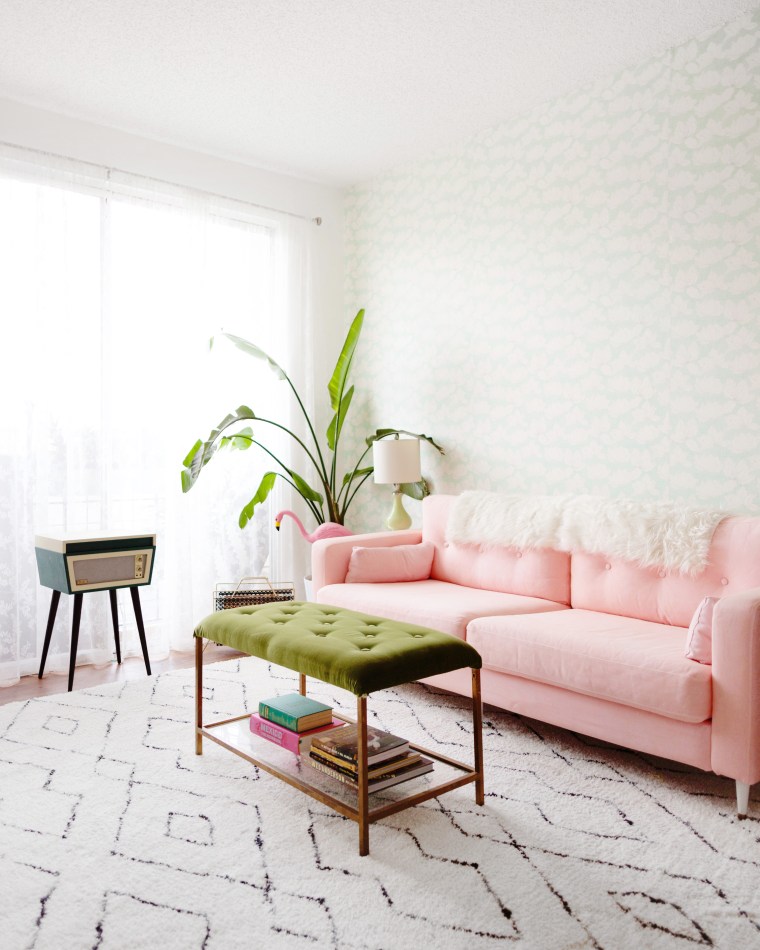
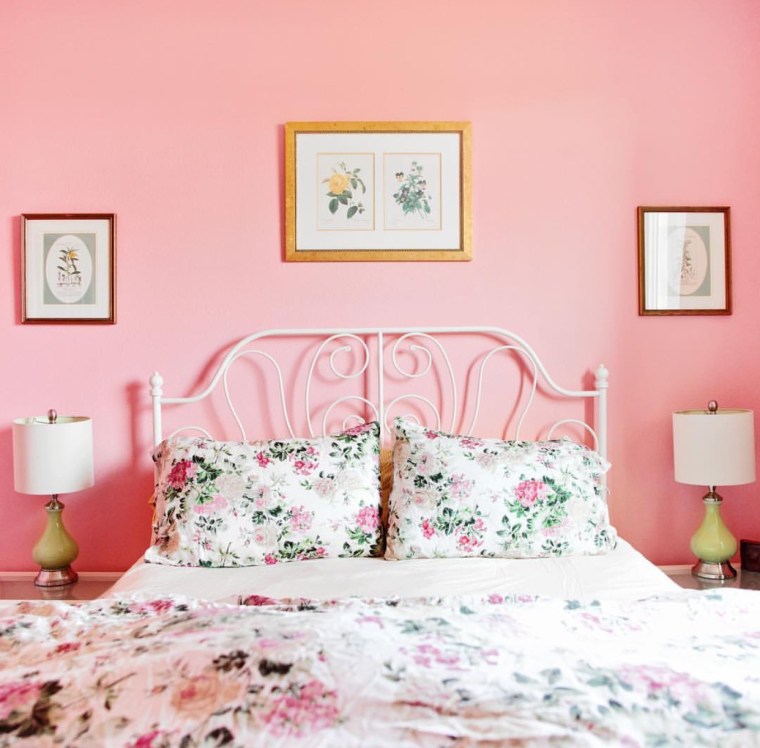
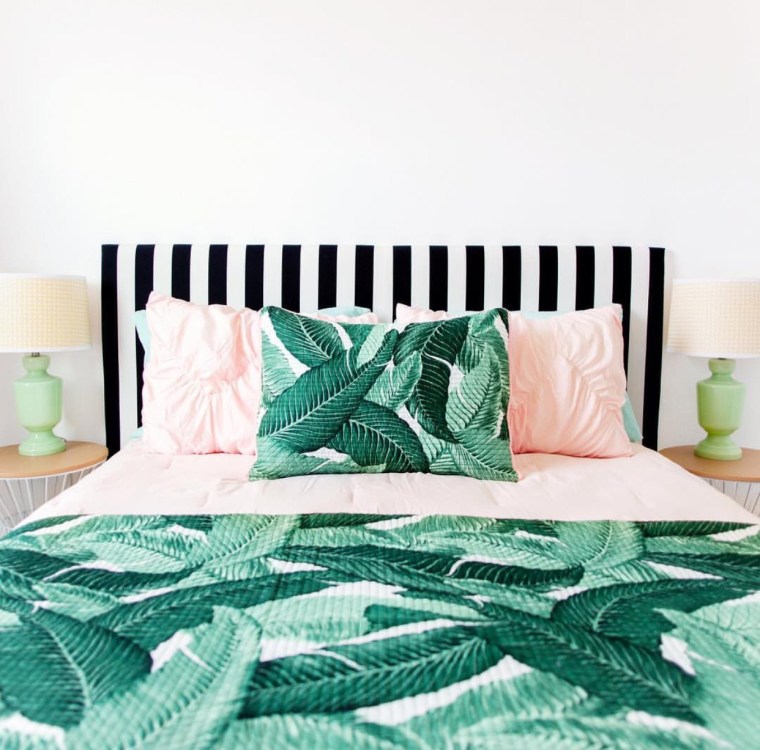
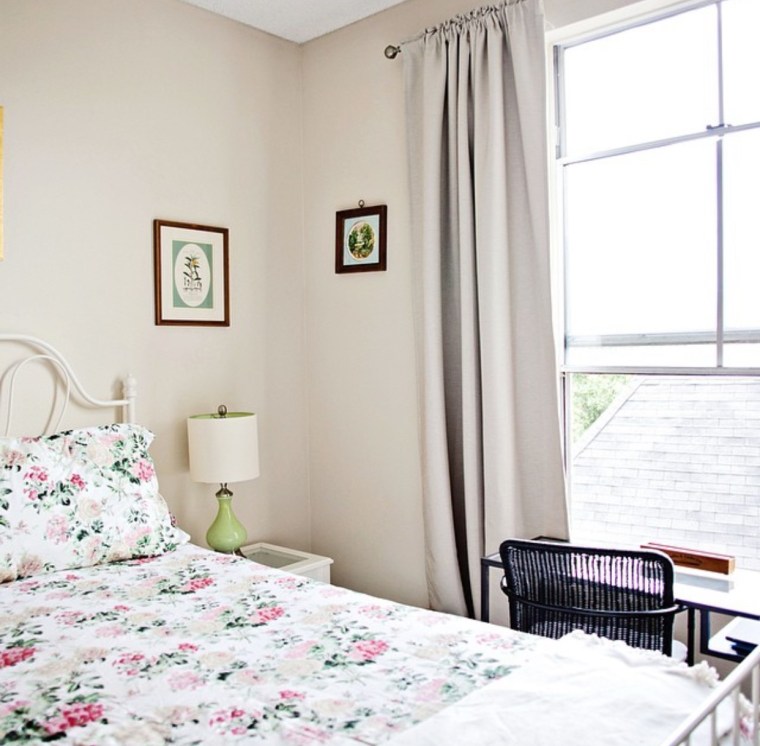
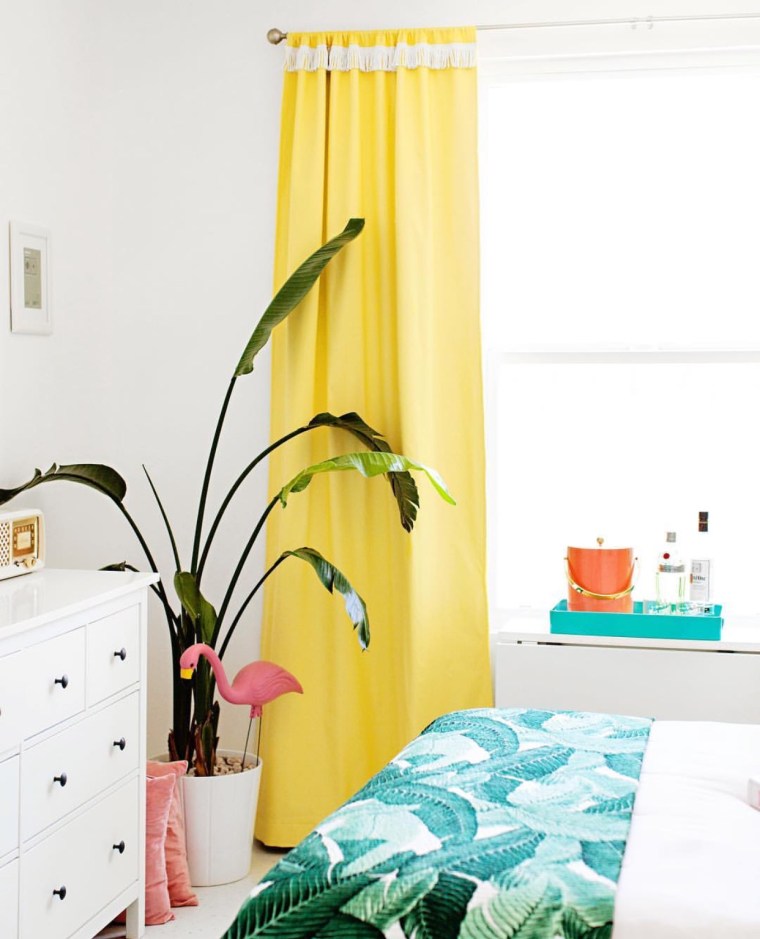
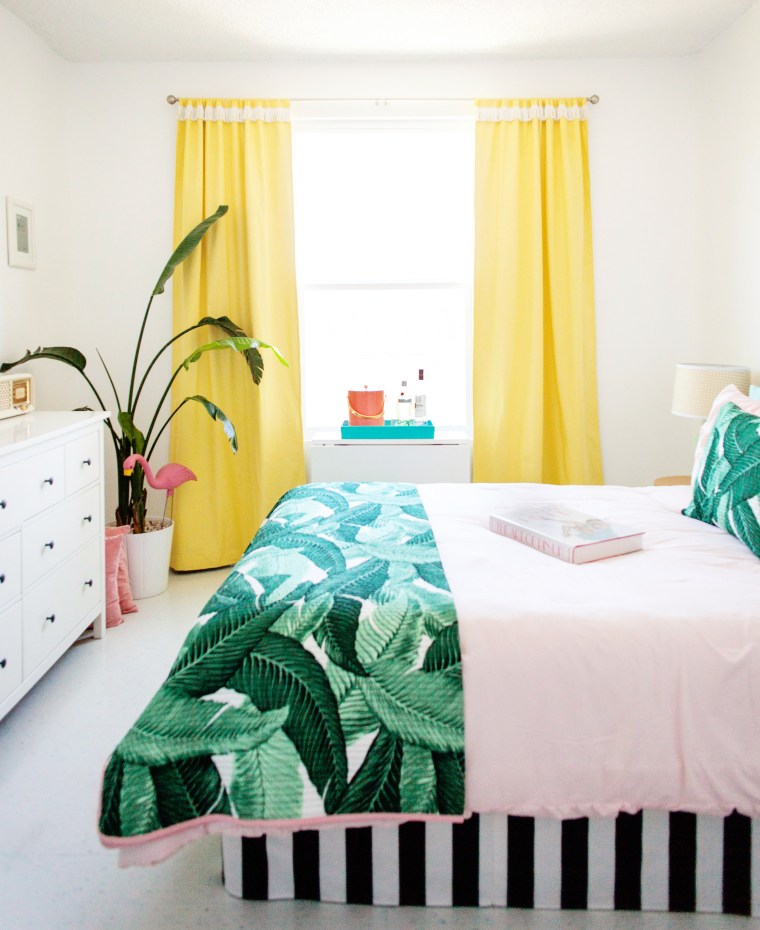
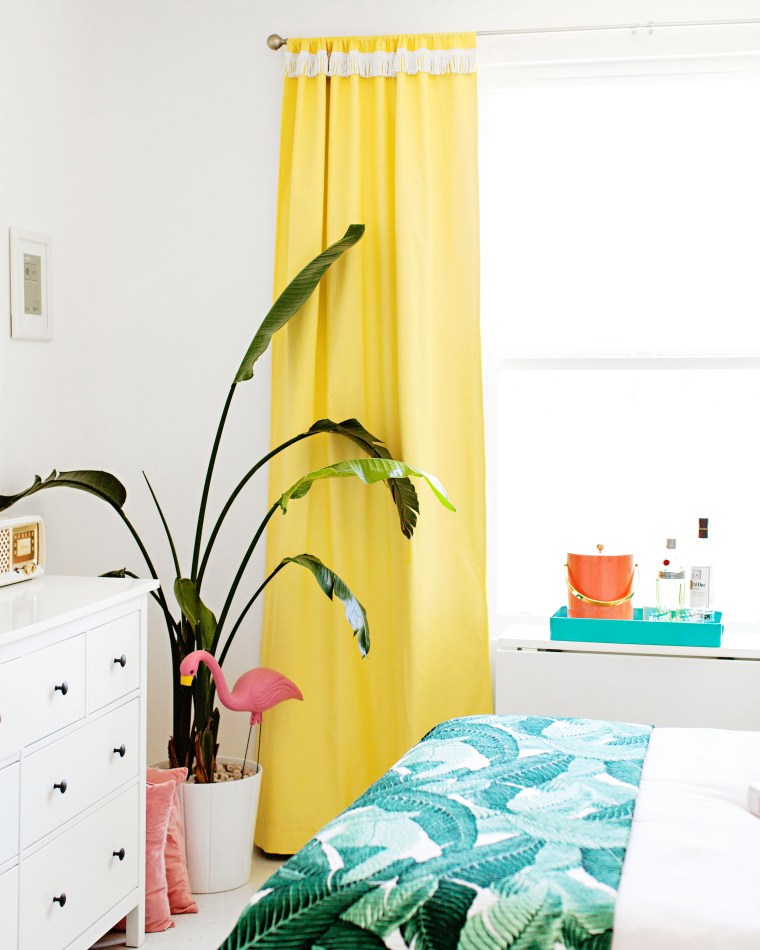
And lastly, the bedroom. I went from garden grandma chic vibes to tropical resort vibes.
I’ve had a lot of fun living here and sprucing this place up, but I’m excited for something new!
I’ve said it before but I feel like this month has flown by. I honestly wanted to do a little more decorating but ran out of time. Boooo. I did manage to get all of the necessities in here though! Christmas Tree: check! Bottle brush trees: check! More Christmas trees: check! I’ve realized this year that I have a thing for Christmas trees.
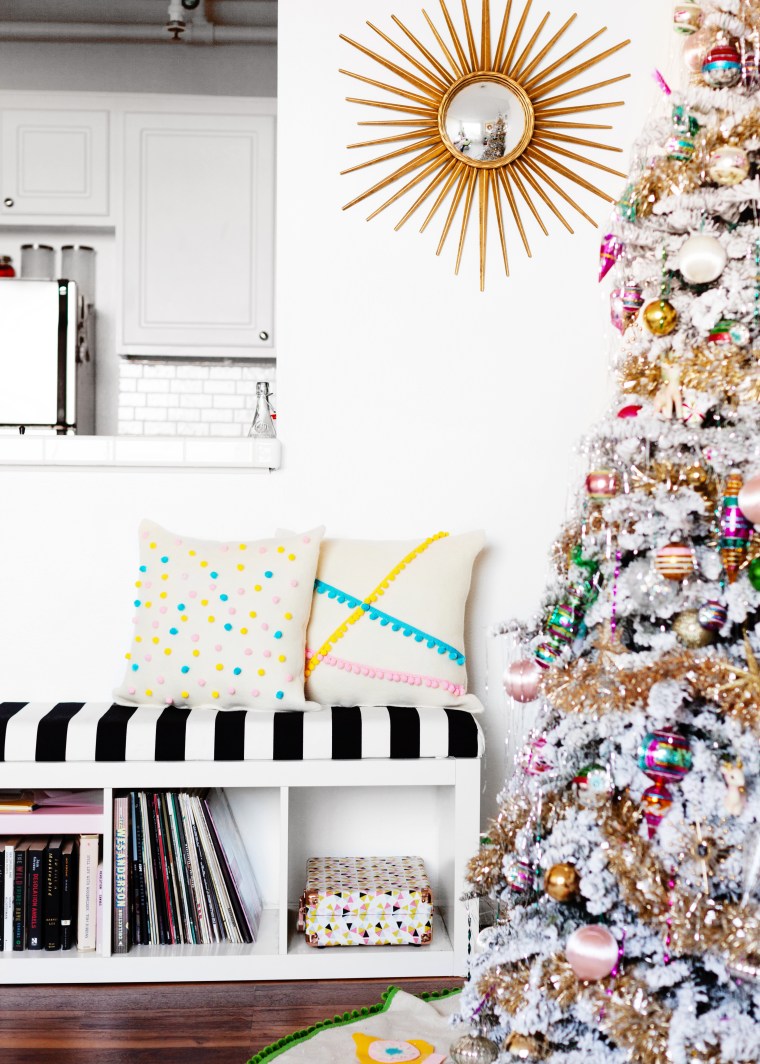
In the dining room I used large bottle brush trees from Target to decorate my shelves and then stuck in two more baby trees for good measure.I got a little more festive on the adjacent bar, of course. I used Shiny Brite ornaments and epsom salts to dress up a cheapy $5 plain wreath and garland.The living room is definitely the most festive place in the apartment! I spy a DIY corn husk wreath over the fireplace.I also decorated the fireplace with my collection of bottle brush trees and DIY Putz Houses. And then there’s the tree!
I’m going to miss this when it’s gone.
I got this hat for my dog but she hates it so Frank the flamingo got a festive little makeover.
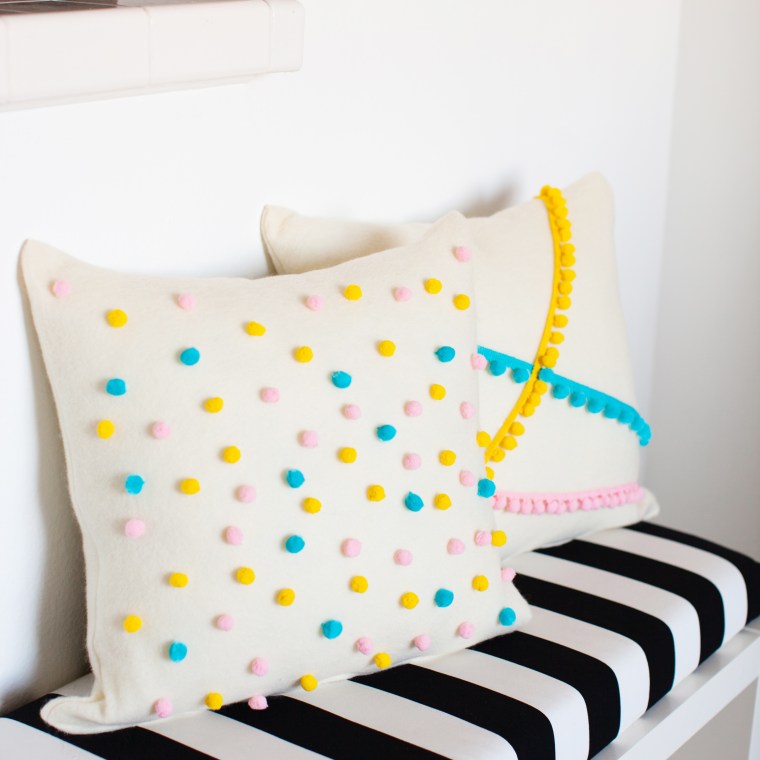
These DIY pom-pom pillows dressed up our little IKEA Hack bench. I made these for Christmas but I think they’ll end up sticking around all year.
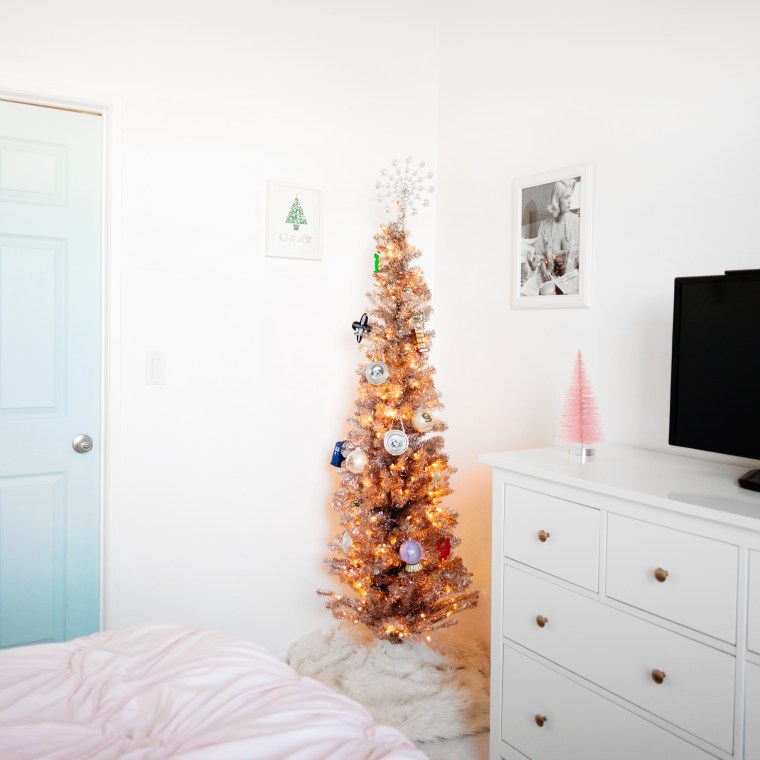
I didn’t get much decorating done in our bedroom, except for this little gold tree that holds our personal, heirloom, and travel collection of ornaments. I used a faux fur throw as a tree skirt and hung a cute little DIY Christmas print on the wall. The lighting from this tree is super cozy and great to have on during bedtime Christmas movie watching AKA my favorite winter time hobby.
That’s it! Thanks for stopping by and Happy Holidays! Xoxo!
Accent pillows are one of the easiest things you can use to change the look of a sofa or chair in your home, and they’re also one of the easiest DIY projects to do. I wanted to bring a little color and fun to a bench I have in my living room so turned to my fabric scrap collection for something to make pillows with. I had some felt and pom poms and thought they would be perfect pillows for the holiday season. To be honest they might stay well after that.
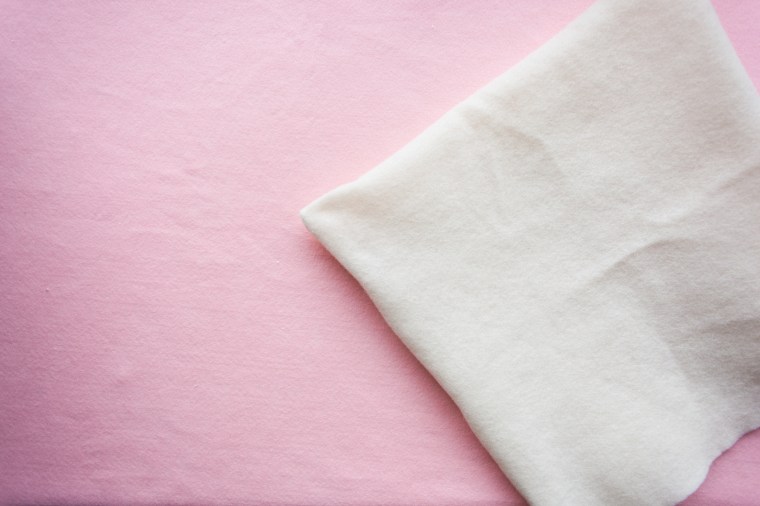
To make a basic pillow you just need to cut a piece of fabric to the size and shape of the pillow you want to cover. Leave about an inch on each side for seam allowance. Sometimes I cut the fabric on a fold so I end up with one longer piece rather than two pieces. Either way works fine.
Sew the pieces together at the sides, leaving one side open.
Turn your pillow case inside out so the seams are inside. By the way you can do these steps with fabric glue like liquid stitch if you don’t have a sewing machine.
Insert your pillow stuffing and then use a slip stitch or fabric glue to close the open end.
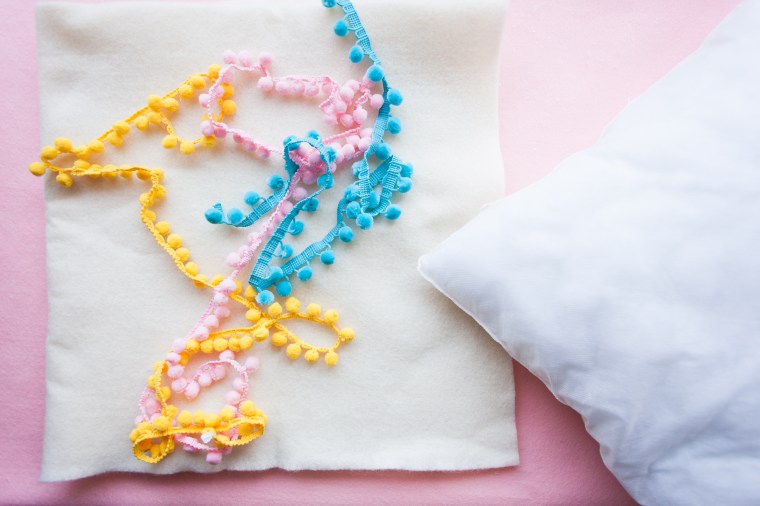
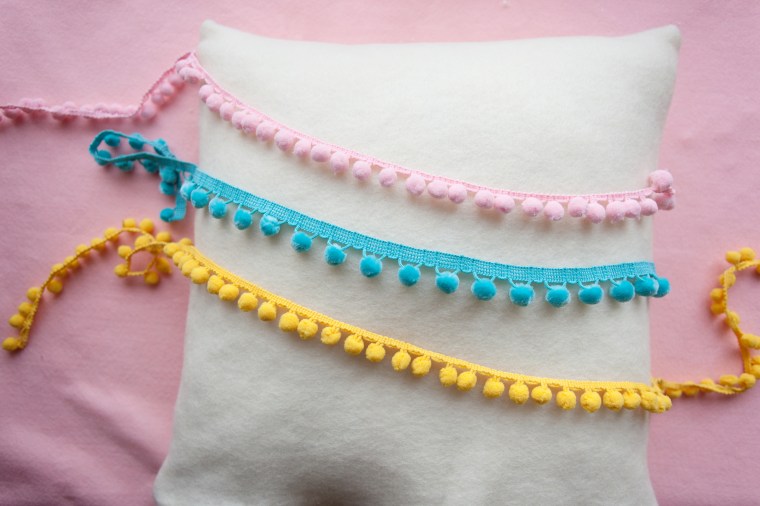
Next figure out where you want to apply your pom pom trim and use fabric glue to adhere it! Easy!
I also cut some of the pom poms off and glued them on in a random pattern.
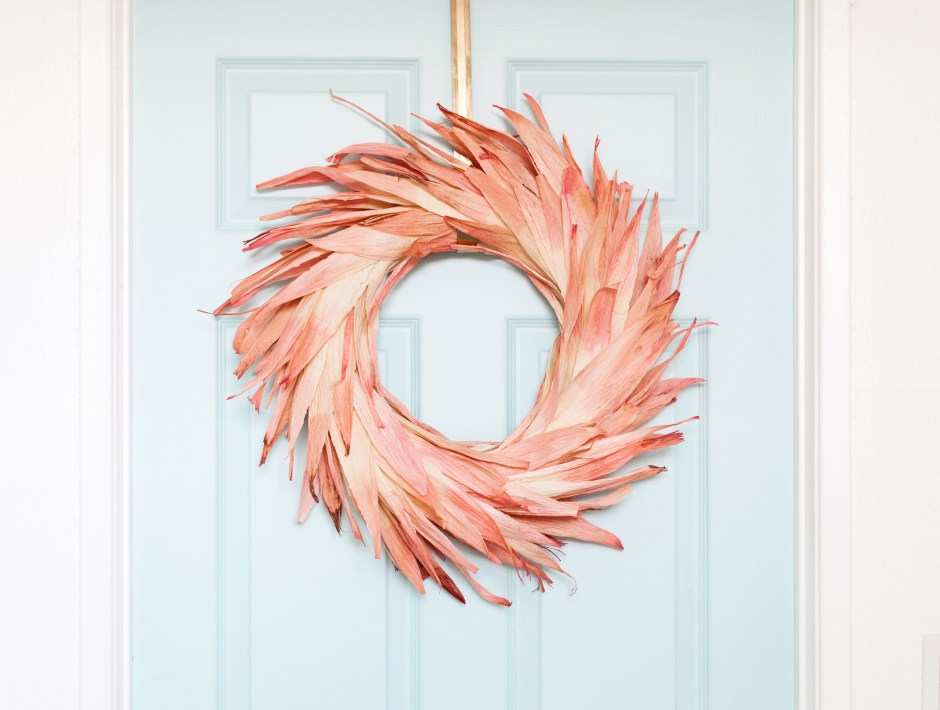
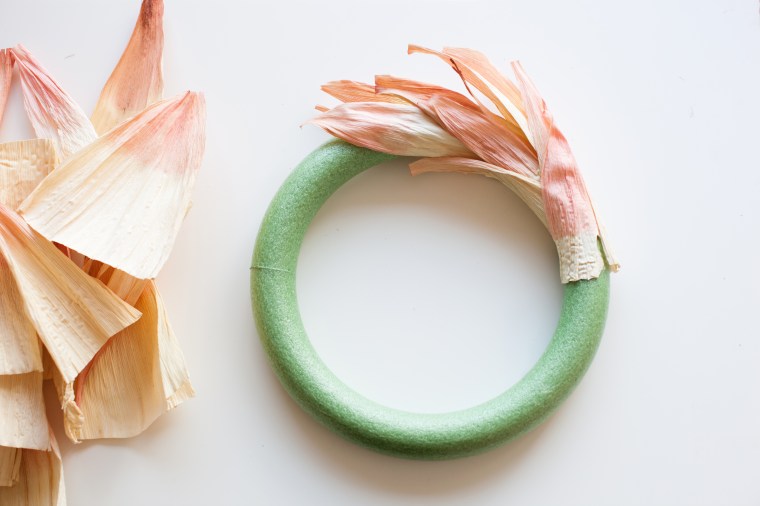
I’m totally one of those people who likes to hang a wreath to celebrate every season. For Thanksgiving this year I wanted a to bring in some natural elements while keeping a pop of color. Since it happens to be the time of year when I buy corn husks for tamales, I figured I would try to use some of the corn husks to make an autumn wreath! I wasn’t sure if it would work out the way I envisioned but it totally did!
This wreath is extremely cheap and easy to make. Here’s what you’ll need:
Foam or Straw Wreath Form
Corn Husks (I used an 8oz pacakge)
Colored Dye (I used Rit. Food coloring and easter egg dye also works.)
Hot Glue Gun
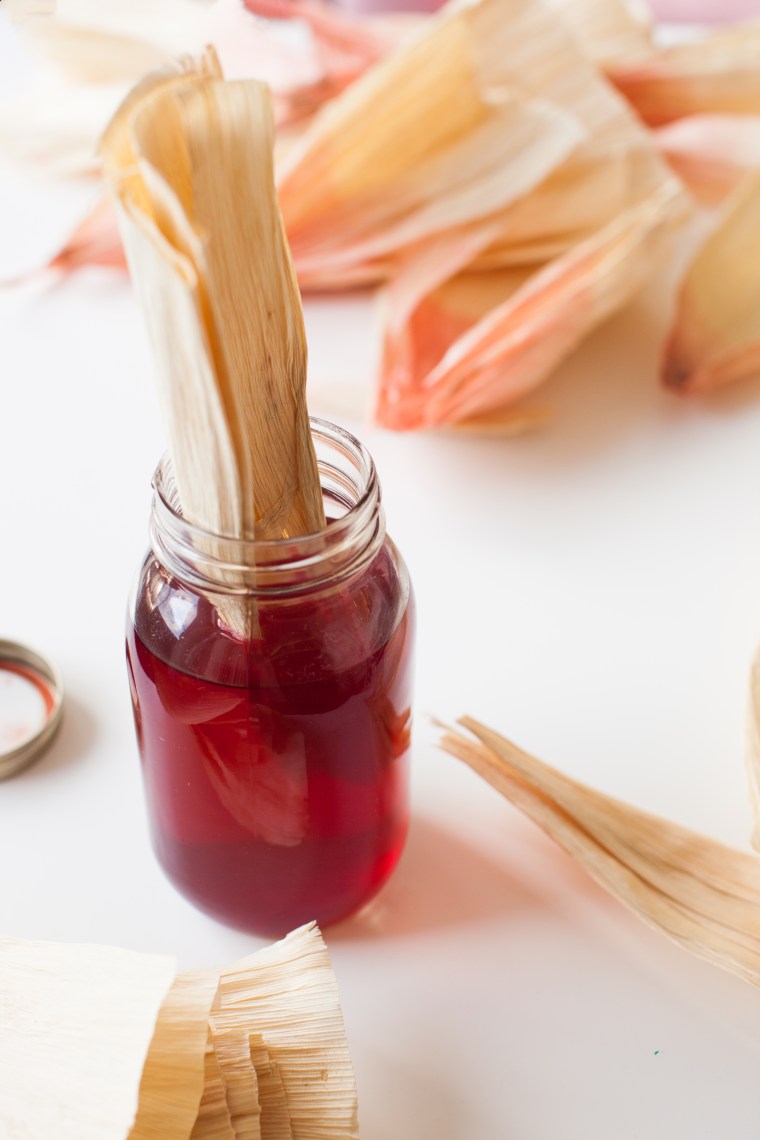
First you’re going to mix up the dye color of your choice and then soak the corn husks until the level of color you desire is achieved. I chose to only dye the tips of my husks for an ombre effect.
Let the husks dry completely before assembling your wreath.
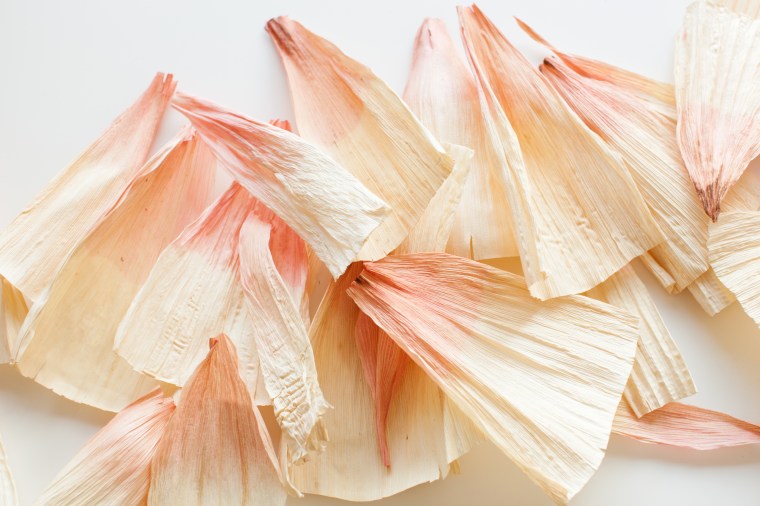
Next, using a hot glue gun, start gluing the husks to the wreath form in one direction, layering the husks all the way around until the wreath form is covered. Split up the husks into thinner pieces for more depth and keep adding in more husks until you reach your desired volume.
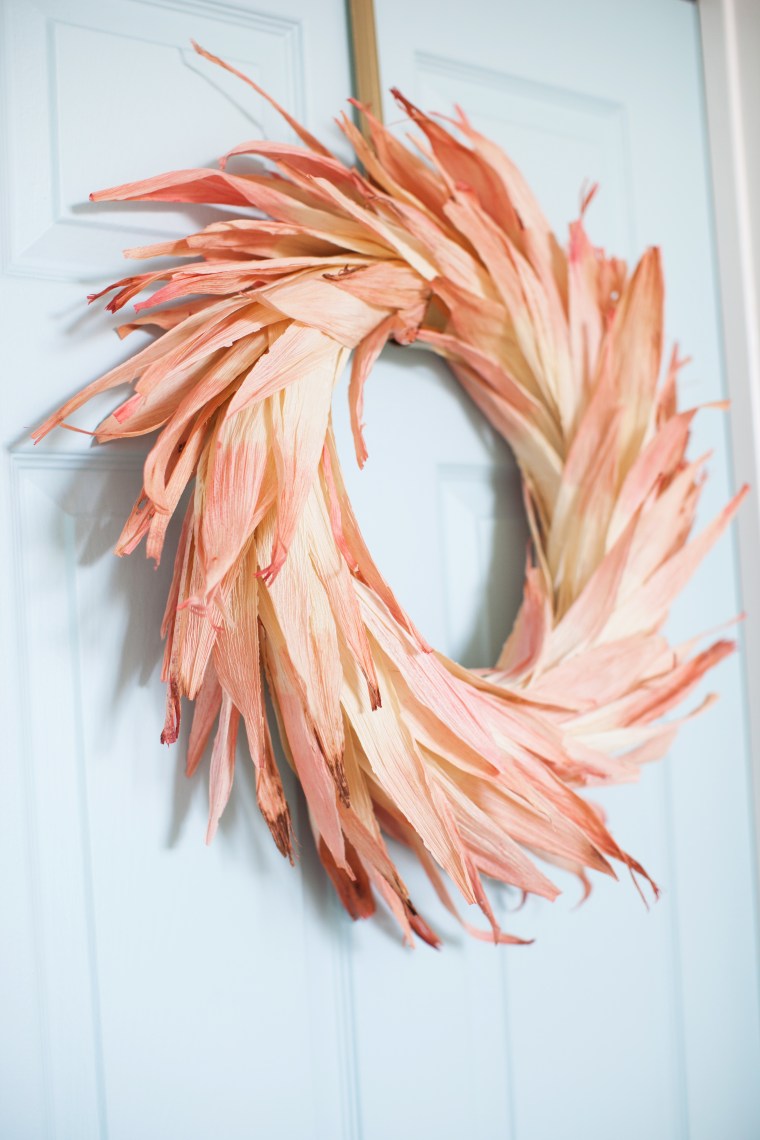
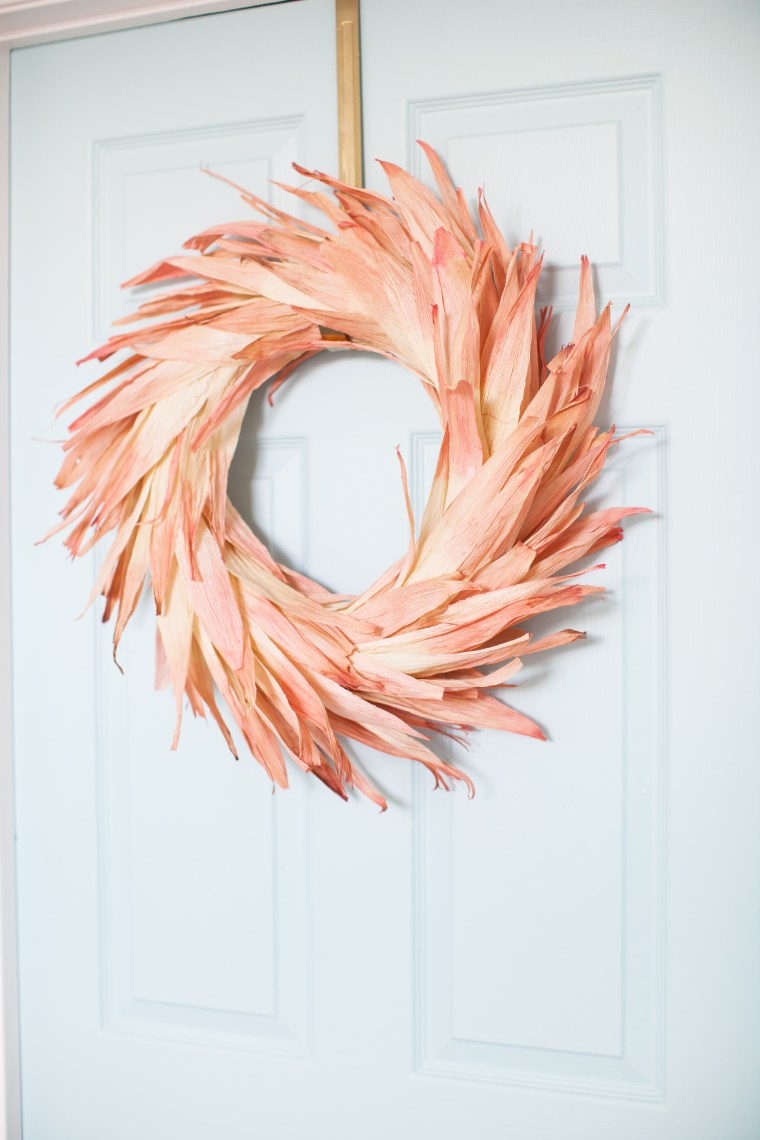
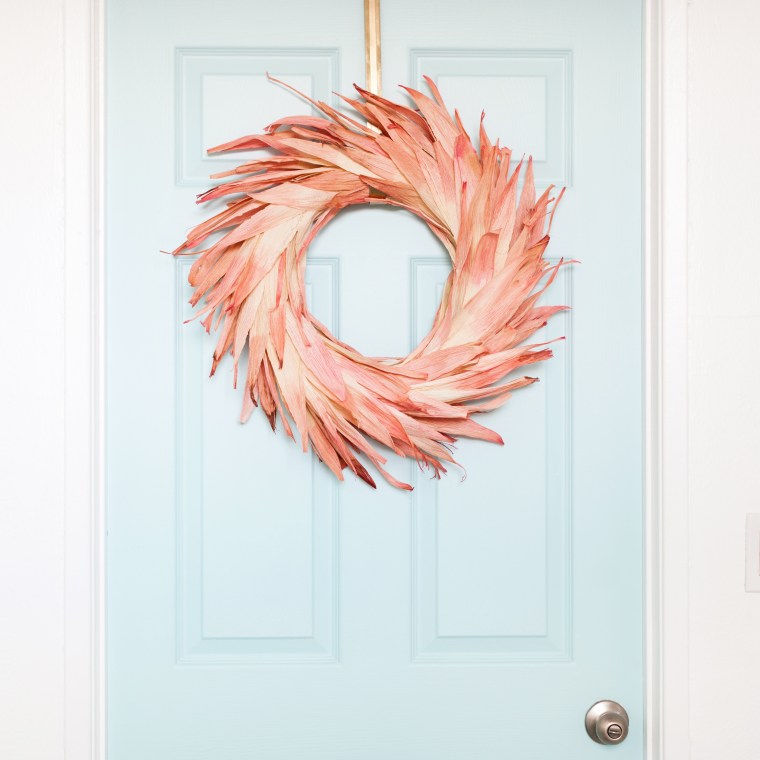
And that’s it! Easy peasy.
I love the way it looks like feathers! I’m in love with the way it turned out and will probably keep it up throughout winter too.
You guys, let me start by saying I’m bummed because I lost all of the how-to pics from this project when my old computer died, BUT I still wanted to share how easy it is to make your own curtains.
I couldn’t find any light blocking curtains that I liked for my bedroom so I took on the task of making my own. Curtains are the easiest thing to make if you can sew a straight line. All you need is enough fabric to make a panel long enough to fit your window and hem all four sides, leaving a big enough loop at the top to fit a curtain rod through. I found a really nice and inexpensive fabric in the perfect shade of buttercup yellow, but the problem was that it was too thin and let a lot of light through. We’re not morning people so this was a no-no. To remedy the problem all I did was lined my fabric with an old black out curtain from IKEA. Easy enough!
Doing that completely blocked any light from coming into my bedroom and also added some much needed weight and heft to the panel.
For some extra flair I added a strip of vintage looking rope fringe to the top.
Tada! Stay tuned for more bedroom decor updates and be sure to follow along on Instagram.
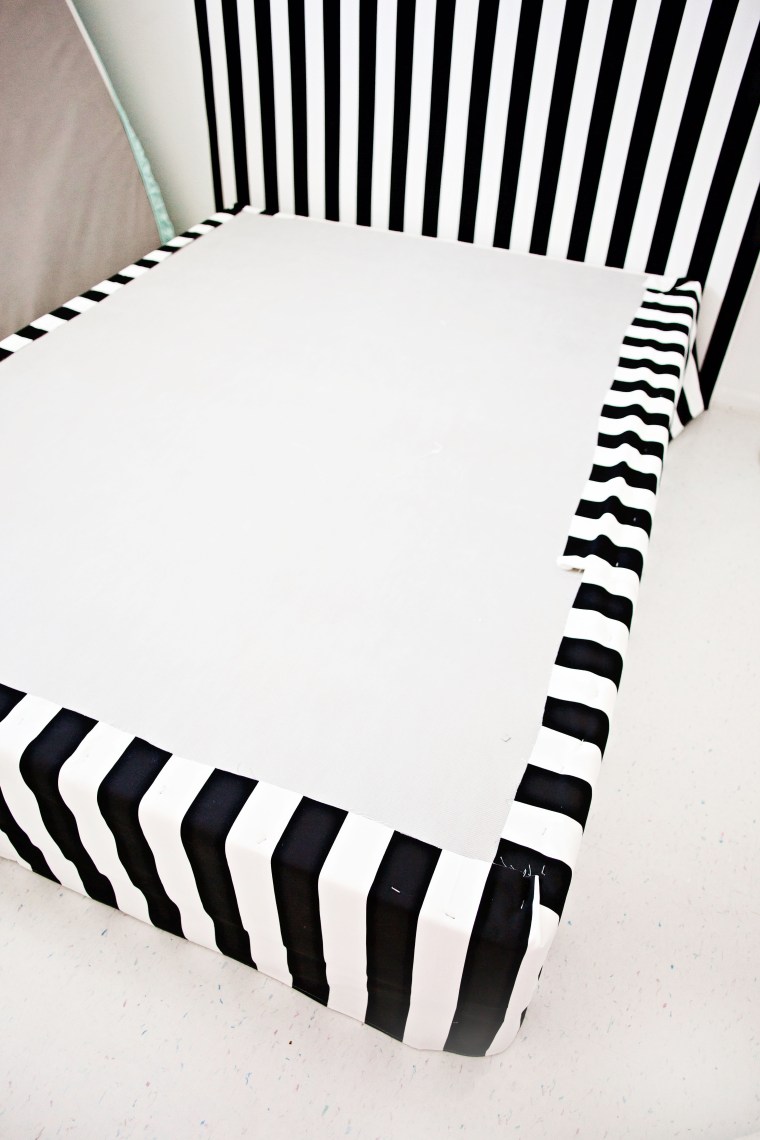
If you would have told me that finding a bed skirt would be the most difficult part of my bedroom makeover I wouldn’t have believed you. I thought I would just be able to pick up your run of the mill white skirt at any home goods store and be done with it. Nope. Of course not. Story of my life.
I had to exchange 3 bed skirts before deciding I was better off making one on my own. Either they were too short, too long, too sheer, or the wrong color. Who knew?! Luckily making your own custom bed skirt isn’t as hard as it may seem.
The first thing you need to do is figure out how long your skirt needs to be. Measure the distance from the top of your box spring to the floor. Then add 3-4 inches for seam and stapling allowance.Mine was at 16 inches, so I cut 20 inch long strips of fabric. The fabric is 58 inches wide, so I needed 3 of these strips in order to cover 3 sides of my box spring.Next you need to make the hem. Fold over the long edge at 5/8″ and press.
Then fold the raw edge under itself and press again. This creates a nice clean hem. Stitch at 3/8″. If you don’t have a sewing machine you can use iron-on hem tape.
Once that is done, stitch the strips together at the ends to create one long strip. Then staple the raw edge directly to the box spring, making sure the hem just barely touches the ground. If you don’t have a staple gun you can use flat head tacks.
Continue all around the box spring. The mattress should cover the staples and it’ll look like a normal bed skirt!
Finally, make your bed as usual and reward yourself with a nice nap.
For instructions on how I made the headboard, click here.
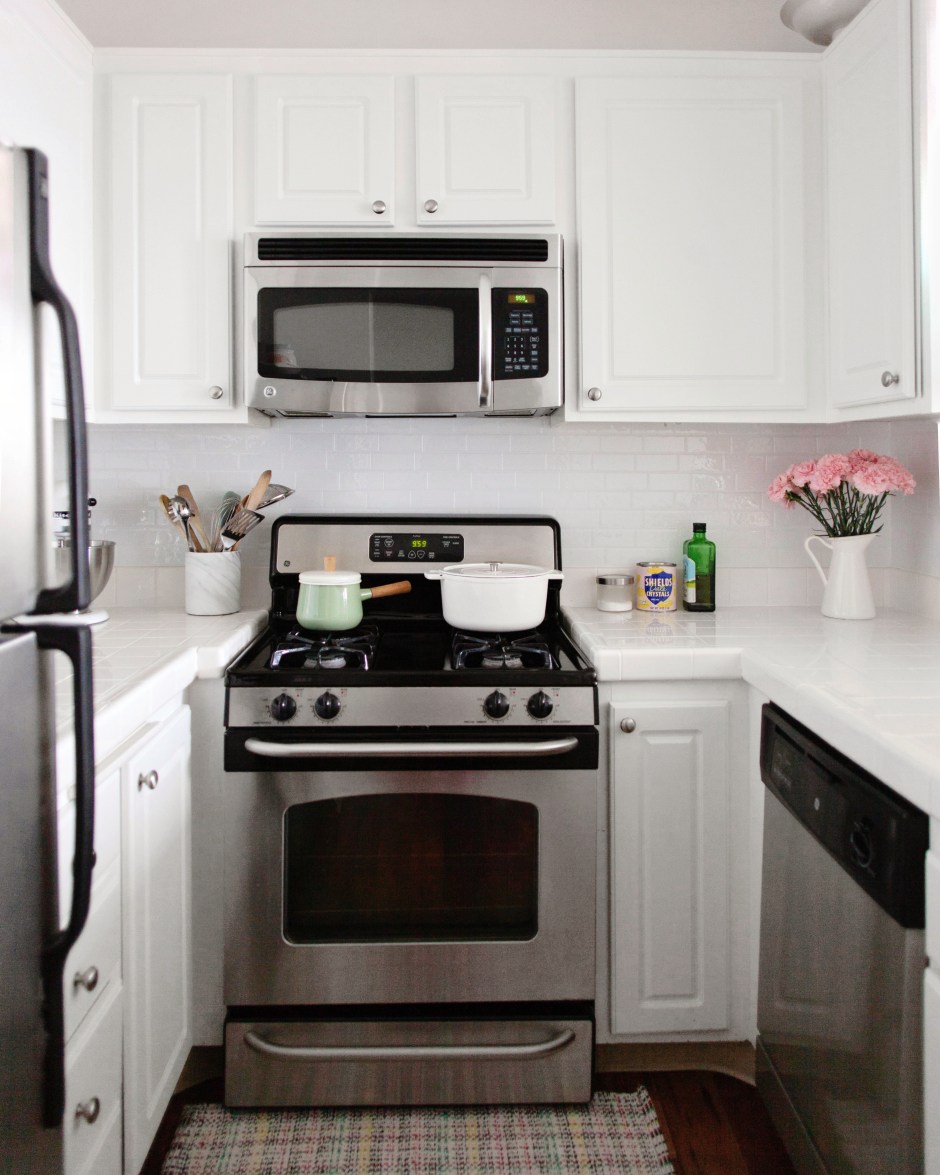
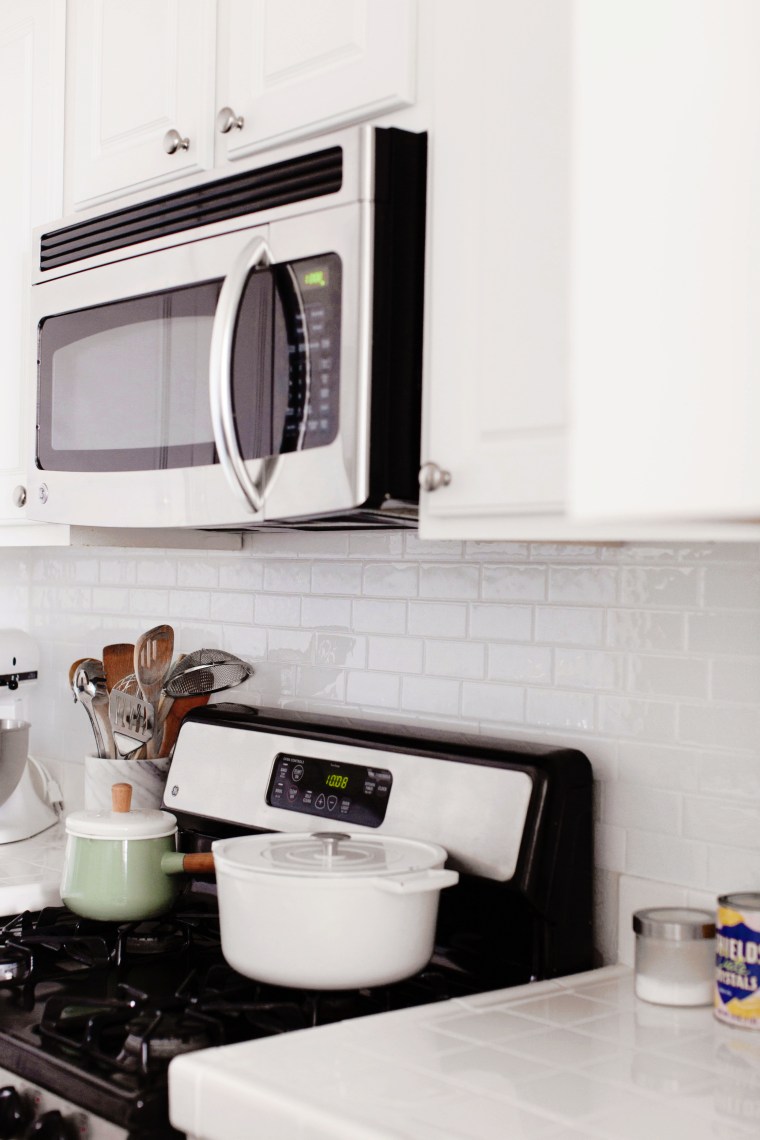
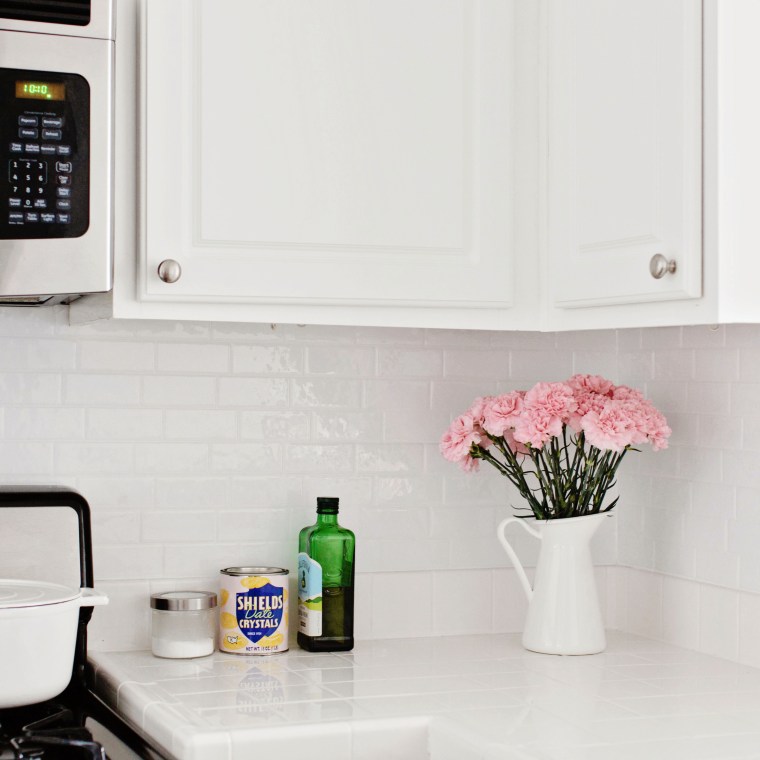
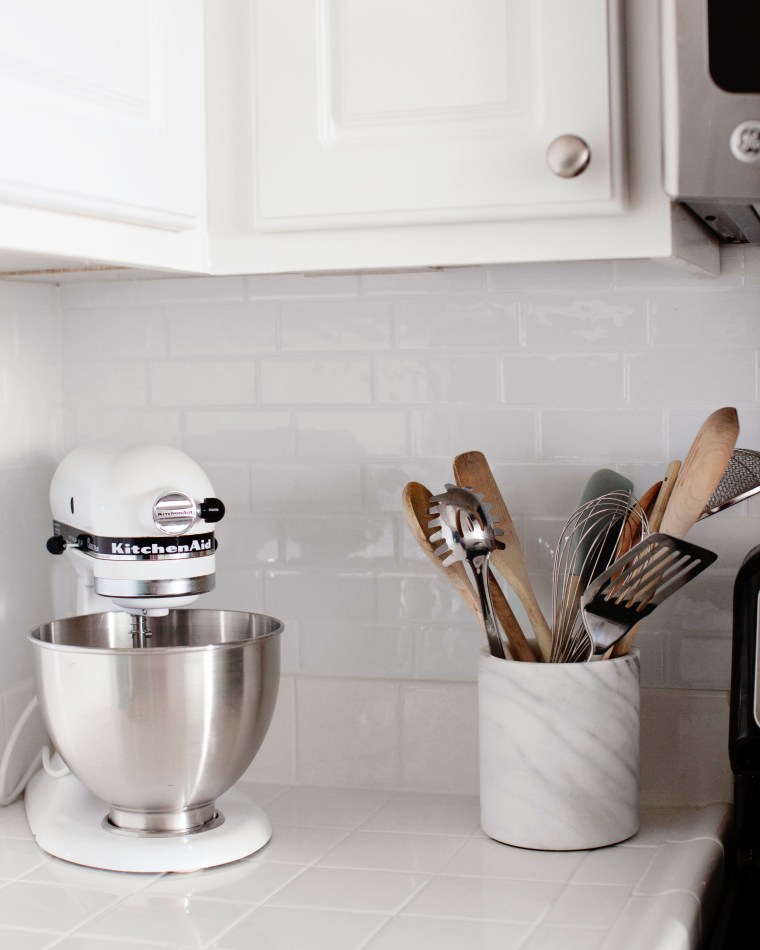
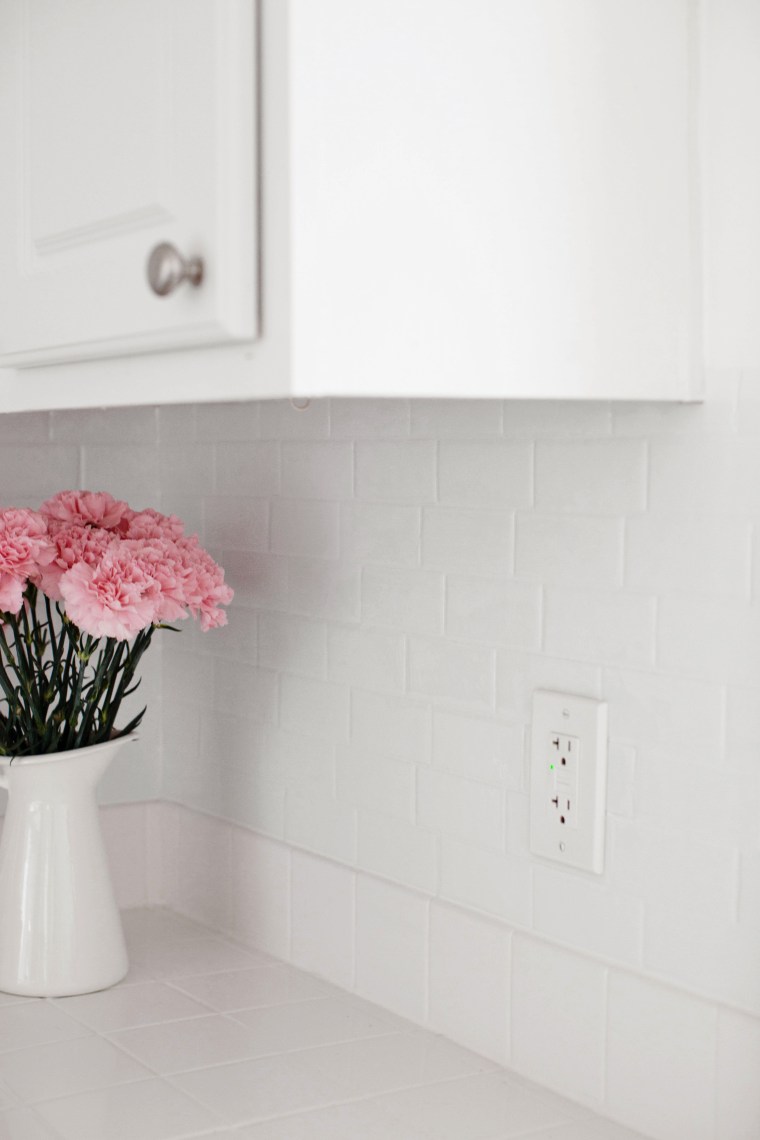
If you’ve been following me on Instagram and Snapchat you’ll probably remember that I installed a white tile backsplash in my rental kitchen a couple of months ago. I didn’t want to post details about it right away just in case the product didn’t live up to its promises, but I’m happy to finally report that it has been great!When deciding on a backsplash I had some important requirements that had to be met. I’ve mentioned before that I rent so anything I decided on needed to be temporary, easy to install, and easy to remove. I also didn’t want anything that looked too fake and wouldn’t hold up over time. I came across the Metro Blanco peel and stick tiles from SmartTiles that met all of my criteria and decided to give them a try.
They’ve been AWESOME. We use our kitchen a lot and I was worried they wouldn’t stick for long with all of the cooking and cleaning we do, especially behind our stove. So far they’re holding on strong and have held up to steam, 500 degree oven temps, pasta sauce splatter, and daily cleaning.
I could have taken progress photos but honestly, SmartTiles has wonderful installation videos that do it better than my photos could. All you need is a utility knife and a ruler. It’s really that easy.
They really have transformed my kitchen for the better. It no longer looks super basic and boring. My kitchen doesn’t get a lot of light, but these add some reflectivity and brighten up the space. (I had before photos but they got lost on my dead computer. Sad.)
My friends and family couldn’t tell that they weren’t real until I told them. They’re usually brutally honest with me so I can trust them.
One of the main challenges I always have while decorating my apartment is finding the decor I envision, at the prices I want. Neither of those are ever easy. Either I can’t find what I have in mind, or when I get close, somehow it’s the most expensive item in the store. I can drool over those high ticket items all I want, but let’s get serious, I’m no Rockefeller.
But it’s ok! This is where my handy-dandy DIY skills get to shine. This is where I get to do my favorite task of trying to figure out how to get the look I want for as little money as possible.
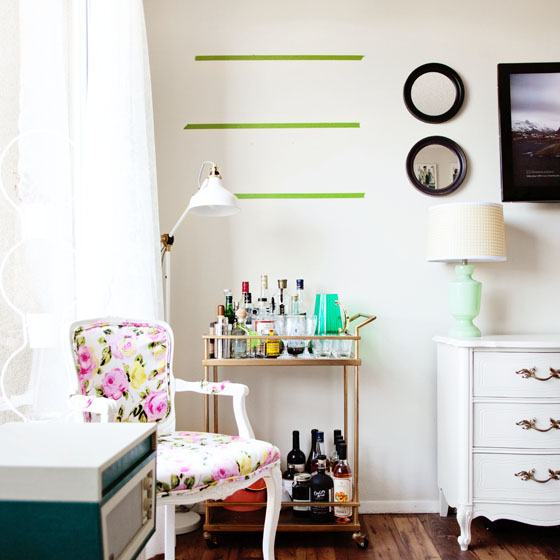
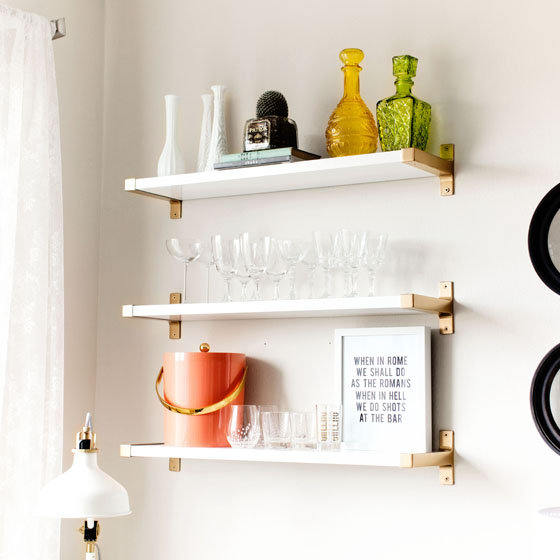
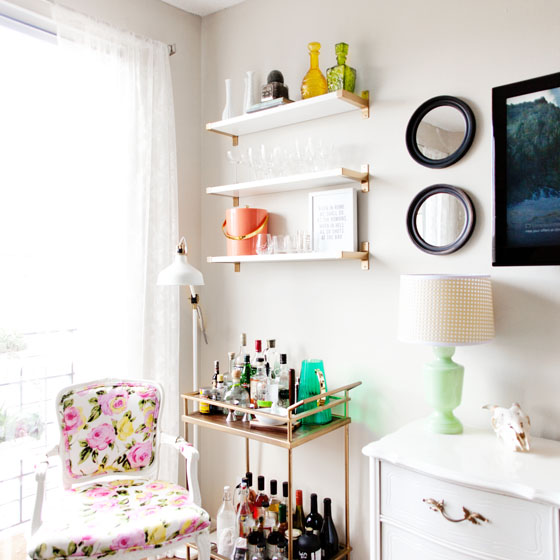
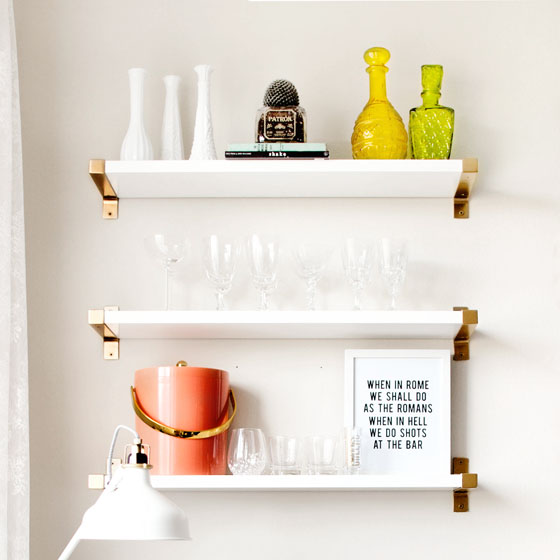
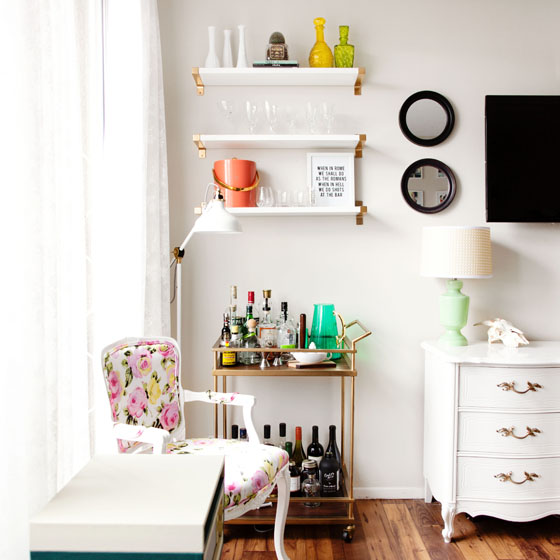
For example, I wanted to expand my home bar area by adding 3 shelves above my bar cart. I wanted them to be gold to match said bar cart. My search pretty much turned up empty except for one option that was almost the right dimensions (from a store that will remain nameless) for over $100 per shelf. My other option was an IKEA favorite of mine that I’ve been keeping my eye on for a bit, and it just so happens that the EKBY JÄRPEN/EKBY BJÄRNUM combo was the perfect size, style, and price I was going for. The only drawback was that the brackets are only available in aluminum. Womp, womp.
EASY FIX.
The right choice for me was clear and I’m glad I made it. Did I want to spend $300 on shelves from Unnamed Store, or around $60 for IKEA shelves and a can of spray paint? Um. DUH. The way I see it is if I can spend $60 total on a DIY version and use the extra $200+ toward other fun things like going away for the weekend or, I dont know, paying my bills, you’re damn straight I’m taking that route.
Let’s all just take a moment to reflect on the magic of spray paint. All I did was spray the brackets and screws with metallic gold chrome paint and it completely changed the vibe of the shelves. Done and done. So easy.
I styled them with the help of my growing glass and bareware collection, and a DIY framed print.
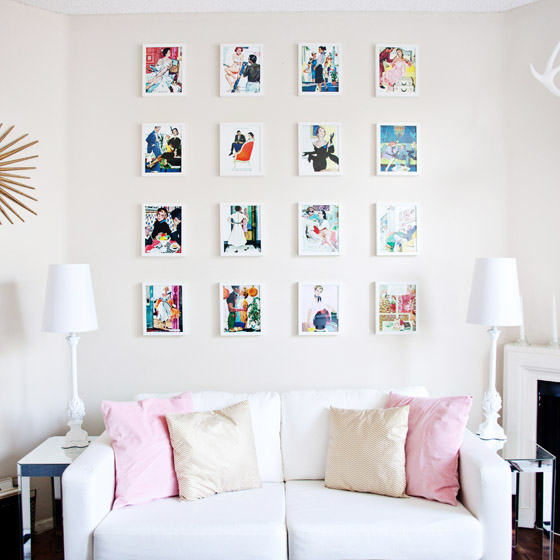
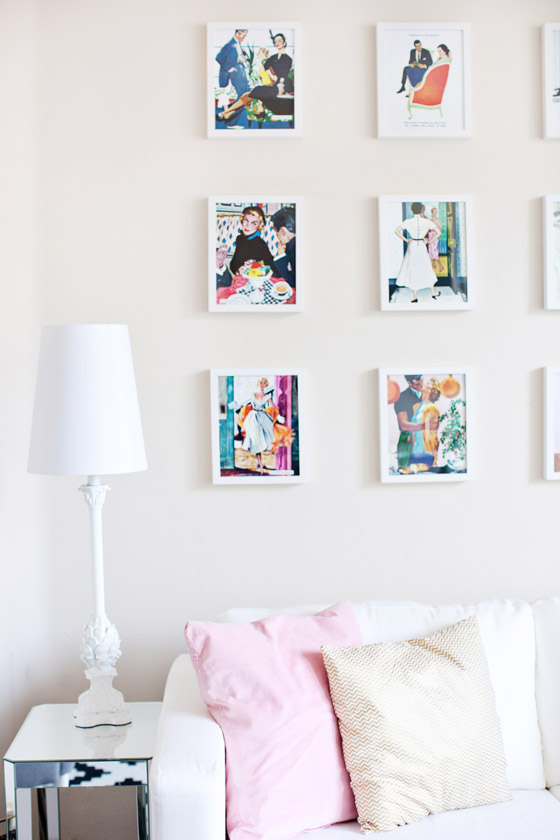
I’m always changing things up in this small, little apartment of mine. I was craving a little more color on my living room walls, so I planned on ditching the large abstract canvas and doing a gallery wall instead.
I’d been thinking about doing a gallery wall for awhile but art, even prints in the quantity I needed, were turning out to be too expensive for my project’s budget. I’m a big fan of vintage illustrations like the kind you’d find in The Saturday Evening Post, so when I came across a bunch from the 1950s, I ran to get frames immediately. Ok, more like power walked.
Gallery walls can be scary! Whether you’re doing a random pattern or lining them up strategically, putting that first hole in the wall is scary business when you’re not sure if you’re going to like how it’s all laid out once it’s up there. I hate patching nail holes more than anything, and I don’t even know where the touchup paint is, so I had to get this right the first time.
One of my favorite tips for creating gallery walls is to cut pieces of paper to the size and shape of your wall decor. Mark where all of the nails should go, and tape the paper pieces up on the wall to get a better idea of where everything will go. I rearranged my pieces at least 4 times until I got a spacing I was happy with. Measuring is fine, but I like to actually see everything up on the wall before I start making holes. Once I was happy with it, all I needed to do was hammer the nails into the pre-marked paper.
I hung every picture up and used a level to make sure they were all straight and in line, because when one is out of place everything looks wacky. That’s something I’ll probably have to go back and do every once in awhile but it’s SO WORTH IT. If you have a problem with your pictures staying straight, try using a little piece of gum tack on the back corners of the frame.
The illustrations add a lot of fun color and fun vintage character into the room. I’m definitely happy with it.
I have this problem where I envision something that I want and either it doesn’t exist or the closest thing I can find costs, like, a million dollars and still isn’t exactly what I had my heart set on. I have another little problem where I see something generic in a store and immediately start planning how I could change it to fit my personal style and make it, well, less generic. This happens way more often than you’d think. I’m all “Blahblahblah we can paint it and then cut this off and then maybe screw these together…” My husband stares at me for awhile before voicing his concerns, which I usually just brush off, and reply with a casual “It’ll be fiiiiine.”
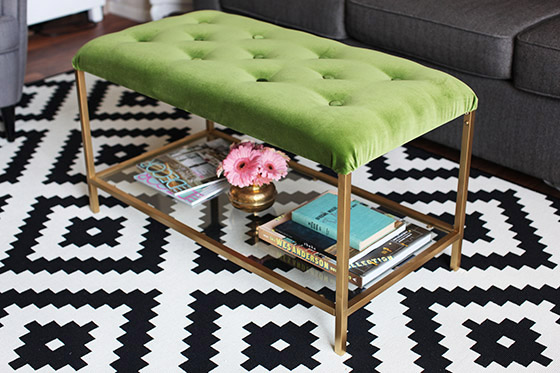
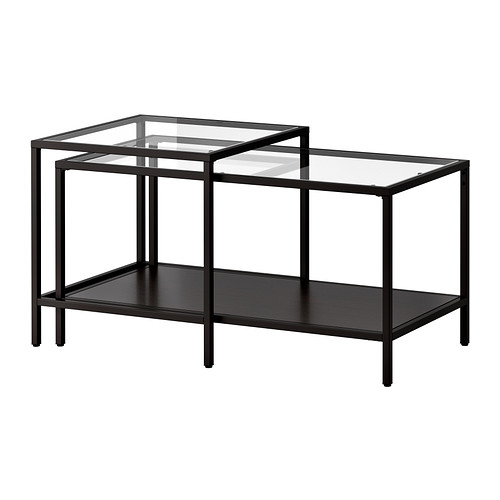
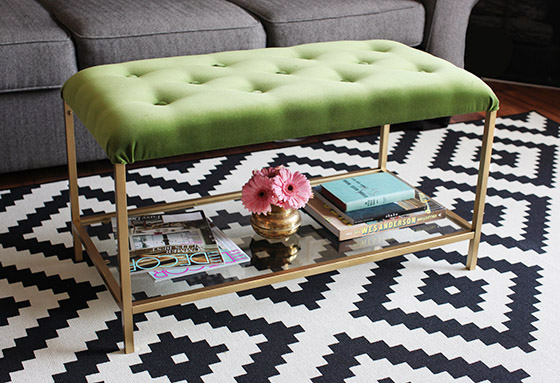
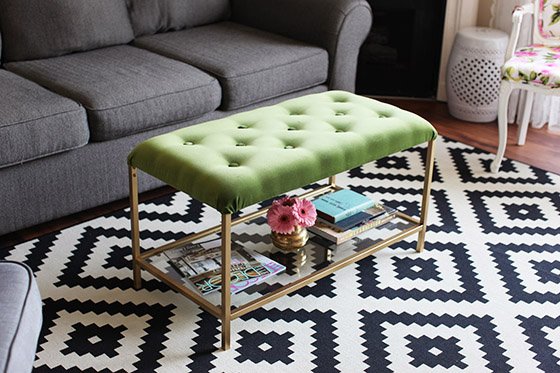
And that’s what happened this time. I wanted a cocktail ottoman to use as a table and footrest, in some great color, probably tufted, with a little gold to tie in with the rest of the room. Couldn’t find it. When I saw the surprisingly sturdy VITTSÖ nesting tables at IKEA I instantly knew how I was going to make it happen. I would just need to upholster…and paint…and drill a little. NO BIGGIE. No, seriously, it’s a lot easier than it sounds.
I’m saving the smaller one for later.
Finding the perfect fabric was actually the most annoying part. I went to 4 different fabric stores before I found the perfect green velvet at Deco Home for $80/yard. Totally worth it. It’s durable and lovely and perfect for a project like this. Exactly what I wanted.
ANYWAY, I’ll get down to it.
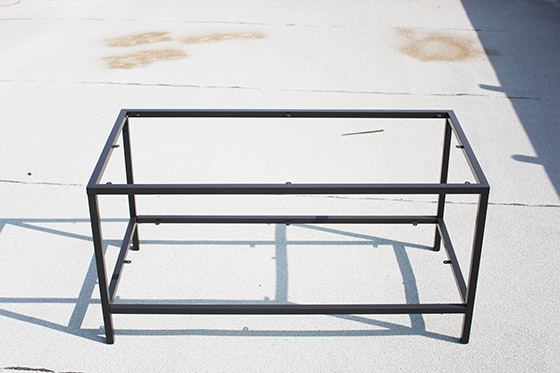
I put together the frame of the table and sprayed the entire thing with metallic gold spray paint. You can use whichever gold you like.
I sprayed all the hardware and those little glass cushion sticker things gold, too.
I picked up one yard of 2″ thick foam from the craft store and cut it to the size of the table. Using a sharp knife or blade makes it super simple. Just run the blade through a couple of times. You should maybe put cardboard or something down so you don’t slice up your floor.
The larger table in VITTSJÖ nesting tables set has a glass shelf on the top and a wood (MDF) shelf on the bottom, but since this is a hack, I switched them. Why? Because I needed to use the MDF for upholstering and tufting purposes. The glass shelf would be for holding books and cute decorative items while keeping a clean, floaty look.
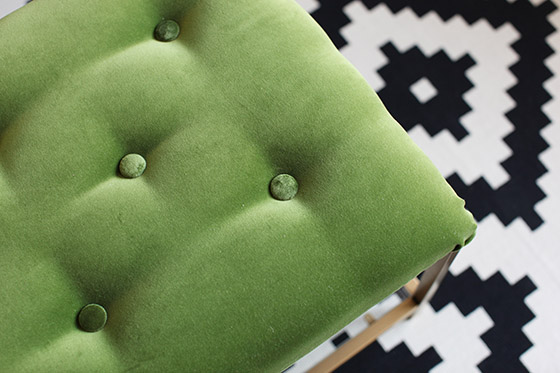
After that I did some really annoying measuring and marked where I wanted my buttons to go. Ugh. Math is hard.
Then I used the multi-purpose drill bit on my Dremel to make the holes where I’d be pulling my tufting cord through.
I covered the foam and board in batting and my velvet. I pulled the fabric tight enough to round out all of the edges. The corners were tricky because of the metal nub where the top connects to the rest of the table. I just sliced the corner piece of fabric, pulled the fabric back around the piece of leg, and then stabled it securely into place. When I connected the pieces back together I just tucked any raw edges that were showing.
At this point you can leave it how it is or you can get fancy with tufting. I did a shallow tuft since this will be used as a table sometimes and I don’t want my serving trays to lay all wonky and wobbly on top. I also don’t want to be digging crumbs out of deep tufting craters after every shindig.
These regular button covers are fine but if you’re using a thick fabric you might need to put in a little extra effort.
Instead of securing the fabric with the back of the button like you normally would, you might need to sew the fabric closed on the back using a heavy duty thread. I use “outdoor coat” thread. It works perfectly.
Thread a large upholstery needle with the polyester cord.
Find your holes on the bottom side of the board and push your needle through as straight as possible. Pull one end of the cord through to the top.
Use the needle to go through the back of the button and pull the end of the cord through.
Then put the needle back through the hole to bring the cord end back through to the bottom side.
Pull the cord tight and secure with staples. Stapling in multiple directions makes sure it doesn’t slip over time.


 Here are a couple of my favorites.
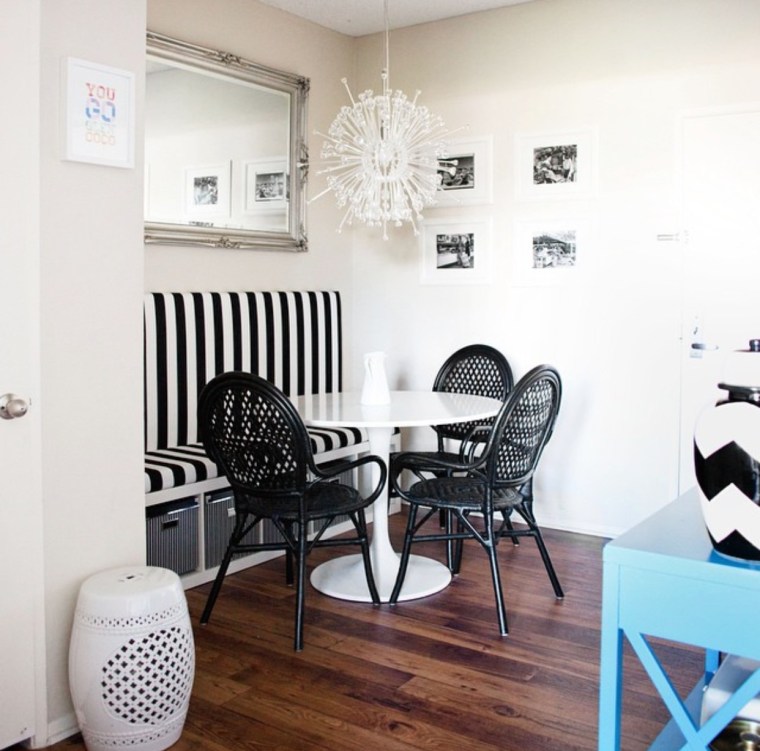

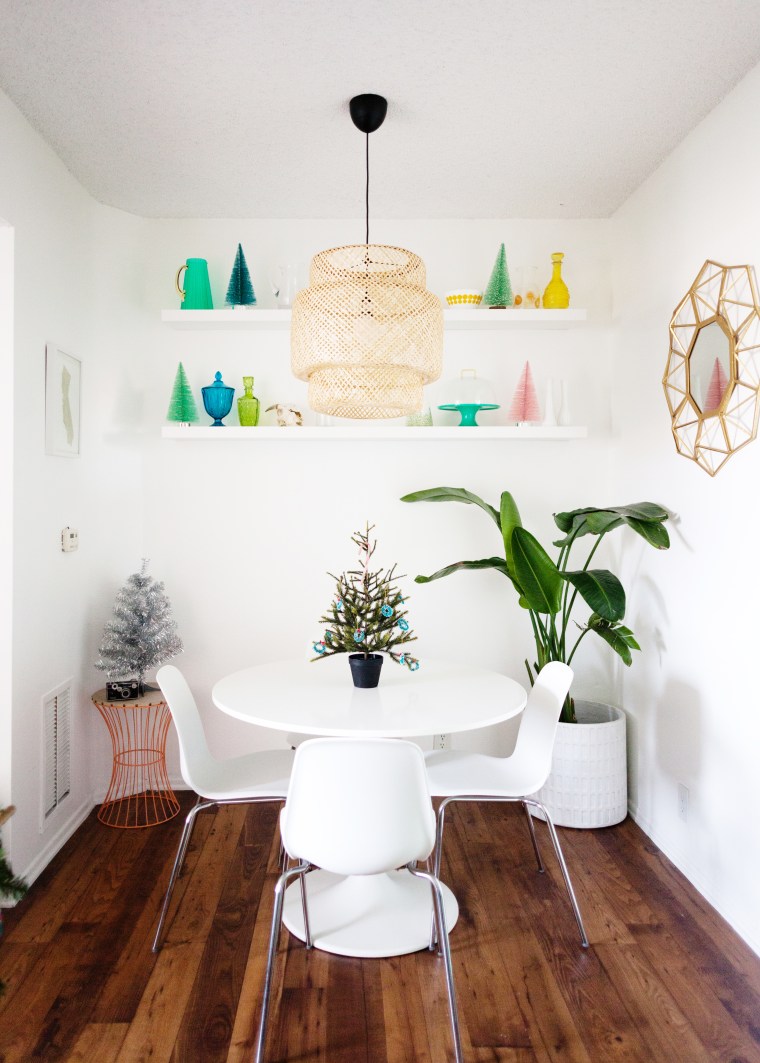 In the dining room I used large bottle brush trees from Target to decorate my shelves and then stuck in two more baby trees for good measure.
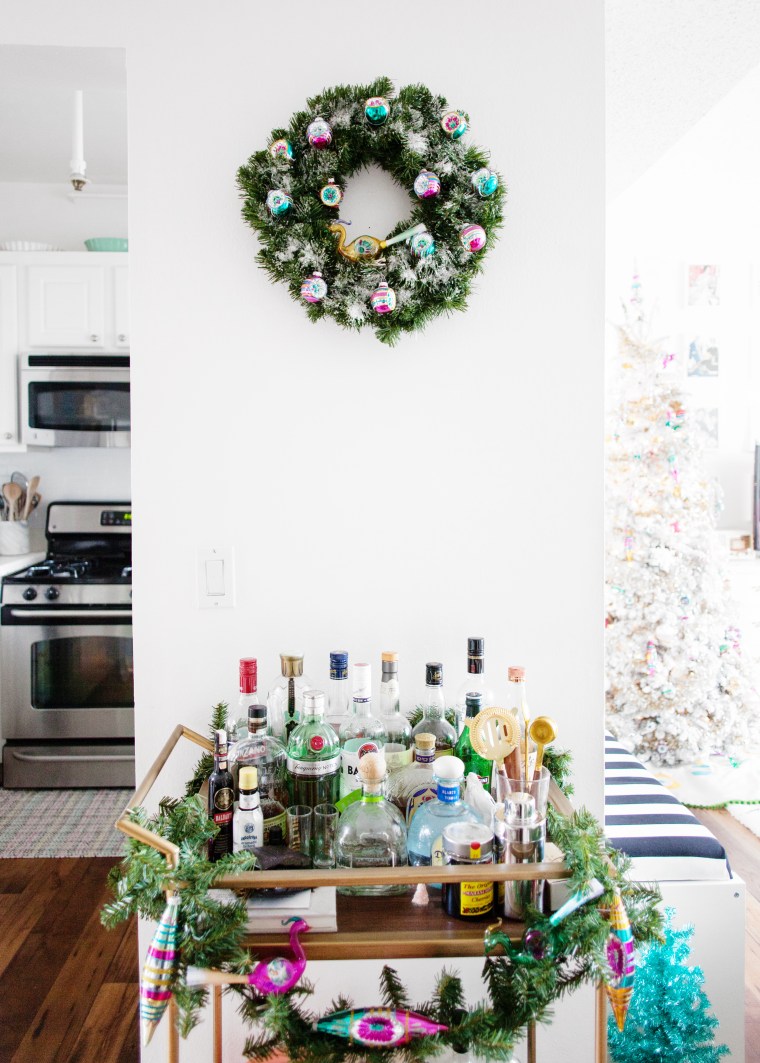 I got a little more festive on the adjacent bar, of course. I used Shiny Brite ornaments and epsom salts to dress up a cheapy $5 plain wreath and garland.
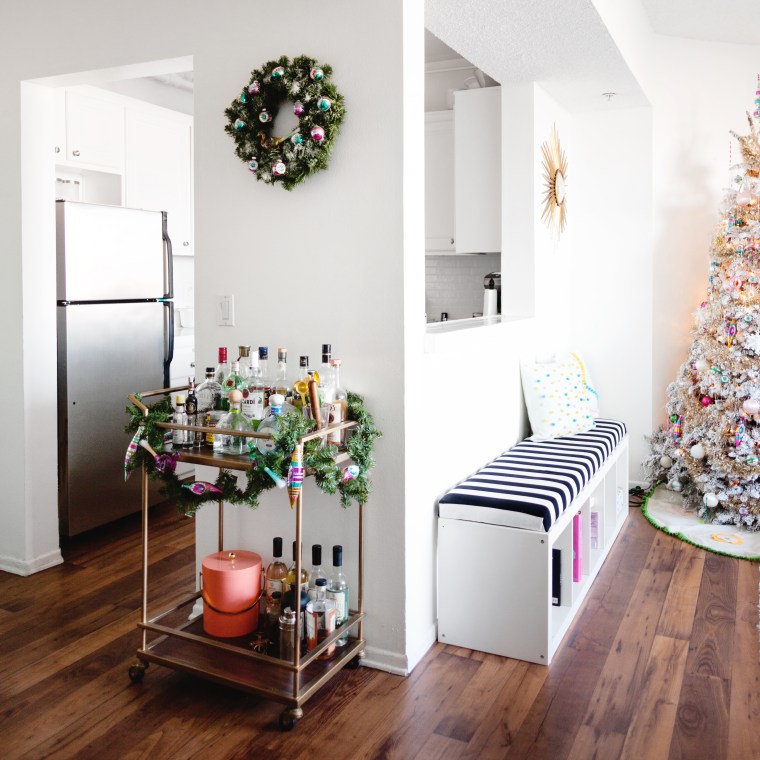
 The living room is definitely the most festive place in the apartment! I spy a
 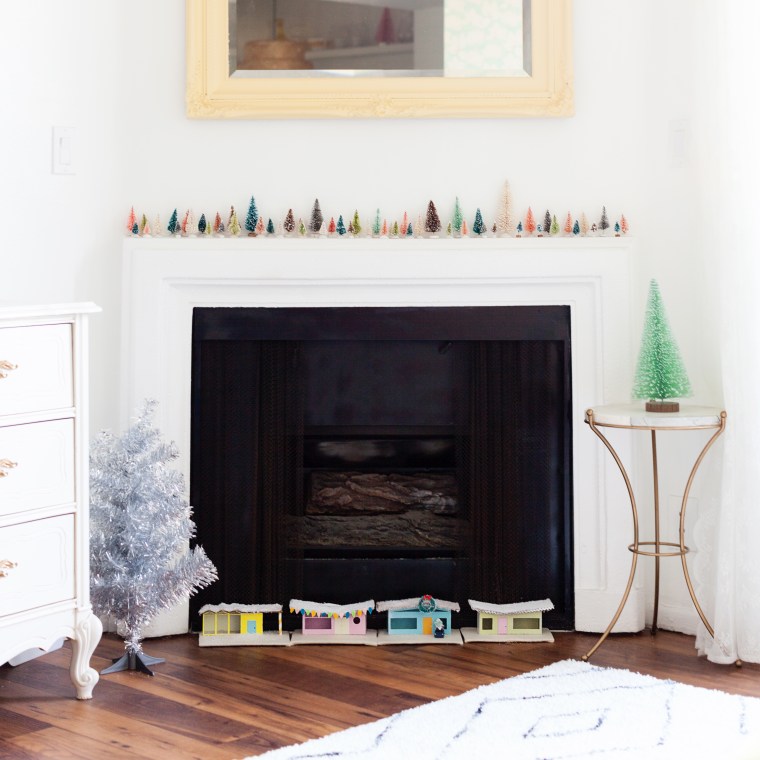 I also decorated the fireplace with my collection of bottle brush trees and
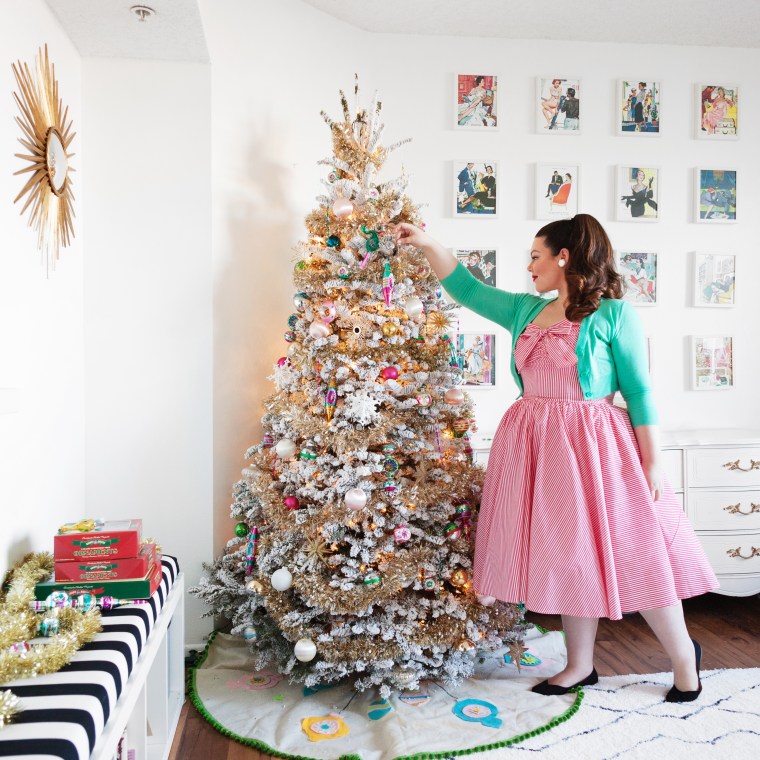 And then there’s
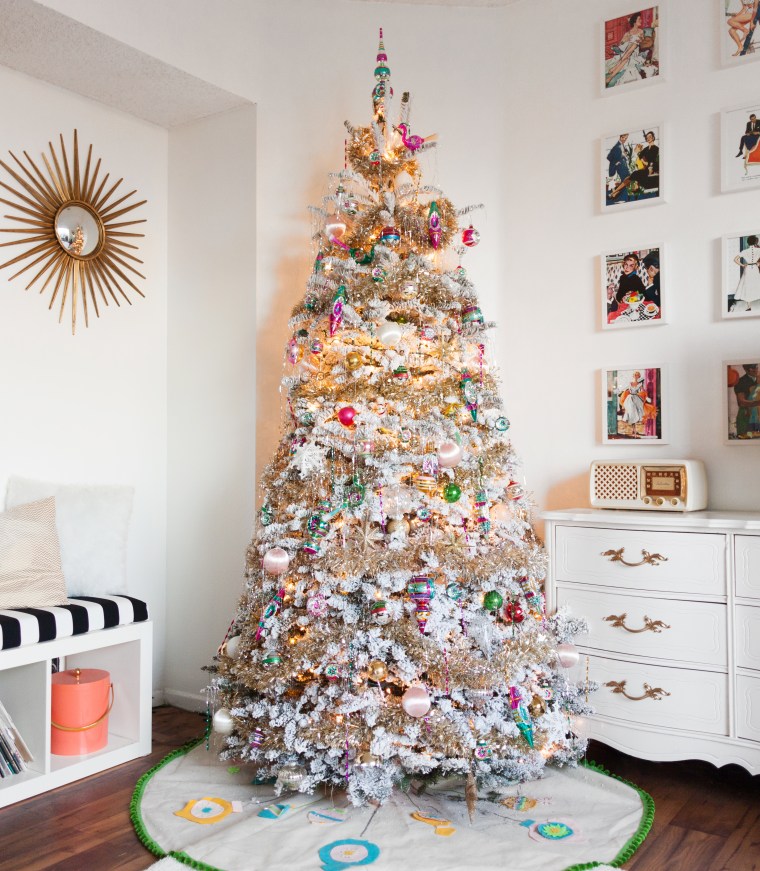
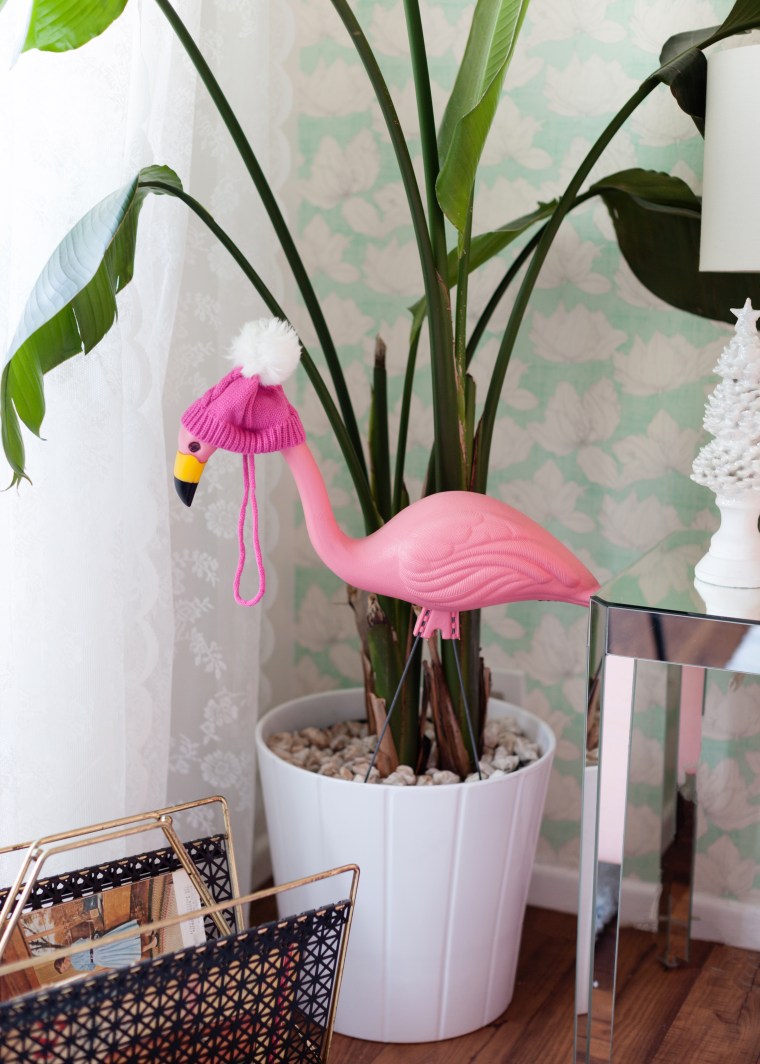 I got this hat for my dog but she hates it so Frank the flamingo got a festive little makeover.

 Sew the pieces together at the sides, leaving one side open.
 Doing that completely blocked any light from coming into my bedroom and also added some much needed weight and heft to the panel.
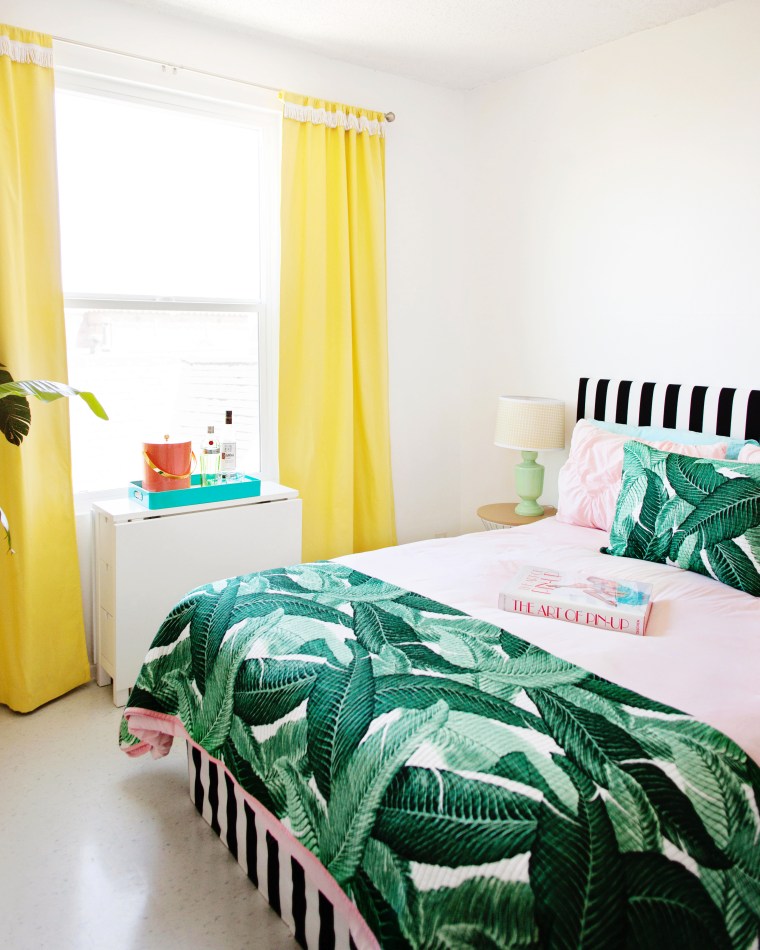 For some extra flair I added a strip of vintage looking rope fringe to the top.
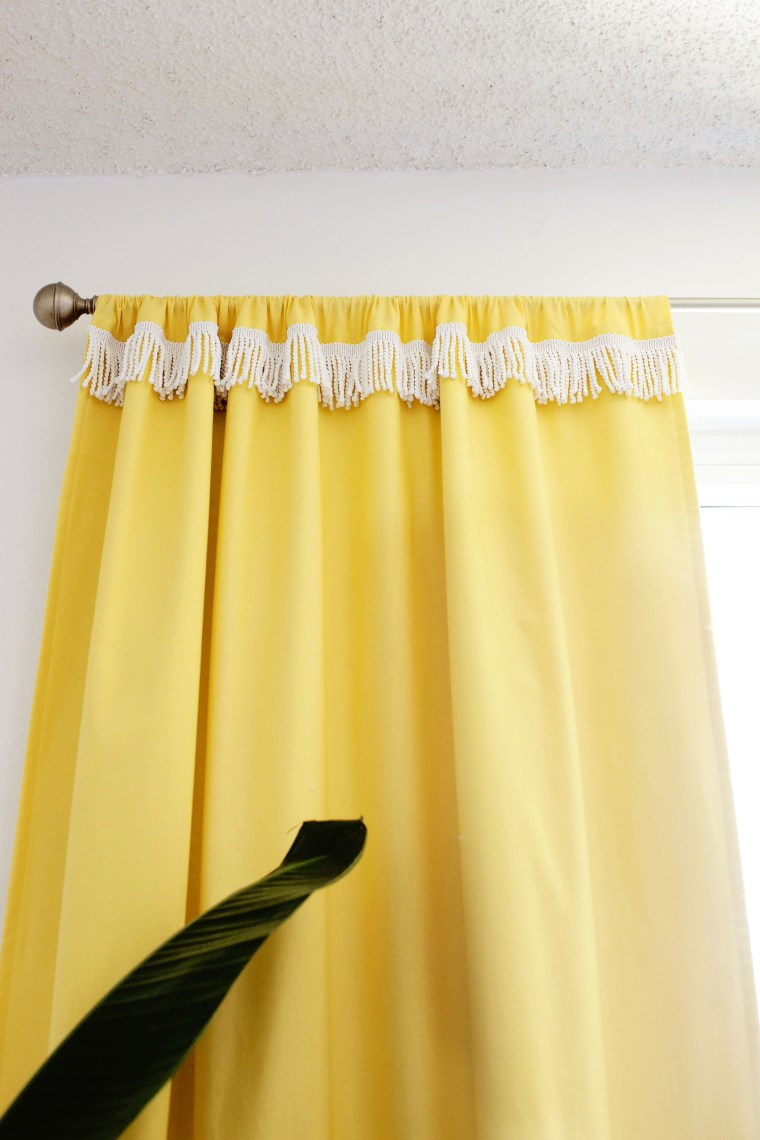
 Tada! Stay tuned for more bedroom decor updates and be sure to follow along on
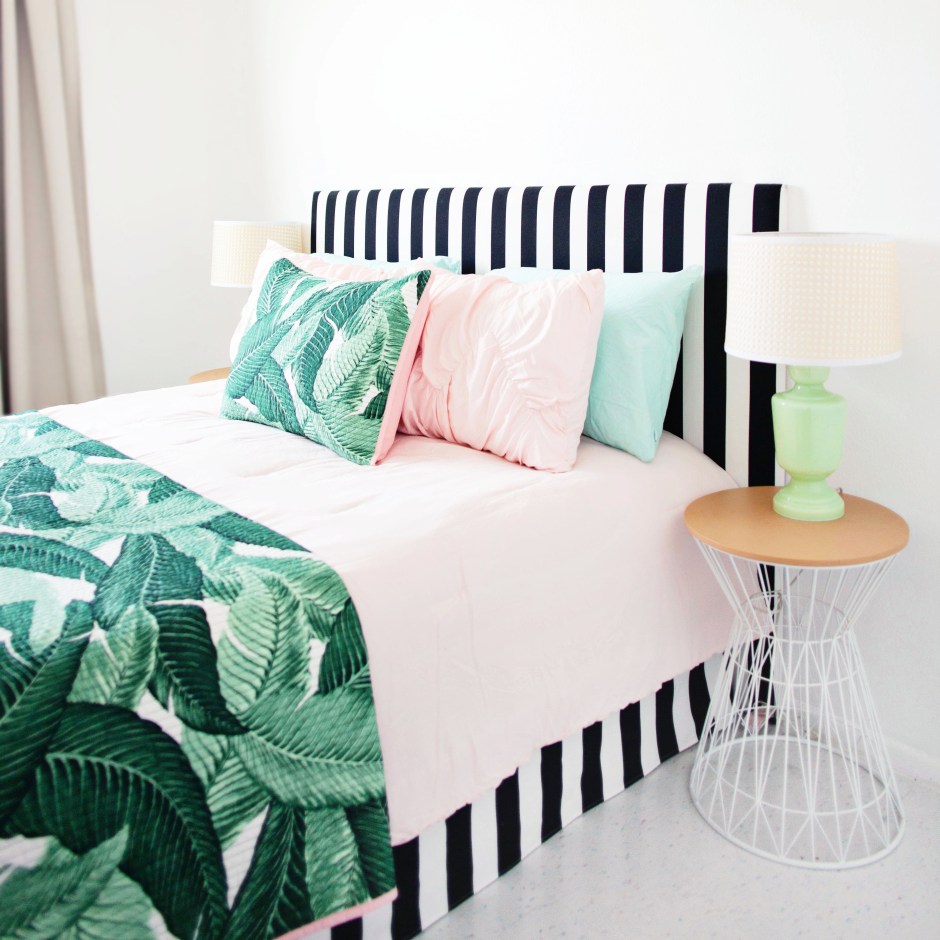
 The first thing you need to do is figure out how long your skirt needs to be. Measure the distance from the top of your box spring to the floor. Then add 3-4 inches for seam and stapling allowance.
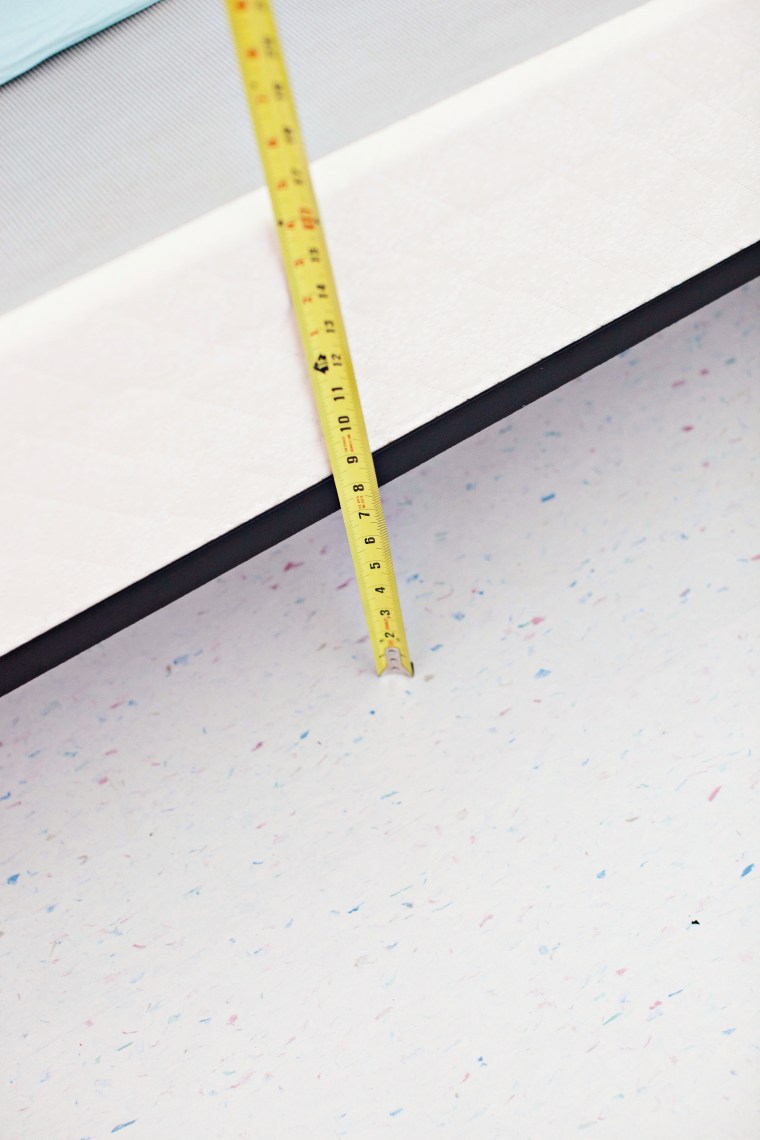 Mine was at 16 inches, so I cut 20 inch long strips of fabric. The fabric is 58 inches wide, so I needed 3 of these strips in order to cover 3 sides of my box spring.
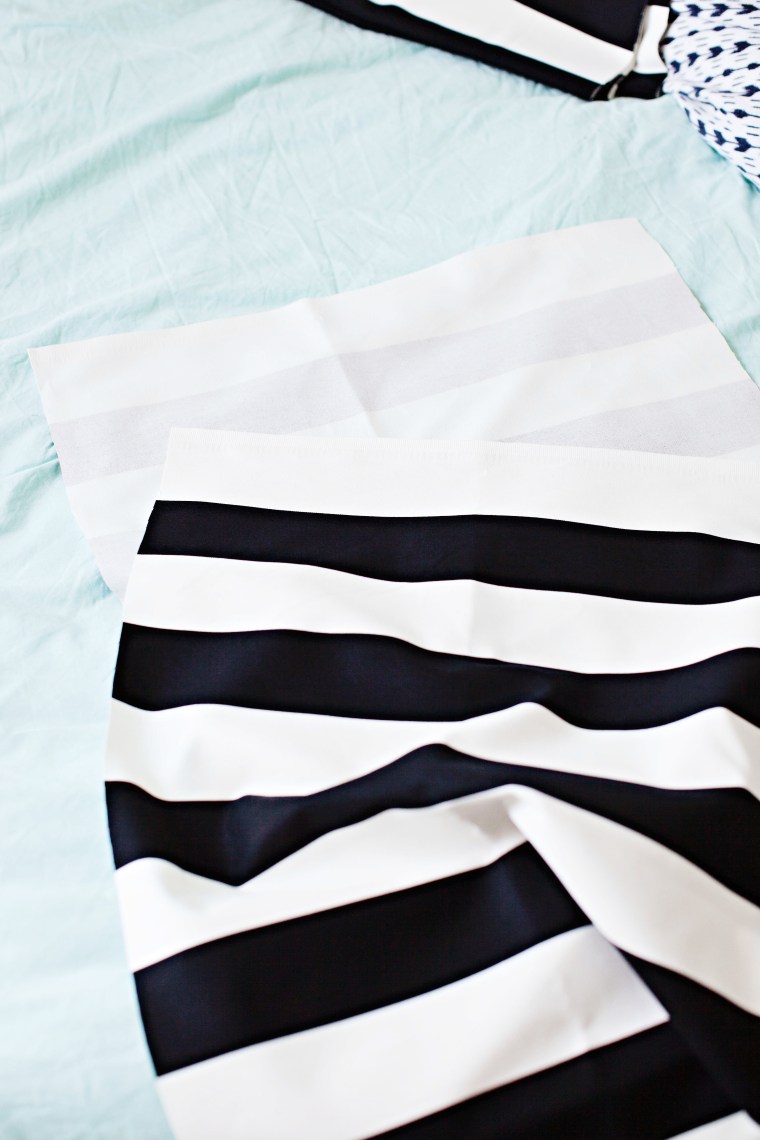 Next you need to make the hem. Fold over the long edge at 5/8″ and press.
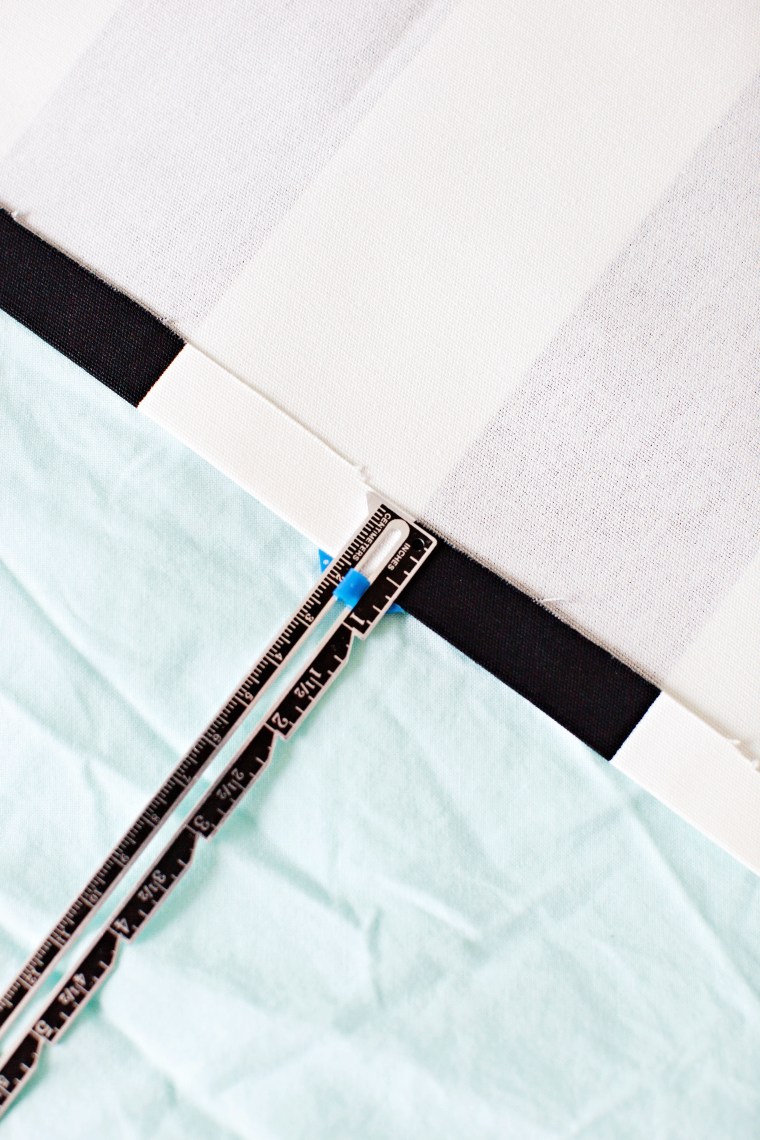
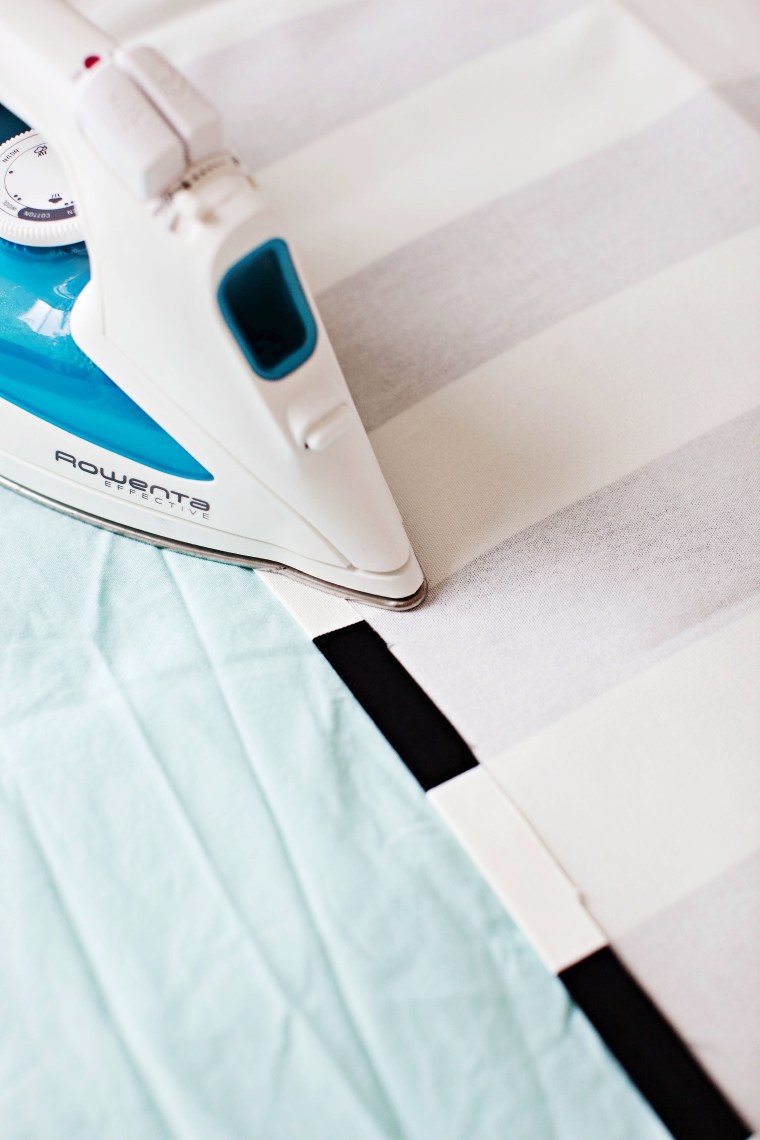 Then fold the raw edge under itself and press again.
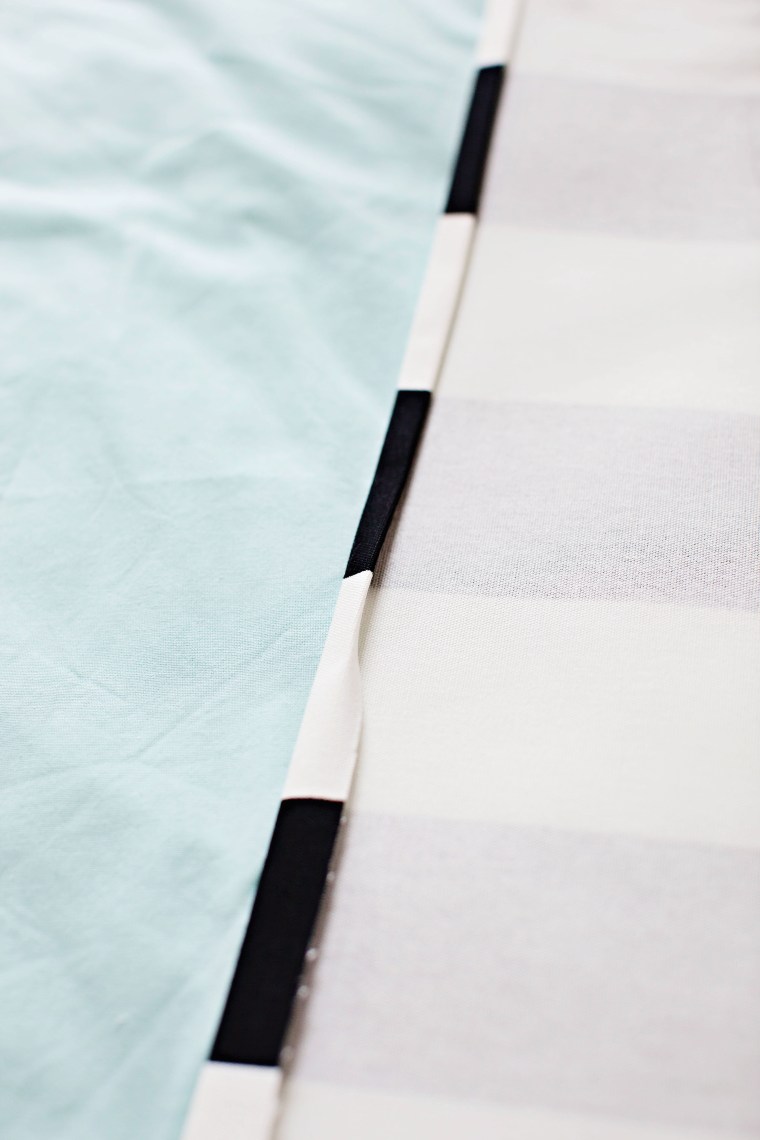 This creates a nice clean hem. Stitch at 3/8″. If you don’t have a sewing machine you can use iron-on hem tape.
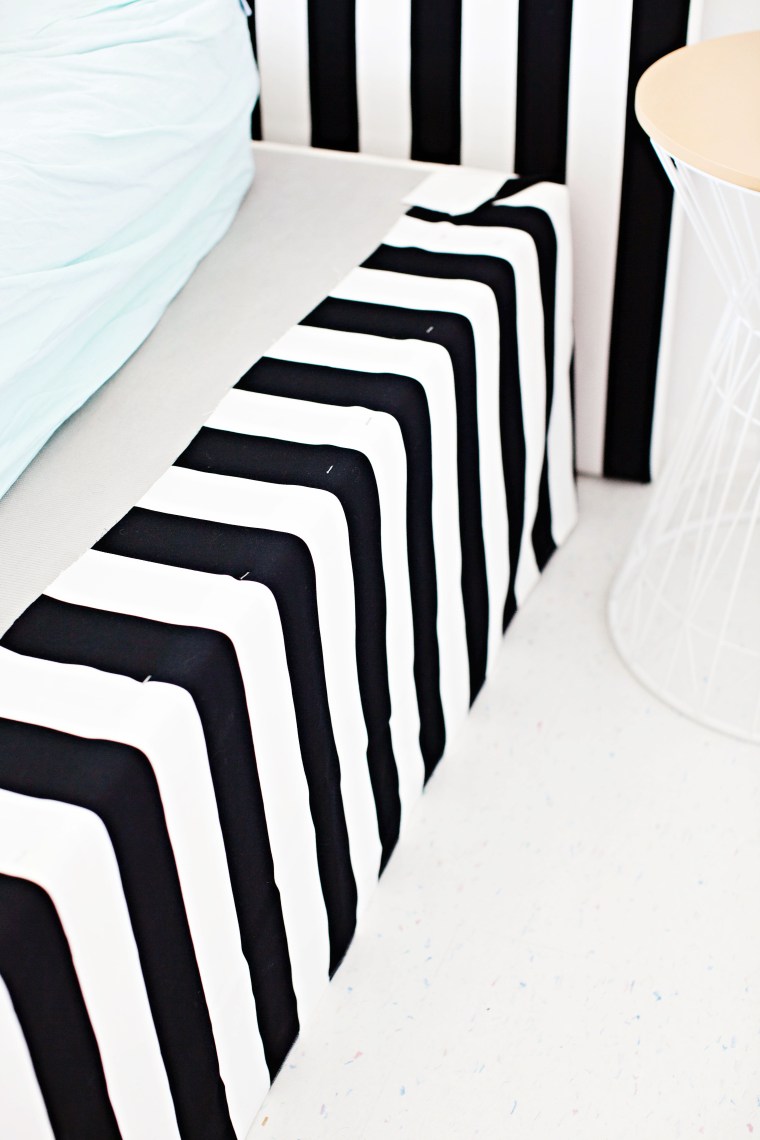
 Continue all around the box spring. The mattress should cover the staples and it’ll look like a normal bed skirt!
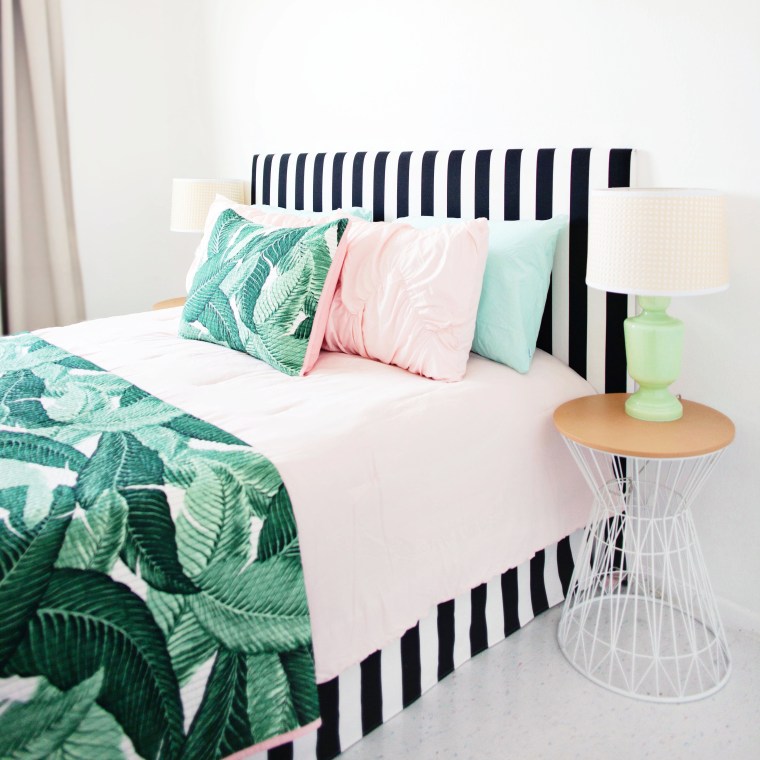 Finally, make your bed as usual and reward yourself with a nice nap.