DIY Mini Pumpkin Pie Thanksgiving Drink Stirrers

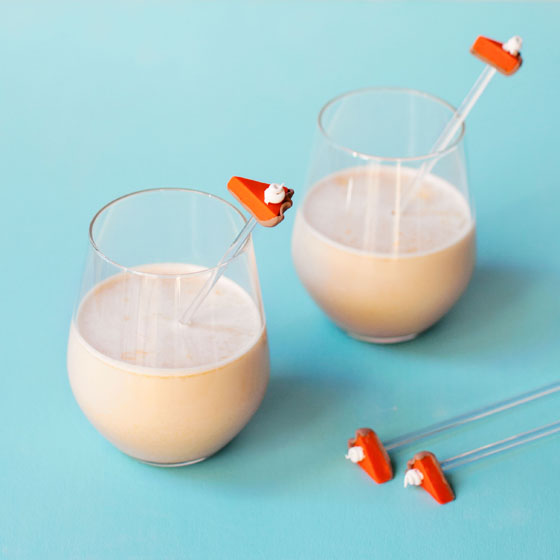
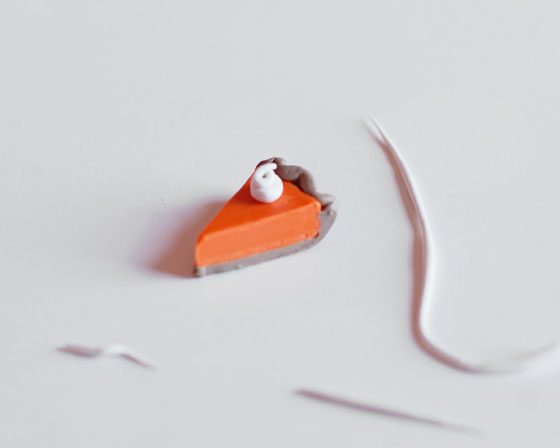
There’s nothing I love more than kitschy holiday decorations and cocktail accessories are no exception. What do you think of when you think of Thanksgiving? Pumpkin pie, right? Me too. That’s why I made these adorable mini pumpkin pie drink stirrers for all of the autumnal cocktails I’ve been drinking (specifically this spiced pumpkin pie nog cocktail).

DIY Pumpkin Pie Drink StirrerI love making miniature things out of clay. It’s so…therapeutic. These mini pumpkin pies were particularly easy and fun. Here’s how I did it.

What You Need:
Oven-bake Clay (orange, brown or tan, and white)

Plain 6 inch Drink Stirrers

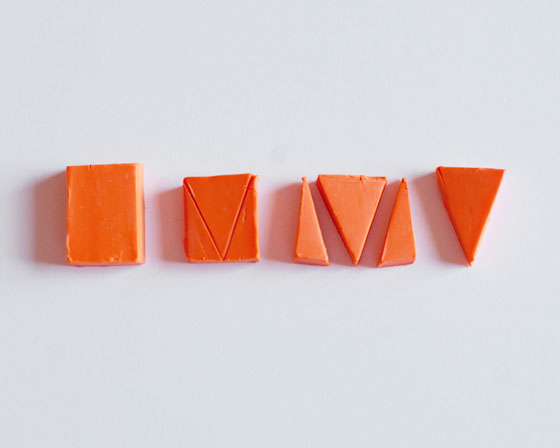
First I cut out triangles out of orange clay. The easiest way to do this was to use a small, sharp knife to cut a 7cm think piece of clay to a 25cm x 20cm rectangle. Then cut it into a triangle.
Mini Pumpkin Pie Drink Stirrer

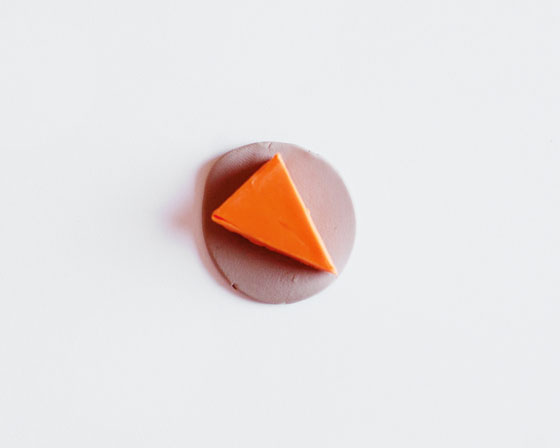
Mix some brown clay with a little white to get your desired shade of brown for the pie crust. Roll it into a ball and press it out into a 3cm thick disc. Place the orange triangle onto the disc.

Mini Pumpkin Pie Drink Stirrer

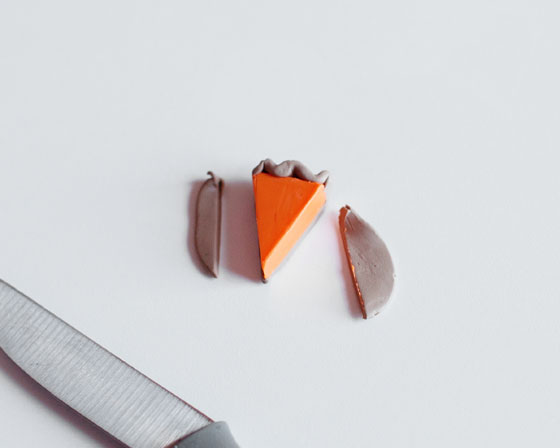
Pull up and flute the clay to create the crust.

Mini Pumpkin Pie Drink Stirrer

Then cut the remaining clay off.

Mini Pumpkin Pie Drink Stirrer

Roll white clay into snake-like shapes and spiral it onto itself to make a dollop of whipped cream.

Mini Pumpkin Pie Drink Stirrer

Next, use a cocktail stir to make a hole on the bottom of the clay pie.

Mini Pumpkin Pie Drink Stirrer
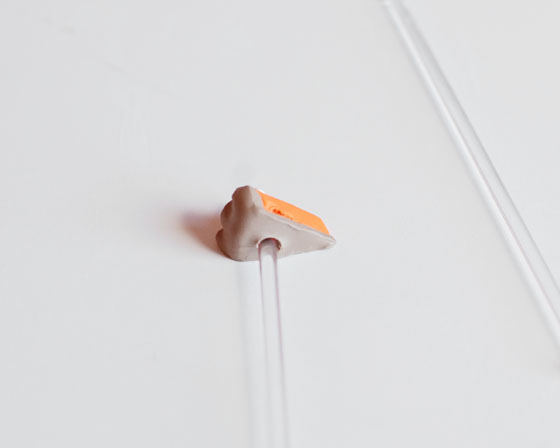
Remove the stick and bake at 275 degrees fahrenheit. Mini Pumpkin Pie Drink StirrersUsing a little super glue, replace the cocktail stick into the pre-made hole.

And that’s it! Adorable, right? I got carried away and made a bunch of these as gifts. Happy drinking!

DIY Pumpkin Pie Drink Stirrer

Halloween Devil’s Booze Cake Recipe

If you’re in the mood for something super rich, chocolate-y, and boozy for your Halloween shindig, I’ve got the perfect cake for you. It’s a chocolate cake soaked in coffee flavored vodka, with gooey dulce de leche in between the layers and on top, and finished with black sea salt. It basically tastes like a boozy candy bar. In the words of Ina Garten, “How bad could that be?”. It’s perfect for Halloween! Or for when you’re generally feeling dark and want to eat your feelings, have PMS, etc. This cake has no limits, but it really is most perfect for Halloween.

Let’s bake.
Devil's Booze Cake Recipe via Melodrama
This recipe was adapted from Beatty’s Chocolate Cake

Butter, for greasing the pans
1 3/4 cups all-purpose flour
2 cups sugar
3/4 cups cocoa powder
2 teaspoons baking soda
1 teaspoon baking powder
1 teaspoon kosher salt
1 cup buttermilk, shaken
1/2 cup vegetable oil
2 extra-large eggs, at room temperature
1 teaspoon pure vanilla extract
1 cup freshly brewed hot coffee
2 cans sweetened condensed milk
1 cup coffee or espresso flavored vodka
Black Hawaiian Sea Salt for finishing

Preheat the oven to 350 degrees F. Butter two 8-inch x 2-inch round cake pans. Line with parchment paper, then butter and dust the pans with cocoa powder. (I like to flour chocolate cake pans with cocoa powder. I think this gives it a nicer finish.)

Sift the flour, sugar, cocoa, baking soda, baking powder, and salt into the bowl of an electric mixer fitted with a paddle attachment and mix on low speed until combined. In another bowl, combine the buttermilk, oil, eggs, and vanilla. With the mixer on low speed, slowly add the wet ingredients to the dry. With mixer still on low, add the coffee and stir just to combine, scraping the bottom of the bowl with a rubber spatula. Pour the batter into the prepared pans and bake for 35 to 40 minutes, until a cake tester comes out clean. Cool in the pans for 30 minutes, then turn them out onto a cooling rack and cool completely.

Meanwhile, make your dulce de leche. Place two cans of sweetened condensed milk to a pot of simmering water. Make sure the cans are completely submerged in water or they will explode. Simmer for 3-4 hours. Remove from water and let cool to the touch. Be cautious of opening cans. If they are still too hot they may splatter.

Once cakes are cooled, use a tooth pick to poke small holes around the layer. Brush the coffee flavored vodka onto each layer (about 1/2 cup each layer). Let the cake soak up the vodka.

Place 1 cake layer, flat side up, on a flat plate or cake pedestal. Pour a good amount of dulce de leche on and spread around. Place the second layer on top, rounded side up, and pour remaining dulce de leche on top and let it run down the sides.

Devil's Booze Cake Recipe via Melodrama

Top with a sprinkle of black sea salt. SO. GOOD.

Devil's Booze Cake Recipe via Melodrama

DIY: IKEA FADO Lamp Turned Jack-o-Lantern

I can be a bit of a Halloween traditionalist, you guys. I like my October nights lit by the faces of Jack-o-lanterns and I like those Jack-o-lantern faces to be classic. However, I still like to mix things up sometimes, and get serious, it’s not exactly practical for me to have carved pumpkins sitting around as light sources for the entire month. When I saw the orange FADO at IKEA, I didn’t just see a colorful orb lamp, I saw a potential Jack-o-lantern.

fado-table-lamp__0275795_PE413950_S4

The FADO is a pretty cool lamp on its own. It has a spherical shape that is a throwback to the mid-century space age era and it gives off a nice, soft, glowing light.

Pulling this off is really as simple as drawing or painting a Jack-o-lantern face onto the lamp. I used chalk to draw my ideal face shapes and then painted over it using a charcoal colored chalk paint. You can use a sharpie, a paint pen, or whatever you’d like. I just liked the chalk paint texture against the frosted glass of the FADO. It also looked more vintage to me that way.

IKEA FIDO Lamp turned Jack-o-Lantern

I love this little guy. Look how cute he is! And the glow sets the perfect mood light for Halloween movie watching.

IKEA FIDO Lamp turned Jack-o-Lantern